summary for the curious
Commercial aircraft in Australia (and a lot of the world) periodically transmit their location and the altitude. Aircraft with ADS-B determine their position using GPS; and broadcast that position along with identity string, altitude (plus other useful information such as speed).
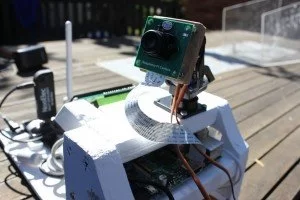
Using some inexpensive components, we can build a receiver to listen to these ADS-B signals to track these aircraft as they fly overhead. Using a bit of spunky maths, a bit of electro-mechanical tinkering and a few elastic bands I built a system to determine where in the sky these planes are; point a camera to them and track their movement whilst recording a short video of the flyby.
The videos are pushed onto a website; along with basic information such as aircraft type and destination. This flight information is textually overlaid onto the video.
The videos and metdata are stored in a database; and a dynamic public web site allows the curious to see a short video of planes and magic carpets flying over my home
The bits
(start your eBay shopping)
To create your own (or if you plan to rob me; you can score) …
- Raspberry Pi – a very inexpensive credit-card sized computer
- Powered USB hub – allows the peripheral parts to connect and be fed
- DVB-T & RTL-SDR Receiver, RTL2832U – helps receive and decode aircraft transmissions
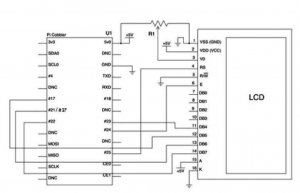
- GPIO Kit for Raspberry Pi, T-Cobbler – connects the Raspberry Pi to outputs such as the servo motors
- PT Pan/Tilt Camera Platform Camera Mount w/ 2 Servo – a pre-assembled platform to allow 2-axis of movement for the camera
- Raspberry Pi Camera Board – a CMOS camera suitable for the Raspberry Pi
- LCD Display: lcd1602 – an LCD display panel
The Operating System
Getting geeky now
The Raspberry Pi has some fantastic tutorials. In short, you put the image of the free operating system (a Linux varient) on an SD card; and add power
Software Defined Radios
I used a RTL2832U as a software defined radio (SDR). This is a USB stick (a TV “dongle”), designed for digital TV on a computer. This is re-purposed as a powerful, configurable receiver. Using specialized software a device originally intended to receive television broadcasts can be configured to listen for aircraft transmissions.
Dump1090
On the Pi I installed Dump1090 – a program which accesses ADS-B data via the RTL2832U and a small antennae
Firing up dump1090 dumps all transmissions as they come in. There are multiple aircraft puking this information out; so it looks like a random jumble of text initially (it’s like everyone’s talking at the same time at a party)
Great starting points
I’m no expert, and I relied tremendously on the hard work (and great tutorials) scattered across the web. A terrific introduction to RTL-SDR cheap ads-b aircraft radar is at http://www.rtl-sdr.com/adsb-aircraft-radar-with-rtl-sdr/
And an equally useful explanation for understanding ADS-B using dump1090 for the Raspberry Pi is at http://www.satsignal.eu/raspberry-pi/dump1090.html
Software Defined Radios and Dump1090
So remember the RTL2832U is acting as software defined radio (SDR). On the Pi I installed Dump1090 – which does a fine job of understanding the data packets transmitter by a planes transponders. The Dump1090 suite of programs can also display the locations and track of aircraft on a map, but all of this visual trickery was unnecessary for my project
Example 1
For simplicity, lets look at a single transponder message. Mode S ADS-B transponders transmit information about the aircraft such as this location message below. Information is always sent with an identifier called the ICAO Address. In Dump1090 this 24-bit address takes the form of a hex code such as 7c6c99. It is a permanent and constant part of the aircraft’s transponder; so we can use this to correlate messages back to an air-frame.
And here is another message. Same air-frame 7c6c99 now reporting the flight code
Parsing these addresses and messages you can rapidly assemble a representation of aircraft and movements within a close range
The maths
So after receiving the latitude/longitude and height as transmitted from the plane, and knowing where we are we can do some nifty maths to point a camera at where the plane should be.
Here is a typical location message, note we know the air-frame and the altitude, latitude and longitude as reported by the plane
So we now know where the plane is and we want to point a camera towards it. Most specifically, we need to work out a relative bearing (from ground station to latest location of plane) to work out which direction to twist left/right (relative to North). We also need to determine the azimuth to work out how to angle up/down (relative to the horizon) to aim the camera
Deep Breath – The ‘haversine’ formula
The maths involved turned out to be harder than I had anticipated (and in no way do I understand it). I’m heavily indebted to this website to help me with the ‘haversine’ formula to calculate distance, bearing and more between Latitude/Longitude point
The website very helpfully has some JavaScript demonstrations; so it was not too taxing to form some Python equivalents

|
1
2
3
4
5
6
7
8
9
10
11
12
13
14
15
16
17
18
19
|
cRadiusOfEarth = 6371;cFeetToKm = 0.0003048cHomeLat1=-33.123cHomeLon1=151.456f1 = math.radians(cHomeLat1);f2 = math.radians(lat2);delta_f = math.radians(lat2-cHomeLat1);delta_g = math.radians(lon2-cHomeLon1);a = math.sin(delta_f/2) * math.sin(delta_f/2) + math.cos(f1) * math.cos(f2) * math.sin(delta_g/2) * math.sin(delta_g/2);c = 2 * math.atan2(math.sqrt(a), math.sqrt(1-a));dist_km = cRadiusOfEarth * c;brng_r=math.atan2(math.sin(lon2-cHomeLon1) * math.cos(lat2), math.cos(cHomeLat1)*math.sin(lat2)-math.sin(cHomeLat1)*math.cos(lat2)*math.cos(lon2-cHomeLon1))brng_d=(360.0 - math.degrees(brng_r))%360.0azmth=math.degrees(math.atan(pFeet*cFeetToKm / dist_km)) |
Using a Raspberry Pi to control servos
Servos are small, cheap, actuators used for radio control and small-scale robotics (thanks Wikipedia).
The servo is commanded to hold at a particular angle using a PWM (pulse width modulated) signal. That is, the rate of the pulses is changed to command a new position, or the pulses are held at a constant rate to remain in the same position. Generally servos are connected to dedicated hardware to maintain these pulses (it’s very tedious using software). Unfortunately the raspberry pi does not have hardware PWM; but you can fake a reasonable signal on the GPIO pins
For more detail: 1. The Pi Plane Project


