
Story
The Raspberry Pi Zero W
The worst thing about all of the information on the WWW is trying to sort through the noise to find the specifics for your immediate need. And there is a lots of noise out there in Internet Land around the Raspberry Pi Zero W. If you think you are going to get up and running for $10, that is highly unlikely unless you decide to go pure “headless” and SSH into that puppy; which is a shame since it has a HDMI video/sound connector right on the board. Expect to pay about $15 plus for a compatible HDMI cable, but you do get decent digital sound that way.
I have never actually done a product review and this will not qualify as one either! But, I hope this article will provide a simple methodology for getting your Zero-W up and running quickly.
USB OTG
While I did not link to this cable in the hardware requirements, you will need a USB-OnTheGo (OTG) cable temporarily if you intend on using a Bluetooth keyboard w/ track-pad because you will need to borrow a USB mouse to use while you select the Bluetooth icon from the GUI. If you plan on using a separate USB keyboard and conventional USB mouse, then you will not need the OTG cable but will need a USB 2.0 or better hub (I would suggest a powered-hub unless you are going to limit yourself to just mouse and keyboard.)
I configured my system by connecting a USB-micro power cable to the USB jack on my 4K TV. I plugged in the mini-HDMI thin cable (see hardware list) into the TV. I do not suggest you attempt to run the Zero solely off of the HDMI power supply; why? Because there are many posts on the Web that suggest against doing this and I could not find one single post to suggest it was a good idea. My Chromecast requires a separate USB power cable, too. (Remember, the RPi is a Linux computer and should always be shutdown in a controlled manner. Also, do not insert or remove the microSD card while the unit is powered on.)
Plug the mini end of the HDMI into the Zero-W. Plug in the USB micro to the top micro-USB on the board and not the centrally located microUSB – use the middle one for the USB-OTG cable or for the USB hub. Place your TV/monitor to accept the proper HDMI signal. The RPi-Zero-W should boot to a GUI; the RPi-Zero will start to boot when power is supplied.
Bluetooth Keyboard and Mouse
The RPi Zero W has Bluetooth Classic 4.1 and Bluetooth LE: if you intend on using a Bluetooth keyboard such as I did, you will need to plug in a conventional USB mouse into the OTG cable at this time. The Raspbian OS should load the drivers in a few seconds and the mouse should come alive. Move over the the Bluetooth icon and click – select Add Device… Put your BT keyboard into paring mode. When the RPi desktop displays the keyboard in its list, select and you should be presented with a numeric key to enter on the keyboard. Complete the paring process (it took me 3 times) and when the key is accepted, the units are paired and the paring will be remembered for the future. Unplug the USB mouse. The integrated keyboard + track-pad should be active at this time. With a keyboard and mouse configured and working, you can now configure the wireless networking.
WiFi Network
You can do this from the shell and there are many online references for special cases. But since we have a GUI up and running and have a keyboard and a mouse lets do our configuration from the GUI. Rather than talking you through something I did not do (my network had to be configured from the CLI), let me point you to some simple instructions with pictures!
The reason that I was unable to use a GUI setup for my WiFi network here in the lab is that I have multiple APs and the test AP/router (no Internet connectivity) is configured as WEP: and we all know WEP is not very secure. While WPA can be setup on the RPi-Zero-W via the GUI, WEP will require that you edit files directly. (Note: This did not work for me… I modified the interfaces file directly, removing references to the wpa_supplicant.conf)*
Ray's Notes
- I am not sure I learned anything from going through this process but I did reacquaint myself with the Linux command-line. I use Linux Mint day-by-day but I do not normally have to ‘drop' into the CLI and grunt around – sometimes, however, the CLI is just necessary. I already mentioned that some of my networking configurations needed to be done in the CLI for my personal RPi-Zero-W. Also, I installed tightVNC which works remarkably well with my Nexus Android tablet (I use ConnectBot from the Play Store, too.) These two products allow me to get a remote shell, load VNC server on the RPi-Zero-W and then run the GUI over VNC client to the tablet.
- The 512MB of RAM on the RPi-Zero goes fast. If you run your device completely without HDMI, you can disable HDMI completely and save some power.
- Here is “top” executed over VNC with the GUI running Chromium and streaming from YouTube. I logged in from the notebook as ssh [email protected] (The addressed assigned by DHCP from my router.)
 %Cpu(s): 69.9 us, 27.9 sy,  0.0 ni,  0.0 id,  0.0 wa,  0.0 hi,  2.2 si,  0.0 st
KiB Mem:    445084 total,   418716 used,    26368 free,     5772 buffers
KiB Swap:   102396 total,    33932 used,    68464 free.   182352 cached Mem
 PID USER      PR  NI    VIRT    RES    SHR S %CPU %MEM     TIME+ COMMAND
2497 pi        20   0  456464 156796  89704 R 40.1 35.2   3:31.57 chromium-br+
2296 pi        20   0  498788 102428  67680 R 22.8 23.0   2:45.44 chromium-br+
1123 pi        20   0   49520  15812   6004 R 14.1  3.6   2:02.01 Xtightvnc
2273 root      20   0       0      0      0 S  6.1  0.0   0:17.20 kworker/u2:0
  53 root       1 -19       0      0      0 S  3.9  0.0   0:05.15 VCHIQ-0
  62 root      10 -10       0      0      0 S  3.9  0.0   0:05.02 SMIO
  60 root     -51   0       0      0      0 S  1.9  0.0   0:23.17 irq/86-mmc1
2362 pi        20   0  332276  89444  58032 S  1.9 20.1   0:33.83 chromium-br+
2574 pi        20   0    5100   2472   2092 R  1.6  0.6   0:00.27 top
  17 root      20   0       0      0      0 S  1.0  0.0   0:01.25 kswapd0
 187 root      20   0       0      0      0 S  0.6  0.0   0:07.56 brcmf_wdog/+
   3 root      20   0       0      0      0 S  0.3  0.0   0:03.81 ksoftirqd/0
  54 root       1 -19       0      0      0 S  0.3  0.0   0:00.46 VCHIQr-0
  66 root      20   0       0      0      0 S  0.3  0.0   0:02.62 mmcqd/0
  85 root       0 -20       0      0      0 S  0.3  0.0   0:00.72 kworker/0:1H
 588 root      20   0  163868  31896  13568 S  0.3  7.2   0:15.61 Xorg
 596 ntp       20   0    5764   2272   2128 S  0.3  0.5   0:01.45 ntpd
- Interestingly, while I invoked the vncviewer from the notebook which is where the remote session was displayed, the audio still plays over the HDMI connected TV. The video displays on the notebook and the TV video is unchanged. I'm sure this is because the vnc client/server does not hook the audio stream. Normally, I would invoke the browser on the RPi and not across VNC – nothing to worry about, just unexpected because I did not think it through.
- If you bring up a GUI session automatically at boot, then log into the RPi-Zero remotely to run VNC, you will not connect to the already running session. I suspect there is a way to get around this but remember that you have limited RAM, so auto loading stuff you may not use could prove detrimental to performance. Solution: Configure VNC to automatically run with the X-session from the raspi-config GUI menu. This was a noob error on my part.
- If you think you are going to stream YouTube in HD across your HDMI with decent video performance – you are in for a disappointment. The specification is 1080P HD video & stereo audio via mini-HDMI connector which is great for a desktop but the single-core cpu really struggles with streaming video. However, minimize the YouTube session running in the Chromium browser, and the audio will stream well; but you may notice your mouse pointer jitter over the Bluetooth connection. I have noticed that the HDMI connection seems to reset after a long period of listening, but everything returns in a few seconds. I've not started to dig-in to this issue at this time because I do not plan on streaming video/audio; I did this only as an experiment in stressing the various subsystems. The HDMI resets become more frequent with higher cpu load and will become annoying. (A non-browser hosted session of YouTube using a dedicated application may improve performance.)
- The RPi-Zero series does not have analog inputs – be forewarned.
- I have had no issues powering the RPi-Zero-W from USB 3.0 ports on my notebook. Powering from your notebook USB 2.0 or USB 1.1 ports is not advised as the RPi-Zero current requirements (peak) may exceed the older specifications: use the dedicated micro-USB power connector and a quality external, stable power supply.
Added content regarding WEP
* WEP setup is problematic… yes, you should not be using it but if you have lots of old hardware to test and support, you may have an AP running WEP. For the RPi-Zero-W, here is the results of my hacking to get WEP running.
Start the editor:
sudo nano /etc/wpa_supplicant/wpa_supplicant.conf
and add the following after the country=
network={
	ssid="SSIDNAME"
	key_mgmt=NONE
	auth_alg=OPEN
	wep_key0=hexadecimal_key_no_quotes
}
The above should get you up on WEP; however there seems to be an issue with the DHCP renewal: it fails sometimes. I confess that I have not fully explored this issue, but the log file clearly shows the unit requesting a renewal over the network but the RPi detects no reply. I disabled IPv6, but that did not correct the error. One can easily use:
sudo ifdown wlan0
sudo ifup wlan0
which will get a DHCP renewal for the WiFi interface.
The bottomline on this is that WEP is an outdated methodology and the RPi Zero W will not support this configuration directly. Any workaround will be a workaround.
Added optional HDMI to VGA with audio out
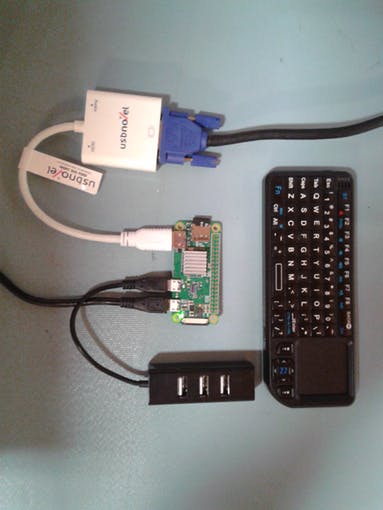
The above photo shows my actual lab connection with fully working components. Everything is being powered from the RPi microUSB power connector to a wall wart from an old Blackberry: 5V and the measured current is 280mA steady-state with the boot-up being around 340mA peak. The USB keyboard and trackpad work great and pairing was not too difficult; that is, it took me 3 times but because I was slow on the typing and verification. The USB hub is a convenient non-powered (powered by the RPi Zero) and is used for a real USB mouse and USB keyboard during setup of Bluetooth. Yes, that is a heatsink on the RPi Zero. Without the heatsink, the test unit SoC became warm, showing around 110F with the system in idle. With the heatsink, the temperature is around 85F.
For more detail: The $10 RPi Zero W – First Impressions (updated)