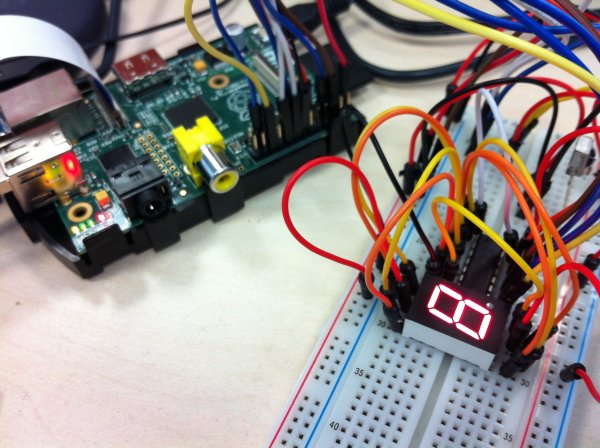
This project shows how to use the Raspberry Pi to drive a 7 Segment Display with the help of a 74HC595 chip.
Parts used in this project:
- Breadboard
- Wiring cables (Male-Male, Female-Male)
- 7 Segement display (it actually has 8 segments because of the dot)
- 74HC595 Chip
- Raspberry Pi Revision 2
- some Python code
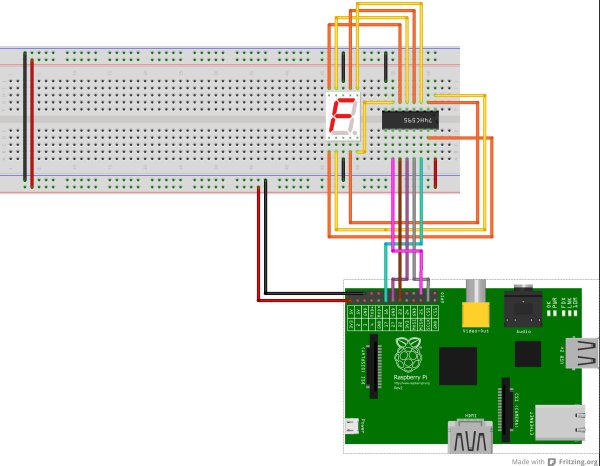
Here is a schematic made with fritzing of the project when it is ready. Here a link to download the 7-segment-display with 74HC595 and Raspberry Pi fritzing project.
the interresting thing here is the 74HC595 Chip. It takes some time to understand what it does. I think that the video from Kevin Darrah describes it fast and easy.
Here is the Python code: rpi_7_segment_74hc595
|
2
3
4
5
6
7
8
9
10
11
12
13
14
15
16
17
18
19
20
21
22
23
24
25
26
27
28
29
30
31
32
33
34
35
36
37
38
39
40
41
42
43
44
45
46
47
48
49
50
51
52
53
54
55
56
57
58
59
60
61
62
63
64
65
66
67
68
69
70
71
72
73
74
75
76
77
78
79
80
81
82
83
84
85
86
87
88
89
90
91
92
93
94
95
96
97
98
99
100
101
102
103
104
105
106
107
108
109
110
111
112
113
114
115
116
117
118
119
120
121
122
123
124
125
126
127
128
129
130
131
132
133
134
135
136
137
138
139
140
141
142
143
144
145
146
147
148
149
150
151
152
153
154
155
156
157
158
159
160
161
162
163
164
165
166
167
168
169
170
171
172
173
174
175
176
177
178
179
180
181
182
183
184
185
186
187
188
189
190
191
192
193
194
195
196
197
198
199
200
201
202
203
204
205
206
207
208
209
210
211
212
213
214
215
216
217
218
219
220
221
222
223
224
225
226
227
228
229
230
231
232
233
234
235
236
237
238
239
240
241
242
243
244
245
246
247
248
249
|
#!/usr/bin/pythonimportRPi.GPIO as GPIOimporttime#Data Pins needed on the RPiDATAIN=17#DSLATCH=27#STCPCLOCK=22#SHCPCLEAR=25#MR LowOE=11#Output Enable Low#inter character sleepicsleep=0.06#defining all the single LEDsled1=0x80#10000000led2=0x40#01000000led3=0x20#00100000led4=0x10#00010000led5=0x08#00001000led6=0x04#00000100led7=0x02#00000010led8=0x01#00000001#definition of all writeable letters and numbersletter={"0":0xFC, "1":0x30, "2":0xDA, "3":0x7A, "4":0x36, "5":0x6E, "6":0xEE, "7":0x38, "8":0xFE, "9":0x3E, "a":0xBE, "b":0xE6, "c":0xCC, "d":0xF2, "e":0xCE, "f":0x8E, "g":0x7E, "h":0xB6, "i":0x30, "j":0xF0, "l":0xC4, "n":0xBC, "o":0xFC, "p":0x9E, "s":0x6E, "t":0x38, "u":0xF4, "x":0xB4, "y":0x76, "z":0xDE}#loading function sequenceload1=0x06#00000110load2=0x22#00100010load3=0x60#01100000load4=0xC0#11000000load5=0x82#10000010load6=0x12#00010010load7=0x18#00011000load8=0x0C#00001100#up-down loading function sequenceud1=led8ud2=led2ud3=led1+led3ud4=led7ud5=led6+led4ud6=led5#left-right loading function sequencelr1=led1+led6lr2=led2+led5+led7lr3=led3+led4lr4=led8#rotational loading function sequencerot1=led2+led5rot2=led1+led6+led3+led4+led7#putting all segments of the sequences in a listletterrange=[]hexrange=[]forvalue inletter.values(): letterrange.append(value)forvalue inletter.values(): ifvalue !="g": hexrange.append(value)loadrange=[load1,load2,load3,load4,load5,load6,load7,load8]udrange=[ud1,ud2,ud3,ud4,ud5,ud6]ledrange=[led1,led2,led3,led4,led5,led6,led7,led8]lrrange=[lr1,lr2,lr3,lr4]rotrange=[rot1,rot2]spinrange=[led1,led2,led3,led4,led5,led6]#GPIO definitiondefsetup(): GPIO.setmode(GPIO.BCM) GPIO.cleanup() GPIO.setup(DATAIN,GPIO.OUT) GPIO.setup(CLOCK,GPIO.OUT) GPIO.setup(LATCH,GPIO.OUT) GPIO.setup(CLEAR,GPIO.OUT) GPIO.setup(OE,GPIO.OUT) GPIO.output(LATCH,False) #Latch is used to output the saved data GPIO.output(CLEAR,True) #Clear must always be true. False clears registers GPIO.output(OE,False) #Output Enable speaks for itself. Must be False to display GPIO.output(CLOCK,False) #Used to shift the value of DATAIN to the register GPIO.output(DATAIN,False)#Databit to be shifted into the register #Clean up GPIO, set display to no characterdefcleanup(): #Set all leds to off writenumber(0) #writeout stored in character writeout() #writeout "nothing" writeout() time.sleep(0.7) GPIO.cleanup()#shifts in a bit (but does not write it yet)defshift(input): ifinput==1: input=True else: input=False GPIO.output(DATAIN,input) GPIO.output(CLOCK,GPIO.HIGH) GPIO.output(CLOCK,GPIO.LOW) GPIO.output(DATAIN,GPIO.LOW)#writes the stored data from register out to pinsdefwriteout(): #Display LEDs GPIO.output(LATCH,GPIO.HIGH) #needed to read characters. otherwise the characters would be display to fast after each other time.sleep(icsleep) GPIO.output(LATCH,GPIO.LOW)#writes a character to the registerdefwritenumber(number): forx inrange(0,8): shift((number>>x)%2)#writes a range of character to the display defwriterange(range): forx inrange: writenumber(x) writeout()#additive and following substractive writeout of a range of charactersdefwriteaddrange(range): character=0 forx inrange: character+=x writenumber(character) writeout() forx inrange: character-=x writenumber(character) writeout()#additive and following substractive writeout with reversed call of a range of charactersdefwriteaddremrange(range): character=0 forx inrange: character+=x writenumber(character) writeout() forx inrange: character-=x writenumber(character) writeout() forx inreversed(range): character+=x writenumber(character) writeout() forx inreversed(range): character-=x writenumber(character) writeout()#additive and following reversed substractive writeout of characters defwriteaddbackrange(range): character=0 forx inrange: character+=x writenumber(character) writeout() forx inreversed(range): character-=x writenumber(character) writeout()#chained XORed and reversed XORed writeout of charactersdefwritexorrange(range): #close the chain to have no interrupts while displaying character=range[0]&range[-1] forx inrange: character^=x writenumber(character) writeout() forx inrange: character^=x writenumber(character) writeout() forx inreversed(range): character^=x writenumber(character) writeout() forx inreversed(range): character^=x writenumber(character) writeout()print("####Setup####")setup()#Tryout of most ranges and displayfunctions
whileTrue: writerange(letterrange) writerange(hexrange) writerange(loadrange) writeaddremrange(udrange) writexorrange(loadrange) writexorrange(udrange) writexorrange(ledrange) writexorrange(lrrange) writexorrange(rotrange) writexorrange(spinrange) writeaddrange(ledrange) writeaddbackrange(ledrange)#Wait for KeyboardInterrupt or SystemExit (called by kill or others)except(KeyboardInterrupt, SystemExit): print("Exit...")finally: cleanup() |
For more detail: 7 Segment Display with 74HC595 Shift Register and Raspberry Pi


