
Being a avid aviation buff and pilot, and wanting to learn how the E-Paper display worked I set out to create a METAR Display. It snowballed into a full blown application with multiple display layouts to choose from.

This project uses the 7×5 3-color E-Paper display available from Waveshare. The 3rd color added a lot of options to the design of the layouts. There are currently 9 separate layouts, each unique in its design and information displayed.
There is also the option to cycle through all the displays at specific update intervals or to do a random display of all the layouts. These features are nice to change up the look and also to fight burn-in/artifacts that can occur on these displays. Also, there is an ‘Auto Interval' selection that decreases the update interval as the weather worsens. Since bad weather typically moves fast, it makes sense to update more quickly. Otherwise if the weather is VFR, it updates once per hour.
The script is setup so that it can be run from the command line with or without cmdline arguments. But there is a web interface that is particularly useful in administrating the display. From the web interface the display can be cleared, the RPi can be rebooted, or even shutdown. Any of the layouts can be selected along with the update interval. So this is the suggested way to run the display.
The software is written almost entirely using Python 3. It uses libraries supplied by Waveshare to drive the display along with various libraries such as PIL, Numpy and Flask.
The transition for E-Paper displays is a bit on the slow side, and the 3 colors slows it down even further. A video of the transition is attached, but it was sped up quite a bit for time. So please don't assume there is a problem with yours based on the speed of the video. It's simply to show the update process.
The next step will take you through the supplies needed for this project. Enjoy.
Supplies
There are only a few supplies needed
- Raspberry Pi – https://www.raspberrypi.com/products/raspberry-pi-zero/
- MicroSD Card – 4 gig or larger should work fine.
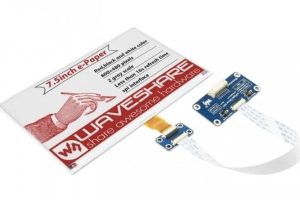
- Waveshare 7×5 3-Color E-Paper display (B) – https://www.waveshare.com/7.5inch-e-paper-hat-b.htm
- Frame/Shadow Box – Michaels.com, Note: one of the side inserts will need to be removed for e-paper to fit properly.
Note: The RPi Zero W was chosen for it's size, but any RPi should work.
Let's take a quick look at METAR's in general before we get into the build process.
Step 1: METAR Info
METAR's are dynamic reports created for airports that provide actively flying pilots information about the weather and conditions at an airport. The idea is to impart important information to all pilots who are flying out of or into an airport ahead of time so that the pilot can make intelligent situational decisions about their flight.
Typically as a pilot, the first thing of concern is what is the Flight Category at the airport. The choices are; VFR, MVFR, IFR and LIFR. These categories are determined by Cloud Ceilings and/or Visibility.
- VFR = Visual Flight Rules, clouds greater than 3,000 feet AGL and greater than 5 miles visibility.
- MVFR = Marginal Visual Flight Rules, clouds 1,000 to 3,000 feet AGL and/or 3 to 5 miles visibility.
- IFR = Instrument Flight Rules, clouds 500 to below 1,000 feet AGL and/or 1 mile to less than 3 miles visibility.
- LIFR = Low Instrument Flight Rules, clouds 500 feet AGL and/or less than 1 mile visibility.
Note: AGL = Above Ground Level
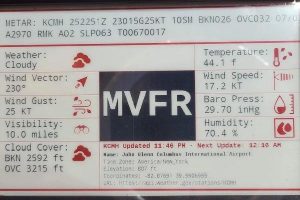
Traditionally these categories have a specific color associated with them, i.e. VFR = Green. The E-Paper METAR Display however uses a slightly different scheme since the colors it can display is limited. So each layout will depict each of these flight categories in this way;
- VFR = Black Text on White background.
- MVFR = White Text on Black background.
- IFR = Red Text on White background.
- LIFR = White Text on Red background.
Note: See pictures for an example of each
The METAR is actually a cryptic string of characters and numbers that need to be decoded. Here is an example and the raw METAR text with its decoded information below;
METAR for: KFPK (Charotte/Beach Fld, MI, US)
Text: KFPK 271935Z AUTO 32012G17KT 10SM BKN044 M02/M13 A3005 RMK AO2 T10211133
- M02 – Temperature: -2.1°C ( 28°F)
- M13 – Dewpoint: -13.3°C ( 8°F) [RH = 42%]
- A3005 – Pressure (altimeter): 30.05 inches Hg (1017.7 mb)
- 32012G17KT – Winds: from the NW (320 degrees) at 14 MPH (12 knots) gusting to 20 MPH (17 knots)
- 10SM – Visibility: 10 or more Statute Miles (16+ km)
- BKN044 – Clouds: broken clouds at 4400 feet AGL
- AO2 – QC Flag: automated observation with no human augmentation
- RMK – Remarks: additional information will be shown as remarks
There are many sources of information regarding reading a METAR. One of the best ones found is; https://www.thinkaviation.net/understanding-metars-part-1/ and is worth reading.
The next step will discuss connecting the hardware, so let's move on.
Step 2: Connect Hardware Together
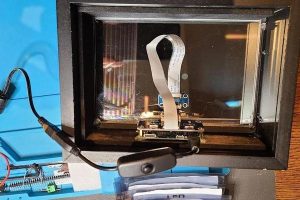
This is an easy project from the hardware standpoint. Simply connect the 7×5 3-Color E-Paper HAT to the RPi. As you can see from the picture, an RPi Zero W was used which provided a slower boot and update time but fit nicely in the shadow box frame.
Visit; https://www.waveshare.com/wiki/7.5inch_e-Paper_HAT_(B) for specific information on the display.
There are 2 ways to connect the HAT to the RPi. The quickest and cleanest way is simply to connect the Hat directly to the RPi's header pins (see pic). The other way requires the use of the connector harness that is included with the display to individually connect to the pins on the RPi, (see pic). This has the advantage of making the other RPi pins readily available if your project needs require that.
The ribbon cable can be a bit finicky when you mount it into it's mating connector. So be sure to firmly hold it in place when you push the connector lever down into place so as to ensure good electrical connection.
Also, there are 2 toggle switches on the HAT. Both need to be in the righthand position looking at them with the switches facing up. In other words, the ‘Display Config' button needs to be in the ‘B' position and the ‘Interface Config' in the ‘0' position.
Another optional addition that is always nice is a Power-On pushbutton switch. This is fairly well known, but if an RPi has power, but has been shutdown it can be booted back up by momentarily connecting pins board pins 5 to 6. (GPIO 3 to Ground). Visit https://pinout.xyz/ to see where they are on the header pins. If you use the HAT connected directly to these header pins, you'll have to solder a wire to pins 5 and 6 underneath the RPi. Be careful not to short the wire on another pin of course, but this works fine for the pushbutton. I mounted the push button on mine through the shadow box's rear cover and it works like a champ.
If the pushbutton seems to be too much trouble you can add a switch to the USB plug. You can see it in the picture above. Here's an example unit.
Mounting the display in a frame at this point is fine as long as you maintain good access to the RPi.
Next step will take you through the software installation.
Step 3: Install Software
There are two ways to get the software setup;
- Download the Image
- Install the software to your own image.
First Way
A working image of this software is located here on Dropbox. You can download this file and copy it to an SD Card rather than go through the installation steps. However, the latest versions will be stored on Github which is where the installation instructions copy the needed software from. Also, I can't guarantee that the image will remain available forever. But for now its available for download. Once downloaded unzip the file then follow the instructions here to copy the image to your SF Card.
This is a Berrylan image, so be sure to download the Berrylan app to your phone so you can easily setup the WiFi network. Visit the Apple Store or Android Play Store.
The hostname and password on the image have both been changed to ‘epaper'.
Tip: If after installing the image you would like to update to the latest version from github.com enter the following;
cd metar
sudo git reset --hard
sudo git pull
Second Way
The software is available on my github repository at; https://github.com/markyharris/metar
Detailed installation instructions are listed there in the README.md file. It will be necessary to follow these instructions to properly setup the image.
Those installation instructions are duplicated and amplified below.
DOWNLOAD NEEDED APPS:
- Download Balena Etcher – https://www.balena.io/etcher/
- Download Berrylan Unix Bullseye Image – https://berrylan.org/
- Download Berrylan App from either Apple App Store or Android Play Store to your phone
Note: The Berrylan image is not strictly required. It provides an easy way to setup the WiFi and enable SSH on a headless RPi system such as this. There are other ways to do this, such as temporarily connecting a keyboard and monitor to the RPi to start. However, if you choose to give this to a friend then having the ability to change the WiFi network through the Berrylan phone app can be very handy. If Berrylan is not desired, visit; https://www.raspberrypi.com/software/operating-systems/ to download the latest image. https://desertbot.io/blog/headless-raspberry-pi-4-ssh-wifi-setup provides steps to setup WiFi on a headless system if Berrylan is not going to be used.
WRITE IMAGE TO SD CARD:
Using Balena Etcher, write Image to Micro SD Card. Visit here for info on using Belena Etcher.
Put SD card into RPi and boot-up. This will take a minute or two. Watch the SD Card access LED on RPi for feedback. It will stop flashing (mostly) when it has booted up.
SETUP WIFI USING BERRYLAN:
Open Berrylan app on phone and select for ‘BT WLAN setup' or ‘BT WLAN' or ‘raspberrypi' depending on what is displayed. The most common is ‘BT WLAN‘. If you see more than one, then pick the first one and go through the steps. If it ends up not being this particular RPi, then run it again and select the next one. You may have to give the app a little time to find it however, so don't be too impatient.
- Select WiFi SSID to use
- Enter the WiFi password
- Write down the IP address that Berrylan displays. You'll need this later. You can tap it and copy it to clipboard.
LOGIN USING SSH CLIENT:
Open a SSH Client and enter the ‘pi@IP address' to start the login process, i.e. ‘[email protected]'
Login using username ‘pi‘ and password ‘raspberry‘. If a normal image was used, then SSH must be enabled before these clients will work. Berrylan automatically enables SSH. Otherwise connect a monitor and keyboard to the RPi and use ‘raspi-config' to do so. See https://www.raspberrypi.com/documentation/computers/configuration.html for info on using ‘raspi-config'
Note: There are a number of SSH Clients. A few of the more popular are;
- KiTTY.
- PuTTY and other PuTTY versions
- MobaXterm
- WinSCP
- SmarTTY
- Bitvise SSH Client
- Terminal (for Mac)
- Chrome SSH extension
SETUP SPI INTERFACE:
This is needed to communicate with the E-Paper display. At the cmd line prompt; ‘pi@raspberrypi:~ $' enter the following;
  sudo raspi-config
  3 - Interface Options
  I4 SPI Enable this? Yes
Note: You can change the hostname and password if desired at this point, but its optional
Answer ‘Yes' when you exit ‘raspi-config' to Reboot the RPi
SETUP GITHUB ON RPI:
After RPi boots up and you login through your SSH client, enter;
  sudo apt update
  sudo apt-get install git
  git --version
If you receive a git version number than you are good to go.
COPY FILES FROM GITHUB:
Enter;
  sudo git clone https://github.com/markyharris/metar.git
  cd metar
  ls -la
This should list the files copied over from github to the directory ‘metar' so you can verify it worked properly.
DEPENDENCIES:
Most of the dependencies used by the software is already installed with image. However there are few that need to be manually installed. Namely; PIL, Numpy and Flask.
Install necessary dependencies needed for the software;
  sudo apt-get install python3-setuptools
  sudo apt install python3-pil
  sudo apt-get install python3-numpy
  sudo pip3 install Flask
FONTS:
The code is written with ‘NotoMono-Regular.ttf' and ‘LiberationMono-Bold.ttf' used, so at minimum these need to be installed in the ‘/usr/share/fonts/truetype/' directory. So enter the following at the cmd line;
  cd /usr/share/fonts/truetype/
  sudo mkdir noto
  sudo mkdir liberation2
  cd noto
  sudo wget https://github.com/markyharris/metar/raw/f1858d85ad3b79864fb6e082cd083346828661ef/fonts/noto/NotoMono-Regular.ttf
  cd ..
  cd liberation2
  sudo wget https://github.com/markyharris/metar/raw/f1858d85ad3b79864fb6e082cd083346828661ef/fonts/liberation2/LiberationMono-Bold.ttf
Note: Due to width of screen, the 2 font URL's may be cut-off. However, if you double click on those strings and hit ctrl-c you will copy the entire string.
TEST RUN METAR DISPLAY:
Now is the moment of truth. We will run the main script manually from the cmd line.
Enter;
  cd ~
  cd metar
  sudo python3 metar_main.py
If all is well the cmd line will display debug data including a raw metar string. Watch your e-paper display to see if it starts to blink as it updates. The full refresh can take a number of seconds so be patient. After a bit, a layout should be displayed showing the default airport from ‘metar_settings.py'. If so, you are good to go!
Now edit the ‘metar_settings.py' file as you wish. These values are defaults that the script falls back on if no other args are passed on the cmd line. Below shows a segment of the ‘metar_settings.py' file. Make whatever changes you'd like, such as your preferred airport id.
  # Default User Settings
  airport = "KFLG" # enter default airport identifier to display. Be sure to use quotes
  interval = 1800  # enter default time in seconds between METAR updates - 3600 = 1 hour, no quotes
  use_disp_format = 7 # Choose which display layout to use. -1 = Random layout, -2 = Cycle layouts
  use_remarks = 1  # 0 = display airport information, 1 = display metar remarks info
  random_airports = ["KEYW","KDFW","KSEA","KORD", "KLAS","KCMR","KABQ","KDEN", \
                   "KPHX","KNBC","KBKV","KTTS"]
Note: The ‘random_airports' list is used by the multiple airport display and takes 12 airports. If more than 12 airports are in the list, the script will randomly pick 12 out of the list. The default airport will be appended to the 12 and displayed as the home airport on the display.
TEST CMD LINE CONTROL:
The script was written to except up to 4 cmd line arguments;
1st argument – airport identifier – must be 4 character ICAO format
2nd argument – layout number – will accept -2, -1, and 0-7
3rd argument – update interval in seconds – 60 = 1 minute, 3600 = 1 hour
4th argument – use remarks – 1 = display metar remarks key info, 0 = display airport information
They must be in the order shown, but not all of them are required. For instance you can enter only the Airport ID and the default settings will be used for the last 3 args
For example enter;
sudo python3 metar_main.py kflg 7 60 0
The display will show the Flagstaff Airport using Layout 7 for 60 seconds before updating using airport info. See picture for an example of this.
Assuming this works properly, then using the ‘webapp.py' and ‘metar.html' scripts below will work just fine.
TEST WEBAPP.PY:
From the ‘metar' directory enter;
sudo python3 webapp.py
This will run a Flask module that will run ‘metar_main.py' using the last save configuration. Flask sets up a web server so we can also run an html file to control the display from any computer, tablet or phone that is on the same WiFi network.
Your display should be showing a layout of information.
Make note that when webapp.py starts, information will be displayed in your SSH client. You will need the URL that it provides. For instance; ‘* Running on http://192.168.86.71:5000/ (Press CTRL+C to quit)'. This is an example, yours will be different.
TEST METAR.HTML:
Using the URL from the previous step, open a web browser and enter it in the URL bar. If all is well you will see a web page that allows for easy control of the E-Paper display. (See picture for example of web page).
Note: The html file must be run from a computer, tablet or phone that is connected to the same WiFi network using the URL provided when WiFi was originally setup. The URL must have ‘:5000' appended to the IP Address, ie. http://192.168.86.71:5000/ (Your IP will be different, this is just an example).
SETUP RC.LOCAL FOR STARTUP:
This is optional, but if you would like the display to restart automatically after a shutdown, or accidental power outage then this is a good way to go. Also, the webapp.py must be running for the web interface to work properly. So its helpful to have it started automatically upon startup.
Enter;
  cd ~
  cd /etc
  sudo nano rc.local
Before the ‘Exit' statement add; (See picture for example).
sudo python3 /home/pi/metar/webapp.py &
Then save the edited file and reboot;
  ctrl-x
  y
  sudo reboot now
Note: There may be times when you don't want ‘webapp.py' to startup automatically, so simply open up ‘rc.local' again and comment out the line that was added then resave and reboot. This will then require that you run ‘webapp.py' manually at the cmd line for the web interface to function.
SETUP POWEROFF.SERVICE FOR SHUTDOWN:
This is optional as well, but its nice to blank the E-Paper display when the unit is shutdown. A power outage won't blank the screen, but once the power comes back on it will reset the display if you setup ‘rc.local' above.
Copy ‘poweroff.service' into ‘/lib/systemd/system';
  cd ~
  cd /lib/systemd/system
  sudo wget https://raw.githubusercontent.com/markyharris/metar/main/poweroff.service
Enable the service by entering;
sudo systemctl enable poweroff.service
Copy the python script ‘metar_poweroff.py' into ‘/opt/metar_poweroff';
  cd ~
  cd /opt
  sudo mkdir metar_poweroff
  cd metar_poweroff
  sudo wget https://raw.githubusercontent.com/markyharris/metar/main/metar_poweroff.py
MISC:
At this point the installation is complete, however it is suggested that the image on the SD Card be backed up to your computer in case something goes wrong, rather than going through this installation process again.
To do so;
- Download Win32DiskImager from; https://sourceforge.net/projects/win32diskimager/
- Insert SD Card into your computer's card reader.
- Click the folder icon and locate a directory to store the image and provide a name, ie. ‘metar_display.img'
- Click ‘Read Only Allocated Partitions'
- Click ‘Read' and let it do its thing.
- Once complete eject SD Card and re-install it in the RPi
Step 4: Trouble Shooting

While learning how to control the Waveshare E-Paper, I ran into many issues that seemed confusing and caused untold delays in creating this project. So in this section I'll try to include the pitfalls that I overcame in an effort to help those who might see the same issues.
No Display
The first unit I received from Waveshare would not come on, flicker or display anything no matter what I did. I worked with their customer assistance folks and followed there suggestions to no avail. To their credit they sent me out another unit, which worked the first time I tried it! That was a weekend I'll never get back. Moral of the story is that it should work, or at least try to work by flickering on and off.
Using https://www.waveshare.com/wiki/7.5inch_e-Paper_HAT_(B) I was able to read up on its operation and more importantly try the test scripts they have provided. To get to them click on the ‘Resources' tab at the top and click on the ‘Demo Code' github link. You'll want to drill down to this url; https://github.com/waveshare/e-Paper/tree/master/RaspberryPi_JetsonNano/python/examples. This will list a number of test scripts. You need to pick the proper one, in our case ‘epd_7in5b_V2_test.py‘.
Obviously its possible that this occurs if power is interrupted to the RPi, so double check the LED on the RPi board to ensure its on.
It's possible that the SD card get's corrupted as well and would need to be re-imaged, which is why its a good idea to save a copy of the image on your computer for such situations.
PLEASE STAND BY
This is a normally occurring error when the RPi is trying to update the data from weather.org. When the site doesn't return an airport's data, or an airport entered isn't currently providing METAR data, or if the airport ID is not recognized, this error screen will be displayed. After 1 minute it will go out and try to get the data again. In most cases it will be successful in receiving the data and then will properly display the chosen layout.
If after a number of attempts this screen is still displayed, check to see that the WiFi network is up and running and has access to the internet. (See picture).
Error Occurred
Most other errors that may occur will generate an ‘Error Occurred' message displayed along with the error description. This is more serious than simply not being able to access the data from the internet. So make note and post it here so it can be debugged if possible. (See picture)
Web Interface Not Loading
Ensure that the proper URL is being entered into the web browser. For instance, http://192.168.84.79:5000/.
Notice that ‘:5000' is appended to the IP address for the RPi. If this is missing, you will not see the web interface.
Also, ensure that the computer you are using is connected to the same network that the RPi is on. This can cause a lot of angst if not checked early on.
The web interface is dependent upon the ‘webapp.py' running on the RPi. This is why it's highly suggested that rc.local is setup to run ‘webapp.py' at startup. If this isn't setup, you must manually run ‘webapp.py' from the cmd line before the web interface will load.
Update Time Long
E-Paper displays naturally take a long time to update, so patience is needed.
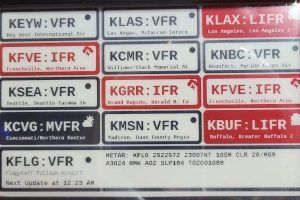
Layout5 – Multiple Airport display needs to poll weather.gov 13 times to get the data for the 13 airports which delays the screen update compared to the other layouts.
If an incorrectly spelled airport ID is entered, it may cause the display to flicker but not display any data. Typically an error message will be displayed but if not, simply re-enter the airport id being sure its a valid 4 character ICAO id.
Shadows and/or Artifacts
Shadows and artifacts are part and parcel with using this type of display. Usually updating the display a few times will remove these issues. The web interface as a feature labelled ‘Clear E-Paper Display' that can be used to help remove these artifacts. A technique to minimize this is to use the ‘Cycle' or ‘Random' display functions which will change the layouts each time an update interval occurs.
Source: 7×5 E-Paper METAR Display