The Raspberry Pi is a small, credit-card sized ARM computer that costs a measly $25. For the money you’ll get a full system-on-chip computer capable of running a variety of ARM-optimised operating systems, USB and Ethernet connectivity but no case.
Future versions of the unit will come with a case, but for now you’ll need to be creative and resourceful in building a housing to protect your small-but-mighty RasPi. If you’re short on ideas or interested in what others have come up with then we’ve assembled a list of ideas that will make the perfect weekend project.
Better yet, if you’ve come up with your own case and would like to show it off then be sure to add it to the comments at the bottom of this post.
Case Basics
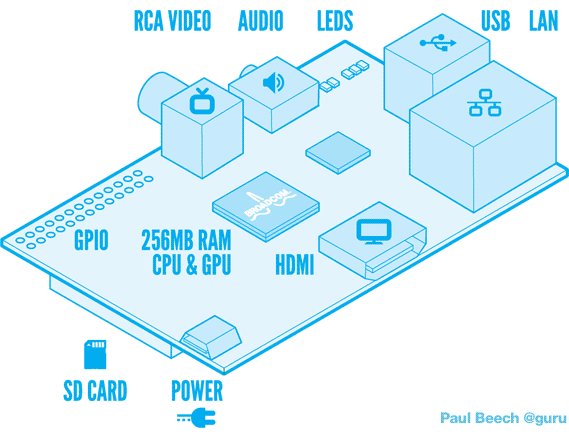
Before you start building a case it helps to know exactly what you’re dealing with in terms of internals. Each of the four sides have at least one port that you will probably want access to as you can see in the image below, so be sure to take this into account when designing.
The dimensions of the unit are 85.60mm x 53.98mm x 17mm with a slight overlap for the protrusion of the SD card. When designing a case be sure not to use conductive materials such as duct tape for mounting, instead something like the Raspberry Sandwich is recommended to reduce the likelihood of short circuiting.
Lego
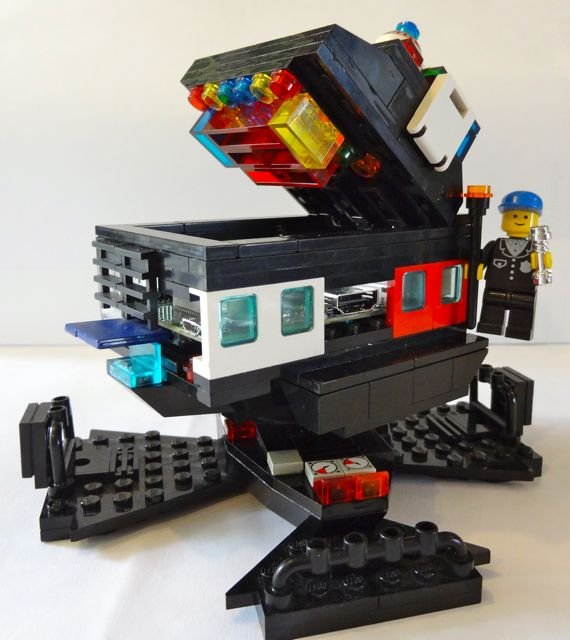
It’s been done to death, and for good reason. Lego is one of the most robust and flexible solutions for housing your Rasperry Pi in that it’s cheap, fun and entirely customisable. You could build a simple lego box with space for ports and ventilation, or incorporate your Pi into an elaborate scene from your favourite film, game or Lego set.
If you’re itching to have a go and seeing what you can come up with then why not use the Lego Digital Designer which allows you to easily share your blueprints with other blockheads. The company has previously offered custom kits, though the service was closed in January this year as they felt it didn’t live up to the especially high standards they had set. Look out for the evolution, coming soon.
Punnet Cardboard Case
The Punnet case is a free, print-and-build cardboard case for your Raspberry Pi. Simply download the PDF, print it out, follow the instructions and insert the unit.
It’s free to download and adapt, which has led to similar designs being made available. It really doesn’t get much simpler than this!
Keyboard Housing
Integrating the Raspberry Pi into a keyboard has both its advantages and disadvantages. If you’re brave, you might want to use a classic piece of computing history like an Amiga or Commodore home computer from the 80s, though any old keyboard will do provided it has a USB interface (which is what the RasPi uses).
You’ll instantly kill the “pocketability” of your $25 ARM computer, but you’ll never need to dig out a keyboard again. Ideally if you’re going to go this route then I’d say make it easy to snap the unit in and out in case your keyboard gives up the ghost or you decide that your Pi is better used elsewhere.
Game Cartridge: “RPi64
One Imgur user has uploaded images of their implementation of a Raspberry Pi into an N64 game cartridge, and as you can see from the results below – it’s a pretty cool concept. The unit fits snugly, though you might want to make the holes for the ports a little tidier in your own version.
While cartridges are hardier than optical media, it’s not hard to come across a dud. Alternatively you could use a really bad game if you feel bad about destroying a working piece of 64 bit history.
For more detail: 8 Interesting DIY Raspberry Pi Case Ideas


