
My preferred method to work with a Raspberry Pi is via SSH. When one installs Raspian from the Raspberry Pi website, SSH is active and available on port 22 (default SSH port number). All one needs is an ethernet connection, a DHCP server and a computer on the network to begin using the Pi.
http://downloads.raspberrypi.org/raspbian_latest
SSH gives one a terminal with command line access. Command line access is fine, but using a mouse and graphics is better. Webmin will give us a web based interface that does that. One doesn't even need to know the commands for most of the common functions and the interface is pretty intuitive.
Note that I am using a Windows computer as the SSH client end. I have no doubt that Linux users can find the Linux solution In the steps that need one.
Step 1: Finding the IP address of the Raspberry Pi
I use Putty for SSH access.
http://the.earth.li/~sgtatham/putty/latest/x86/putty-0.64-installer.exe
To get connected with Putty one needs to know the IP address and port number of the Raspberry Pi. There are a number of ways to discover the Raspberry Pi's address. If we have access to the DHCP server, we can look at the lease table to find the assigned address. We can't always access the DHCP server and even if we can, it can be complicated. A simple way to find the address is with a port scanner. I use Advanced Port Scanner
http://www.majorgeeks.com/files/details/advanced_port_scanner.html
As shown in the image, we can set it to scan port 22 at all the addresses in the subnet. If we are not sure of the subnet, there are several ways to find out what it is. In Windows we can go to the network connections and right mouse click on the connection to the subnet (Ethernet or wireless). Then we can click “Status” and then the “Details…” button. This will show the assigned IP address and the subnet mask. One can also open a command window and use the “ipconfig” command.
Note in the image that we have devices at 192.168.5.73 and 192.168.5.101 that have port 22 open (Note is it easier to look for “closed: 0”). By trying to connect as shown in the following step we can determine that 192.168.5.73 is the device we want.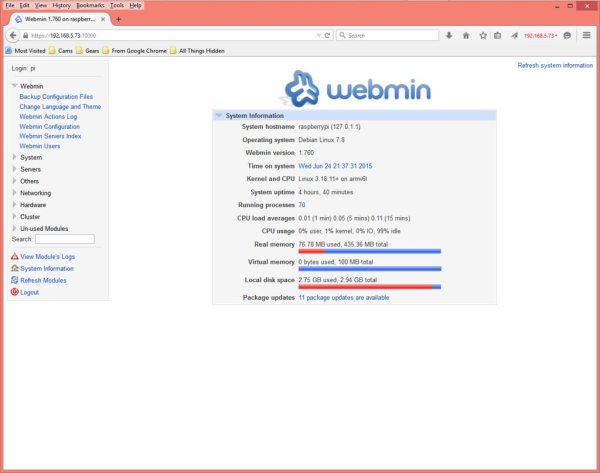
Step 2: Connecting to the Raspberry Pi via SSH for the first time
The above graphic shows Putty when it is first started. Note that we have selected the SSH radio button and entered 192.168.5.73 in the IP address. When we click on “Open” we get the Security pop up that says the host key is not cached. Click “Yes” and we get the terminal window shown in the next step.
Step 3: Logging into the Pi
I have already typed in the user name “pi”. After hitting enter, the Pi will ask for the password, which is “raspberry”. After entering the password we have a terminal window with a command prompt.
Step 4: Installing webmin (apt-get the dependencies)
The following link is to the Webmin page showing how to do a Debian install. It is good idea to use this link instead of the commands below. It will be updated with the latest Webmin. I am not likely to keep this instructable as current as that link.
http://www.webmin.com/deb.html
The reason we are using dpkg to install Webmin is that it is not in the repository. dpkg does not handle dependencies, so it is best to install the needed modules first. Note that apt-get and dpkg needs sudo.
One can select and copy each command line and right mouse click in the Putty terminal window to paste it.
sudo apt-get install perl libnet-ssleay-perl openssl libauthen-pam-perl libpam-runtime libio-pty-perl apt-show-versions python
Step 5: Install Webmin (downloading the deb file)
The command below will download the deb file into the Pi. One should use the line from the Webmin link to get the latest version.
http://www.webmin.com/deb.html
wget http://prdownloads.sourceforge.net/webadmin/webmin_1.760_all.deb
Step 6: Install Webmin (installing the deb file)
Note, the dpkg command can take a while to run. Also change it to install the version downloaded in the previous step.
sudo dpkg –install webmin_1.760_all.deb
Step 7: Accessing Webmin for the first time
For the example Pi we type https://192.168.5.73:10000 into the browser. One would use the IP address for a given Pi in place of the 192.168.5.73. The port will be 10000 on a newly installed Webmin. Note also that https must be used. That is the Webmin default. One should get various warnings about the self-signed certificate, etc.
Congratulations, we have Webmin installed and working. Now for a few tweaks.
We will make those tweaks in the “Webmin Configuration” screen. So we go to the to the Webmin drop down at the top of the Webmin menu and select “Webmin Configuration”.
Step 8: Tweaking the Webmin configuration (Turning SSL off)
Putty allows for tunneled connections. These are connections that go through the SSH connection and appear to come from the inside of the Raspberry Pi and the client computer. The ports being used are not visible on any external interfaces. Using tunneled connections greatly improves security for devices with interfaces directly on the Internet. One can turn off external access to the Webmin port and only accept connections from inside the device through an SSH connection. One can further improve security by changing the SSH port to some obscure port number and setting up port 22 to act like a dummy port that does not allow logins. It can be configured so that it appears to an attacker as a legitimate port and they can be occupied trying to break in there. One can also use signed key access on the obscure port to make it even more difficult. If an attacker were to discover the second port, it is highly unlikely that they can discover the 256 byte (or greater) key. (how to make these changes should be another instructable).
At this point we will just show how to set up the tunnel and to turn off external access to Webmin. We will also drop the SSL, since we get that from the tunnel. Then on the “Webmin Configuration” screen, we select “SSL Encryption”. In the next screen, we choose the “No” button next to “Enable SSL?”. Then click the “Save” button. We will have lost our connection. We need to go to the address bar and edit “https://” to “http://” and we will get our connection back.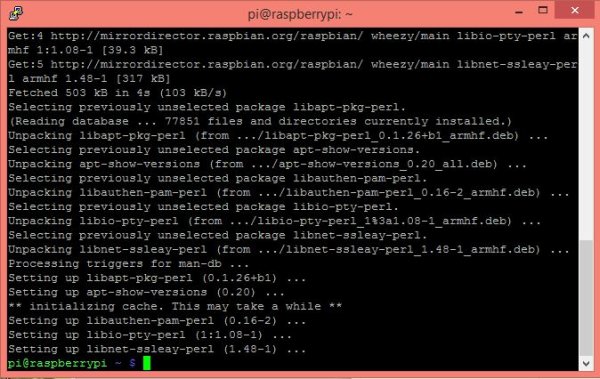
Step 9: Tweaking the Webmin configuration (Disabling external access to Webmin)
Now going back to the “Webmin Configuration” screen we select “Ports and Addresses”. We change the drop down box that says “Any Address” to “Only Address” and put “127.0.0.1” in the box next to it. Then click “Save”. Once again we have lost our connection. This time to get it back, we have to create a tunnel in Putty.
Step 10: Creating a Putty profile (session)
Close our existing Putty window. We are going to create a Putty profile
with our tunnel configured in it, so that the tunnel configuration only needs to be done once. Open Putty and set it up to access the Pi (type in IP address). In the box that says “Saved Sessions” type in the name for this profile. I have done “192.168.5.73” as the profile name. Click “Save”.
For more detail: Adding Webmin to manage a Raspberry Pi