In this project you can make your own personal Smart Home HUB through which you can add, modify and control all the appliances you want.

HUB on Raspberry Pi
First we will setup the HUB on our Raspberry Pi.
Go through the steps on this site: http://docs.openhab.org/installation/openhabian.html. OpenHAB is the best and easiest opensource platform to make some cool smart home devices.
I hope you have successfully managed to install OpanHAB on your Raspberry Pi. (IF NOT, THEN PLEASE LET ME KNOW IN THE COMMENTS. I WILL HELP YOU TO SOLVE THE ERRORS. If not, then follow on.)
Download PuTTY and run it. In the Host Name field, type in the IP address of the Raspberry Pi. (How to find your Pi's IP address: open command prompt, type “arp -a” and you'll find all the connected devices on your network. It's here you'll have to look for the IP address starting with “b8-##-##-##-##-##”. It is your Pi's IP address.)
Click Open. A box should pop up saying not cached in the registry, just press “YES”. To login, type in “openhabian” using default password “openhabian”.
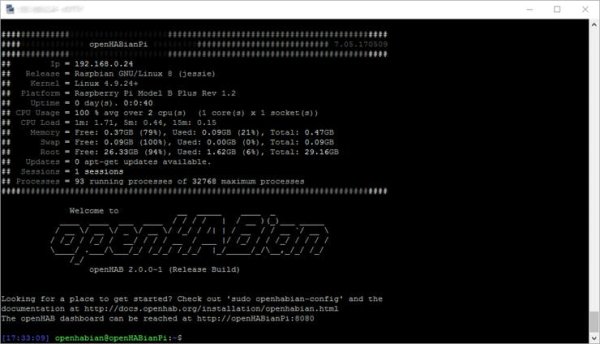
Now you'll see this screen:
MQTT Install
Now we'll install MQTT server. First type these commands:
sudo apt-get update
sudo apt-get install git
sudo git clone https://github.com/openhab/openhabian.git /opt/openhabian
sudo ln -s /opt/openhabian/openhabian-setup.sh /usr/local/bin/openhabian-config
sudo openhabian-config
Now you'll see this screen:
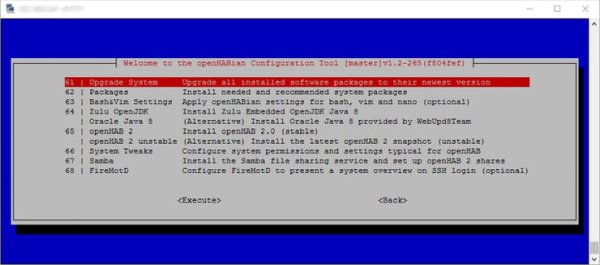
Use arrow keys and go to Upgrade system and press enter. Go down to “optional components”.
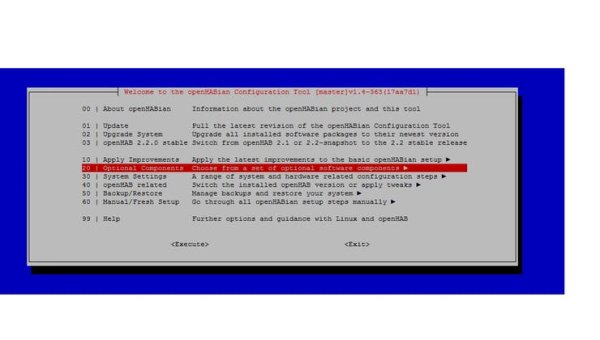
Press enter and go down to Mosquitto.
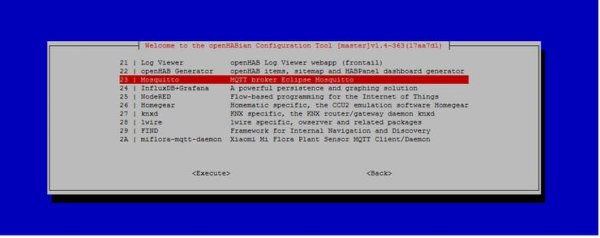
Press continue and then ok. Now you have installed MQTT on your Pi.
Connect MQTT and openHAB
Now we will connect MQTT Mosquitto server to our openHAB.
Open your web browser and go to http://yourPiIPaddress:8080 and replace the yourPiIPaddress with your Pi’s IP address. Example: http://192.168.0.110:8080. You should see a webpage asking which setup you would like, we are going to click Expert. It should be installing our user interfaces, this could take a couple of minutes.
Then click “paper ui”. It is the web administration panel for the automation server. Now: Add-ons –>Bindings –> Search for MQTT binding and install it
Now go to PuTTY terminal and type in:
sudo nano /etc/openhab2/services/mqtt.cfg
It will open a configuration file in which we will change our server's address. Under #URL to the MQTT broker, delete the line:
#<broker>.url=tcp://<host>:1883
And replace it with:
broker.url=tcp://192.168.0.110:1883
But change the IP address to match your Raspberry Pi.
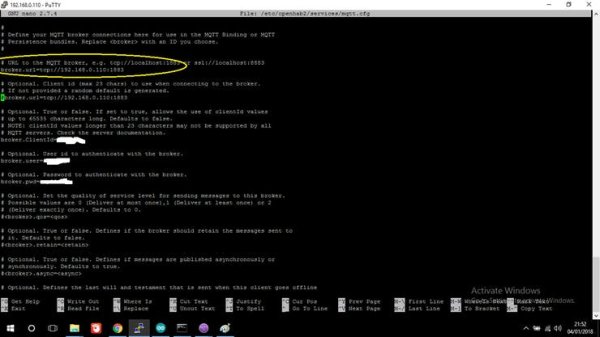
Press ctrl+x then Y and enter. Type:
sudo reboot
It will restart the system. After reboot, open “PUTTY” and log into your openhabian. After logging in, type this command into terminal:
sudo nano /etc/openhab2/items/home.items
You will see a blank file. Here we will add the “items” or Smart Switches for our Home Automation System. Just paste following code in that empty file:
Switch channel1 "Light 1" <Light>  (gLight1) [ "Lighting" ]{mqtt=">[broker:Home-Automation/utilities/SmartHomeSystem:command:ON:1ON],>[broker:Home-Automation/utilities/SmartHomeSystem:command:OFF:1OFF]"}
Switch channel2 "Light 2" <Light>  (gLight2) [ "Lighting" ]{mqtt=">[broker:Home-Automation/utilities/SmartHomeSystem:command:ON:2ON],>[broker:Home-Automation/utilities/SmartHomeSystem:command:OFF:2OFF]"}
Switch channel3 "Light 3" <Light>  (gLight3) [ "Lighting" ]{mqtt=">[broker:Home-Automation/utilities/SmartHomeSystem:command:ON:3ON],>[broker:Home-Automation/utilities/SmartHomeSystem:command:OFF:3OFF]"}
Press ctrl+x then y and then Enter. Now type in:
sudo nano /etc/openhab2/sitemaps/home.sitemap
This command entered in terminal will open up again a blank file. Here we will create a button (User Interface) so that we can control our switches from a smart phone or PC, too.
In that blank file, type in the following code:
sitemap home label="Home Automation"
{
Frame label="Home Automation"
{
Switch item=channel1
Switch item=channel2
Switch item=channel3
}
}
Press ctrl+x then y and then Enter.
Open your web browser and go to http://yourPiIPaddress:8080 replacing the IP address with your Pi’s IP address. Example: http://192.168.0.110:8080
Then go to “paper ui” then go to “addons” and in that navigate to “misc“. Find “openHAB cloud connector” and install it. After installation, go to “configuration” and then the “services” sub tab. Click on “CONFIGURE“.
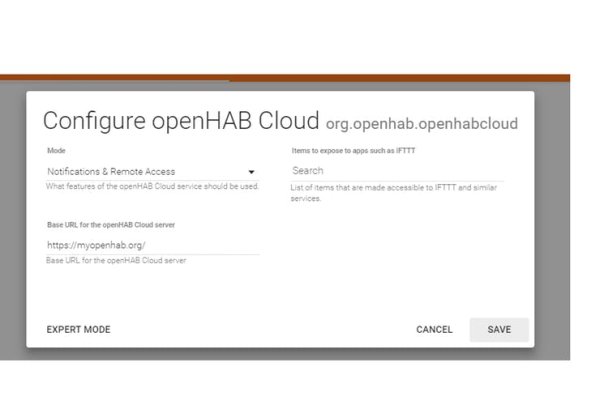
In the mode field, click the drop down and select Notifications and Remote Access. In the base URL Field type in https://myopenhab.org/ and click save.
Now go to this URL: https://myopenhab.org/login and Type in an email address and password of your choosing, this will be known as the admin myopenhab account. There are two other fields the UUID Field and the secret field.So for that go to your putty terminal and Type in:
sudo nano /var/lib/openhab2/uuid
And press enter. That is your UUID; copy that and paste it in UUID section. Press ctrl+x and now type in:
sudo nano /var/lib/openhab2/openhabcloud/secret
And copy the text from the text file and paste it into the secret field in the web browser.
Once you are all registered on the webpage, it might say offline in the top right. So go back to the ssh putty terminal and type in:
sudo reboot
And press enter. The Raspberry Pi should now reboot.
Once it is booted back up, refresh the myopenhab.org webpage and it should now say online. Now download the openHAB application onto your Android phone or iPhone.
For iOS
When it asks to allow notifications, press allow. Then it will ask which sitemap to use, press the home sitemap.
Currently the app is running the openhab demo, so let's change that. Press the three lines at the top right which will bring up some options. Press the settings option. Then next to demo mode, turn off the switch. It will now open up some new fields.
In the local URL type in http://yourPiIPaddress:8080 and obviously replace it with your actual Pi's IP address. In the Remote URL type in https://myopenhab.org. Then in the username and password fields, type in the user account’s credentials from myopenhab.org that will be using the device. Then hit save in the top right.
By default, the app will open up the default home sitemap; we don’t want that, so press the three lines in the corner again. Then press settings. Now press Select Sitemap. Now choose the sitemap that is not the home sitemap or, in other words, the one you want; mine is Home Automation.
Enjoy!
For Android
Open the application and in the popup select the demo sitemap.
Currently the app is running the openhab demo so let's change that. Press the three dots at the top right which will bring up some options. Press the settings option. Then next to demo mode press the check box to make it unchecked. It will now open up some new fields.
In the local URL type in http://yourPiIPaddress:8080 and obviously replace it with your actual Pi's IP address. In the Remote URL type in https://myopenhab.org. Then in the username and password field type in the user account’s credentials from myopenhab.org that will be using the device.
After that hit the back button on your device. A box should pop up asking which sitemap to use press the home sitemap or whatever sitemap your main sitemap is called. It will now load that sitemap as the default one when you open up the app.
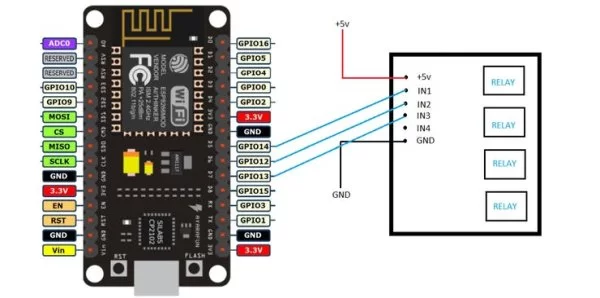
Upload Arduino code from attachments with a few changes and connect the relay as shown in picture. Open the Alexa application, go to skills and search for openhab and log in with your user ID and password. Ask Alexa to discover devices and enjoy!
So after this we can can control our Smart Switch with a smart phone and Alexa.
Source: Alexa NodeMCU Smart Home Automation With Your Own HUB


