
I have designed three* 3D printable cases which each use clear Acrylic tubes as enclosures. Additional printed parts help enclose the Raspberry Pi HQ Camera, a wide angle lens, and the electronics. The tube is sealed with printed flexible seals. All three* designs easily fit on a 200mm x 200mm x 200mm sized printer.
AllSky Z | Station & Mobile**.
- 70mm x 100mm x 3mm Acrylic Tube.
- Raspberry Pi Zero 2.
- Raspberry Pi HQ Camera.
- Arducam LN051 Wide Angle Lens.
- Adafruit 4090 USB C PCB (Mobile).
- 3030 Extrusion (Station).
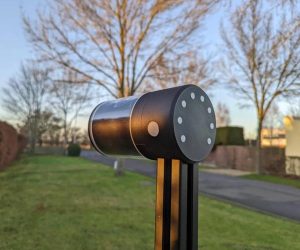
Small, compact, low power and low cost. The AllSky Z Enclosure comes in two flavours; Station and Mobile. The Station version is for long-term installations and can be mounted to a 3030 extrusion. The Mobile variant is design for affixing to a tripod and for taking out into the wild. The Mobile version has a USB C connector for connection to a 5V LiPo battery pack. Using the new Raspberry Pi Zero 2 helps keep the cost and size low.
AllSky B | Station.
- 100mm x 100mm x 3mm Acrylic Tube.
- Raspberry Pi 3B/4B.
- Raspberry Pi HQ Camera.
- Arducam LN051 Wide Angle Lens.
- Pololu – S13V30F5 – 5V3A.
- 4040 Extrusion.
We all have at least one Raspberry Pi sat awaiting a project. The AllSky B Enclosure is that project. Bolt to 4040 extrusion, supply with 3V-22V and setup for your favourite vista.
AllSky POE | Station***.
- 120mm x 100mm x 3mm Acrylic Tube.
- Raspberry Pi 3B/4B.
- Raspberry Pi HQ Camera.
- Arducam LN051 Wide Angle Lens.
- Waveshare PoE Hat.
- 4040 Extrusion.
You have to supply power lines to the electronics. The AllSky PoE goes one-up and adds in wired networking!
All three designs can be angled from horizontal to vertical and everything in between (in 18° increments). I went with the Arducam LN051 Wide Angle lens as I don't like the fish-eye lenses and the overly distorted images they produce. There is no reason you can't try different lenses too.
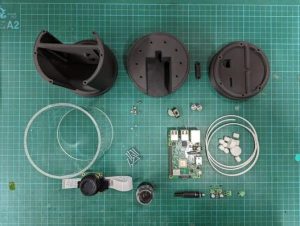
Step 1: AllSky Z – Parts List.
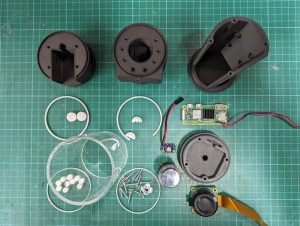
AllSky Z Parts List.
- 1 x Raspberry Pi Zero 2.
- 1 x Raspberry Pi HQ Camera.
- 1 x Arducam LN051 Lens.
- 1 x 70mm x 100mm x 3mm Acrylic Tube.
- 1 x Heatsink (Optional).
- 1 x 15cm Zero Camera Cable.
- 1 x Adafruit 4090 USB C Board (Mobile).
- 1 x 3030 Aluminium Extrusion (Station).
- 10 x M3 x 10mm Plastic Screws.
- 10 x M2.5 x 6mm Plastic Screws.
- 1 x 1/4-20 UNC Pronged T-Nut (Mobile).
- 2 x M6 x 12mm Cap Screws (Station).
- 2 x M6 30 Series T-Nuts (Station).
You can download the AllSky STL Pack from Thingiverse, or you can download the AllSky Design Pack from Cults3d.com.
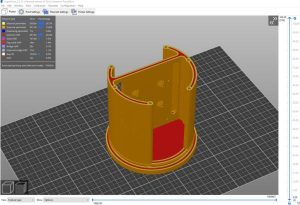
Step 2: AllSky Z – Printing Parts.
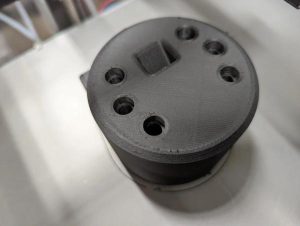
I'm using E3D's ToolChanger to print the parts. I chose Colorfabb's XT-CF20 for the body and 3D4makers' TPC-91A for the seals.
Slicer Settings.
- 0.2mm Layers.
- 0.4mm Nozzle.
- 23% Infill.
- 5 Top layers.
- 4 Bottom Layers.
- 4 Perimeters.
Tip | After removing the parts from the printer, ream the M3 holes with a 2.5mm drill and the M2.5 holes with a 2mm drill. Finish off with a countersink to deburr the holes.
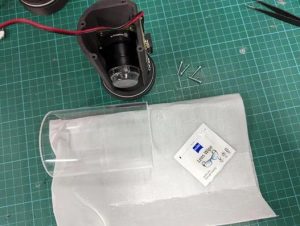
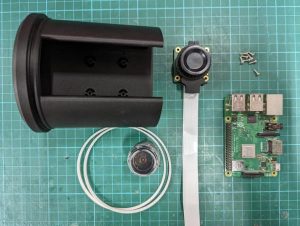
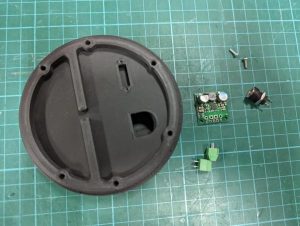
Step 3: AllSky Z – Fitting the Electronics.
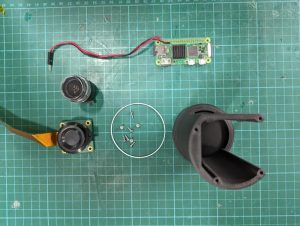
I tested my RPiZ2 and HQ Camera before installing it into the enclosure. During this time I also flashed the SD Card with the Lite OS, installed the AllSky Software, tested and focused the lens.
- Begin by removing the large black tripod bracket on the camera. There are two screws that hold this on.
- Connect the FFC into the HQ Camera.
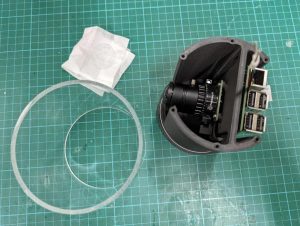
- Move the camera into the enclosure and pass the FFC through the slot.
- Attach the lens to the camera.
- Secure the camera to the enclosure using four M2.5 6mm plastic Screws.
- Install the seal, check the orientation.
- Feed the FFC through the hole at the base and loop it back out again.
- Install the end of the FFC into the RPiZ2. You'll need to lightly bend the FFC for it to sit under the RPiZ2.
- Secure the RPiZ2 with four M2.5 6mm Plastics Screws.
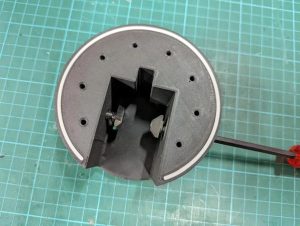
Step 4: AllSky Z – End-Cap.
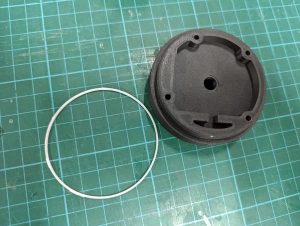
Fit a seal onto the End-Cap. Check the orientation of the seal.
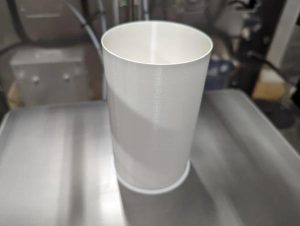
Step 5: AllSky Z – Tube.
The internal edges of the acrylic tube need to be rounded off to help the tube slip over the seals easier. I used a round needle file to round the edges. Something like a 1mm radius or chamfer will be enough.
Before fitting the tube remember to give it a good clean on the inside, and remember to take the cover off the lens and give the lens a clean too.
Lastly, I attached Positive (Red+) and Negative (Black-) wires to the RPiZ2 GPIO. This can be done before or after the RPiZ2 is installed in the enclosure.
The End-Cap is secured using four M3 10mm Plastics Screws. Check the holes align, and that the wires sit in the clearance slot before screwing everything up tightly.
When everything is together split the power lines, and install the seals.
I can recommend putting some silica gel inside the enclosure if you have any. This will help with any trapped moisture.
Step 6: AllSky Z – Station.
- Fit the two M6 x 12mm Bolts and M6 30 T-Nuts into the Mount.
- Carefully install the seal, check it is seated correctly.
- Slide the Mount onto the extrusion.
- Tighten the Bolts, then seals in the bolts.
- Using four M3 x 10mm Plastic Screws, secure the enclosure to the Mount. Be careful to not trap the power cable and check which angle you want it at before securing.
- Seal the screw holes.
- Install the AllSky Z Station.
You will need to provide 5V to the AllSky Z Station and have it connected to your WiFi. The heat from the RPiZ2 and HQ Camera should help minimise, if not entirely prevent, any condensation from building up on the acrylic tube.
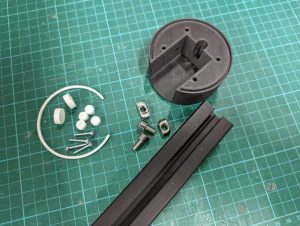
Step 7: AllSky Z – Mobile.
- Install the seal into the Tripod Mount.
- Press in the Pronged T-Nut, take care to align with the slots.
- Fix in the Adafruit USB C PCB using two M2.5 x 6mm Plastic Screws.
- Join the power lines together.
- Using six M3 x 10mm Plastic Screws bolt the Tripod Mount to the Enclosure.
- Apply the seals.
I have a few Tripods to use and the AllSky Z Mobile should work with them all. I tested with a 4000mAh battery pack, which lasted about 10 hours. I'd recommend 10,000mAh or more just to be safe for a single night.
The AllSky Z Mobile version is expected to be used in the wilderness and it is unlikely that it will be able to connect to a local WiFi network. To get around this issue I have set my phone up as a WiFi hotspot and I added the data into /etc/wpa_supplicant/wpa_supplicant.conf on the RPiZ2.
sudo nano /etc/wpa_supplicant/wpa_supplicant.conf
At the end of the file add, and then change the values to match your Hotspot details. Save, and exit.
network={
  ssid="ssid"
  psk="password"
}
If you want to access the AllSky Z Mobile via your phone while it is connected to your Hotspot you will need to fin the IP. To do this you'll need a terminal app. I installed Termux on my phone.
Open Termux and type.
ip neigh
This will scan the network and give you a list of IPs. Simply type them into the browser on your phone until you find the right one.
Tip | To turn off the activity LED on the RPiZ2 follow this guide.
Step 8: AllSky Z – Mobile – BONUS!
While Acrylic is a fairly good material, it can be prone to scratches. For the Mobile version I wanted to protect the tube during travel. I designed a slide-on flexible cover which easily protect the tube during travel and when in storage.
Step 9: AllSky B – Parts List.
AllSky B Parts List.
- 1 x Raspberry Pi B.
- 1 x Raspberry Pi HQ Camera.
- 1 x Arducam LN051 Lens.
- 1 x 100mm x 100mm x 3mm Acrylic Tube.
- 1 x Pololu – S13V30F5 – 5V3A.
- 1 x DC Jack.
- 1 x 4040 Aluminium Extrusion.
- 10 x M3 x 10mm Plastic Screws.
- 8 x M2.5 x 6mm Plastic Screws.
- 2 x M6 x 12mm Cap Screws.
- 2 x M6 40 Series T-Nuts.
- 2 x M2 x 5mm Plastic Screws.
You can download the AllSky STL Pack from Thingiverse, or you can download the AllSky Design Pack from Cults3d.com.
Step 10: AllSky B – Printed Parts.
I'm using E3D's ToolChanger to print the parts. I chose Colorfabb's XT-CF20 for the body and 3D4makers' TPC-91A for the seals.
Slicer Settings.
- 0.2mm Layers.
- 0.4mm Nozzle.
- 23% Infill.
- 5 Top layers.
- 4 Bottom Layers.
- 4 Perimeters.
Tip | After removing the parts from the printer, ream the M3 holes with a 2.5mm drill, the M2.5 holes with a 2mm drill and M2 holes with a 1.7mm drill. Finish off with a countersink to deburr the holes.
Step 11: AllSky B – Fitting the Electronics.
I tested my RPi and HQ Camera before installing it into the enclosure. During this time I also flashed the SD Card with the Lite OS, installed the AllSky Software, tested and focused the lens.
There is no need to remove the black 1/4-20 UNC threaded component on the HQ Camera before installation.
- Install the HQ Camera, with the FFC, into the enclosure using four M2.5 x 6mm Plastic Screws.
- Connect the FFC into the Raspberry Pi.
- Secure the RPi into the enclosure using four M2.5 x 6mm Plastic Screws.
- Remove the cap from the HQ Camera and attach the Lens.
- Attach a power cable to the RPi's GPIO.
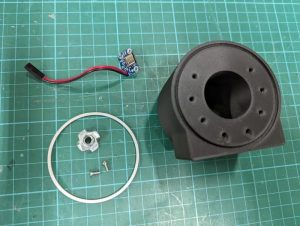
Step 12: AllSky B – the End-Cap.
- Solder the included screw terminals onto the Pololu S13V30F5.
- Secure the S13V30F5 to the End-Cap using two M2 x 6mm Plastic Screws.
- Solder wires to the DC Socket, check the polarity using a Multimeter.
- Install the wires into the S13V30F5, check the polarity.
- Install the seal onto the End-Cap, check the orientation.
Step 13: AllSky B – the Tube.
- Radius the internal edges of the Acrylic Tube using a file or sandpaper. Be careful not to scratch the tube.
- Slide the tube over the enclosure and press down over the seal.
- Connect the wires to the S13V30F5, check the polarity.
- Align the End-Cap screw holes with the matching holes on the enclosure.
- Ensure the wire is in the slot and firmly press the End-Cap on over the seal.
- Secure the End-Cap with six M3 x 10mm Plastic Screws.
Tip | Include a small packed of Silica Gel to absorb any moisture inside the enclosure.
Step 14: AllSky B – SD Card.
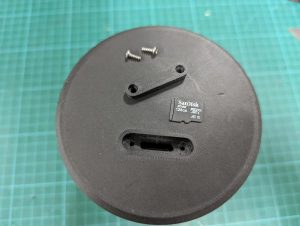
The SD Cover can be removed to gain access to the SD Card. Two M2.5 x 6mm Plastic Screws secure the SD Cover in place.
If you are concerned about any potential ingress of water, download the AllSky Design Pack for a version of the enclosure without the cover.
Step 15: AllSky B – Station.
- Install the main seal.
- Install the two M6 x 12mm and M6 40 Series T-Nuts.
- Slide the 40×40 Extrusion into the slot.
- Tighten the M6 bolts.
- Fit the larger seals over the bolts.
- Secure the Enclosure to the Mount using eight M3 x 10mm Screws.
- Cover the screws with the seals.
- Install the AllSky B Station at your favourite vista!
Step 16: AllSky Z Mobile Testing.
I've setup the AllSky Z Mobile Enclosure in the spare bedroom window and pointed it skyward. There is a lot of light pollution, cloud cover and the moon. However, for a first run it's turned out quite well!
Step 17: AllSky Z Mobile – Outside.
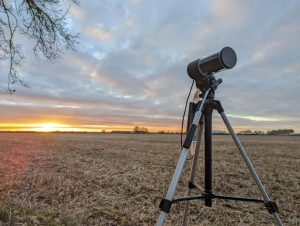
Eager to give the AllSky Z Mobile Enclosure a try, I headed out into the wilderness of South Oxfordshire. After battling past squirrels, hedgehogs and bushes I setup the tripod facing WNW.
AllSky connected to my phone and I opened Termux, found the IP, opened my web browser and adjusted the tripod to get a good view of the sky.
I then went home, and waited. It was going to be a cold night I was hoping that the heat from the RP1Z2 would keep the frost off the enclosure. Running temps on the CPU sit at around 36C, and it does feel warm around the heatsink I put on. I figured it would be fine.
The next morning I found a frozen enclosure. Something had gone wrong.
The problem? The battery pack. I had made an assumption that the heat generated by from the power draw would be enough. Alas, it was not and the battery conked out at 1820, a meagre two hours after setting things up.
There were a few interesting shots, but nothing like what there should have been. There is hope for the next run though. I just need to insulate the battery pack, if the damned thing works again, it's still not outputting anything. The AllSky Z Mobile Enclosure and electronics run fine with a different power source.
The issue is that LiPo cells don't like low temperatures.
I'm going to need to find a view with no, or very few, lights in the frame. I like the slither of landscape, but I think the pollution from the lights in the buildings gets in the way. What I need is a Dark Sky Site.
The British weather is now back to normal and it's going to be cloudy for the next few weeks! The few frames that we're recorded do look cool, some have what I presume is aircraft in the background. For the moment it's back to waiting for better weather.
Perhaps you'll have better luck than I?
Step 18: AllSky Design Pack.
The AllSky Design Pack includes the following benefits.
- Edit the design and adapt the enclosures for use with other lenses.
- Edit the design and adapt the enclosures for use with different mounting methods.
- Edit the design and adapt the enclosures for use with different camera modules.
- Edit the design and adapt the enclosures for different design styles.
Files included with the AllSky Design Pack.
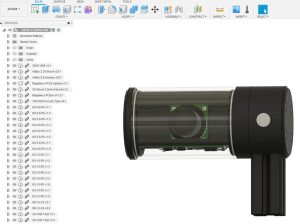
- A complete set of Fusion 360 Design files for all versions of the AllSky Enclosures.
- A complete set of STL files for all versions of the AllSky Enclosures.
- A complete set of 3MF files for all versions of the AllSky Enclosures.
- A complete set of STEP files for all versions of the AllSky Enclosures.
- A complete Bill Of Materials (BOM) for all versions of the AllSky Enclosures.
Source: All Sky Camera Enclosures.