
I know it has been ages since I posted here so I thought I would put something up for Halloween. I have a brilliant and simple project here. It’s easy to understand and, more importantly, it actually does work. I accidentally scared myself with it once! So I know it does.
A Raspberry Pi is so small that it can easily be hidden or concealed and that makes it the perfect tool for this kind of project. The basic idea here is that we’re going to use motion detection to trigger the playback of a scary video clip at high volume. At the same time we can use the Raspberry Pi camera module to record a video of the victim jumping and then play it back for them to laugh at.
You could set this up with your TV pointing out of a window to get random strangers walking past your house? I wouldn’t do that near a road though!
As a minimum you will need
- Raspberry Pi (A or B) with peripherals, USB keyboard, mouse etc
- Raspberry Pi camera module (this)
- HDMI TV or Monitor with Speakers
- At least 3 Female to Female jumper wires (like these)
- PIR Motion Sensor Module (like this)
I also reccomend
- RPi Camera Board 360 Gooseneck Mount (like this)
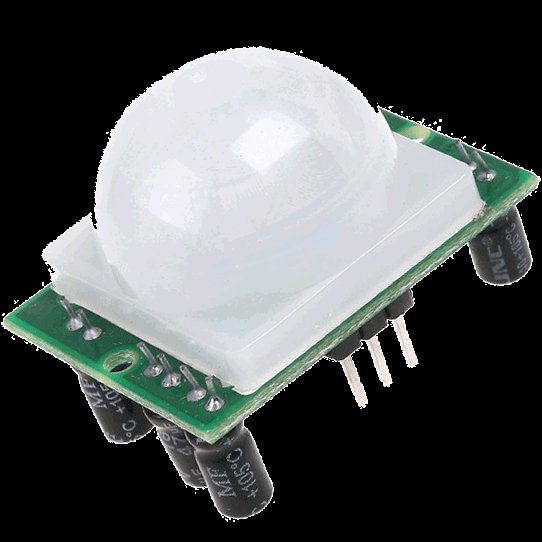
What is a PIR module?
PIR stands for Passive Infra Red. You’ve all seen these things before, they are tremendously common these days. Most often found in the corners of rooms for burglar alarm systems. All objects that are above absolute zero emit radiation in the form of infra red. Infra red wavelengths are not visible to the human eye but they can be detected by the electronics inside one of these modules.
The sensor is regarded as passive because it doesn’t send out any signal in order to detect movement. It adjusts itself to the infra red signature of the room it’s in and then watches for any changes. Any object moving through the room will disturb the infra red signature and will cause a change to be noticed by the PIR module.
We don’t need to worry about its inner workings. What we’re interested in are those three pins on it. We can connect those to the Raspberry Pi GPIO pins. One is for +5 volts, one is for ground and the other is the sensor pin (the middle pin on my one). That pin will receive power whenever motion is detected by the PIR module. We can then see that happening on the Raspberry Pi and take action accordingly.
Wiring it up
Let’s do this in stages. First we’ll wire up the motion sensor and get that working and later we’ll sort out playing the scary clip and recording the victim via the camera.
Have your Raspberry Pi turned off and unplugged when you do this. Refer to the diagram above for pin numbers. If you look closely at the pins on your PIR module you’ll see some white text on the PCB near the base of each one. VCC is for +5 volts in. Take one of the female to female jumpers and connect the VCC pin to pin 2 (red) on the Pi, this will make the Pi give 5 volts of power to the PIR module. Use another jumper to connect GND on the module to pin 6 (black) on the Pi, this completes the circuit and allows current to flow back out of the module into the Pi. Now do the same for the sensor pin (OUT), you can use any of the green pins on the Pi for this but I am going to use pin number 7 (since it’s the first green one).
Note: If you have a different PIR module to my one then the pin layout might be different, this is why I refer you to the labels VCC and GND.
When you’re done you should then have something like this.
Next lets boot up the Pi. Make sure you’re using a recent version of Raspbian since we need this for the camera board software later on. If you need to download and burn a new SD card image, do this now.
After you have logged in we need to create two python files. The first one, listed in full below, is a class that handles the motion detection. We’ll use this in a second python file which will be our main scare program. You can either do this using the X desktop and Leafpad or over an SSH connection using something like Putty. A paste in Putty is done with a right click of the mouse.
Copy the code below and save it as a file named pirDetect.py
#!/usr/bin/python
import RPi.GPIO as GPIO
import time

class detector(object):
        def __init__(self, sensor):
                self.callBacks = []
                self.sensor = sensor
                self.currState = False
                self.prevState = False

                GPIO.setmode(GPIO.BOARD)
                GPIO.setup(self.sensor, GPIO.IN, pull_up_down=GPIO.PUD_DOWN)

        def read(self):
                self.prevState = self.currState
                self.currState = GPIO.input(self.sensor)

        def printState(self):
                print "GPIO pin {0} is {1}".format(self.sensor, "HIGH" if self.currState else "LOW")

        def subscribe(self, callBack):
                self.callBacks.append(callBack)

        def callBack(self, state):
                for fn in self.callBacks:
                        fn(state)

        def start(self):
                self.read()
                self.printState()
                while True:
                        self.read()
                        if self.currState != self.prevState:
                                self.printState()
                                self.callBack(self.currState)
                        time.sleep(.1)
When you have done that we can create another file which will be the actual scare program. This file will link into pirDetect.py so we can make use of its code. Now save the code below into a new file named scare.py
#!/usr/bin/python
from pirDetect import *

objDetect = detector(7)
objDetect.start()
Note: We pass the number 7 into the detector class initialise function, this is telling it to watch pin 7 for activity! Pin 7 is connected to the sensor pin on the PIR module remember.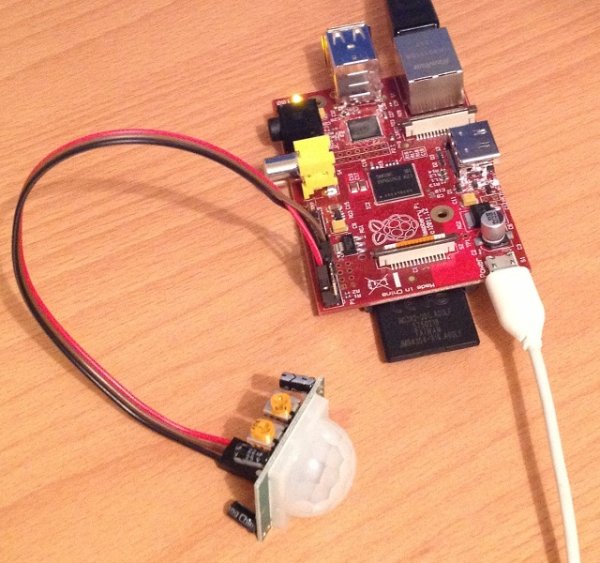
At the moment all this program will do is show some text saying GPIO pin 7 is HIGH or LOW. HIGH means there is power on the pin, low means there is not. So really HIGH means movement has been detected. This is enough to test the PIR module, so let’s give it a try.
After you have saved scare.py we need to set it to be executable and then we can run it. Enter the following commands at the command line (or in LX Terminal if you prefer).
sudo chmod +x scare.py
sudo ./scare.py
If you get an error saying RuntimeError: No access to /dev/mem it means you forgot to use sudo. You must run programs that access the GPIO as root and sudo does this for you. Think of it as super-user-do. Press Ctrl – C when you want to exit.
KEEP STILL
If you keep still you should notice pin 7 will go to LOW. Then if you start moving or wave it will go HIGH. Keep on waving and it will stay HIGH and only go back to LOW if you keep still again. If this is what you have then everything is working correctly. If not then something is wrong and you need to go back and troubleshoot.
For more detail: Arc Software Consultancy using the Raspberry Pi