
Step 1: Step 1: Connecting the Arduino and Raspberry Pi
This step assumes you are using the external UART for connecting the Raspberry Pi with an Arduino Mega 2560. It's also possible to use this with another Arduino.
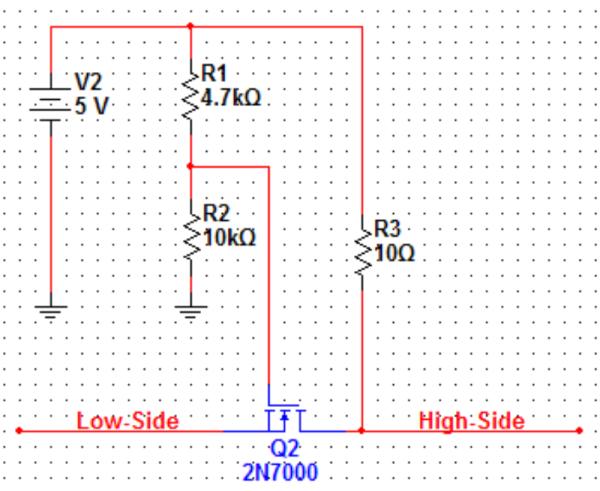
The Arduino uses 5V logic but the Raspberry Pi uses 3.3V logic, so a conversion must be made. I decided to build a circuit but you can also use Sparkfun Logic Level Converter. Note that the schematic is a bit wrong R3 should be 10k instead of 10 ohm!
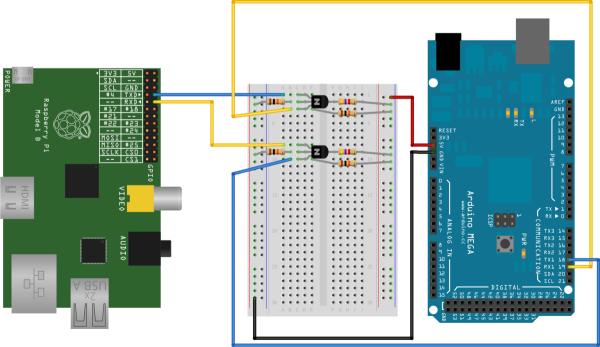
The next image shows how the logic level shifting circuit should be connected with the Raspberry Pi. In the next step the Raspberry Pi gets configured and the first data can be send.
Step 2: Step 2: Configuring the Raspberry Pi
The Raspberry Pi sends all terminal output over the external serial to disable this behaviour the following file needs to be edited: sudo nano /etc/inittab the following line needs to be commented out by placing a hashtag before it (#):
T0:23:respawn:/sbin/getty-LttyAMA0115200vt100
Now the terminal stops listening on the UART pins but the debug information is still being send, to change this the following file needs to be edited: sudo nano /boot/cmdline.txt and the following part should be removed:
console=ttyAMA0,115200kgdboc=ttyAMA0,115200
Now upload the following script on the Arduino (I call it a pass through script):
voidsetup()
{
  // Open serial communications to PC and wait for port to open:
  Serial.begin(115200);
  Serial.println("Connected to PC");
  // set the data rate for the Bluetooth port
  Serial1.begin(115200);
}
voidloop()// run over and over
{
  if(Serial1.available())
    Serial.write(Serial1.read());
  if(Serial.available())
    Serial1.write(Serial.read());
}
}
voidloop()// run over and over
{
if(Serial1.available())
Serial.write(Serial1.read());
if(Serial.available())
Serial1.write(Serial.read());
}
 }
voidloop()// run over and over
{
if(Serial1.available())
Serial.write(Serial1.read());
if(Serial.available())
Serial1.write(Serial.read());
}
}
voidloop()// run over and over
{
if(Serial1.available())
Serial.write(Serial1.read());
if(Serial.available())
Serial1.write(Serial.read());
}Next we can test the connection by sending the following command, the images show the result:
echo-e"This is the text I want to display on my Arduino \r\n">/dev/ttyAMA0
Step 3 will setup PHP or Python