Does anyone know if I can use a single Arduino or Raspberry Pi to control two 32×32 LED matrices as sold on the Adafruit website? Here is a tutorial where you can wire the 32×32 matrix.
Ideally, I'd like to be able to control them separately, but if the wiring only allows simultaneous control of the two, then that is ok.
Thank you for your time.
|
Do you have a specific question that isn't answered by the tutorial you linked to? It seems pretty clear to me. – Dave Tweed♦ Nov 27 '12 at 15:54
|
|||
|
|
@DaveTweed Having very limited Arduino/Electrical Engineering experience (I'm a Comp Sci major) I wasn't real clear on some of the details.
|
|
|
Do you have a specific question that isn't answered by the tutorial you linked to? It seems pretty clear to me. – Dave Tweed♦ Nov 27 '12 at 15:54
|
||
|
|
@DaveTweed Having very limited Arduino/Electrical Engineering experience (I'm a Comp Sci major) I wasn't real clear on some of the details. –
|
These panels inherently need A LOT of refreshing, due to their design. It's going to kill the Arduino if you want to do a lot of colors, especially if you'd like to chain these panels. I wrote up a fairly generic explanation on how the 16×32 display works, and you can extrapolate that to the 32×32 panel, which basically just adds another address line. Basically, you can drive a panel as big as you want as long as you can parallel up the data, and blip thru the address lines quick enough. This is why Adafruit makes multiple mentions of using an FPGA to drive these displays – they are perfectly suited with fast clocking and parallel data outputs.
How the 16×32 RGB Adafruit (and possible others) displays work:
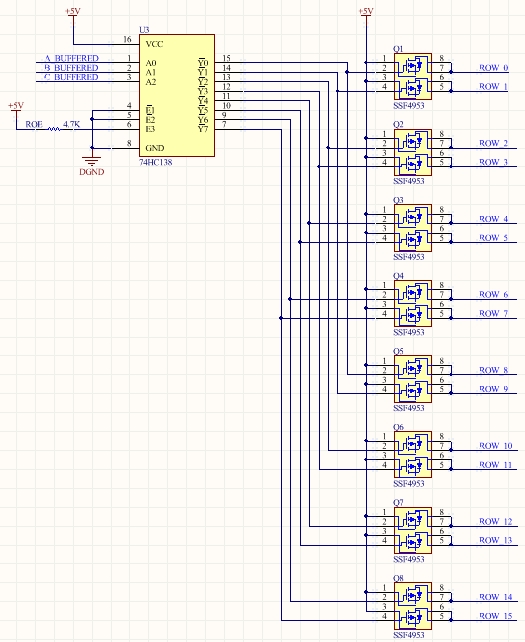
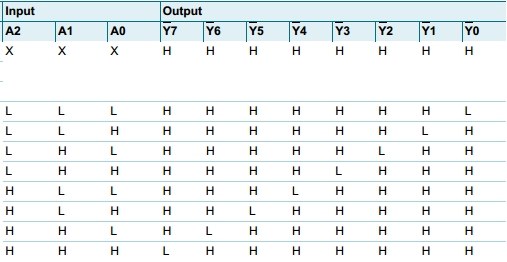
This display draws picture information via multiplexing, which basically means updating the rows and columns of the display faster than the eye can process. If updated fast enough, the eye sees a complete picture, without flickering or artifacts. First, the row to update must be selected. On this display, this is done by using a 3-to-8 address decoder (74HC138D). There are three address inputs to the display marked A, B and C. Based on the truth table, you can see only one input is active (low) at a time.

The outputs of the decoder can only handle low currents and cannot drive a row of LEDs directly. To remedy this, a P-Channel MOSFET is used as a switch, providing us the high current we need to drive a row of LEDs. You can see that the decoder outputs are shared between every 8 outputs (0 and 8, 1 and 9, repeating that pattern until row 7 and 15)
For more detail: Arduino Raspberry Pi 2 LED Matrices


