
This Instructable will you show you how to interface with Atlas Scientificsensors using a Raspberry Pi.
There are 3 main ways to do this:
- By hooking a keyboard, monitor, and mouse up to the Pi and using it as a stand alone computer.
- By connecting the Pi to your local router with an ethernet cord and SSH'ing in using your laptop/desktop.
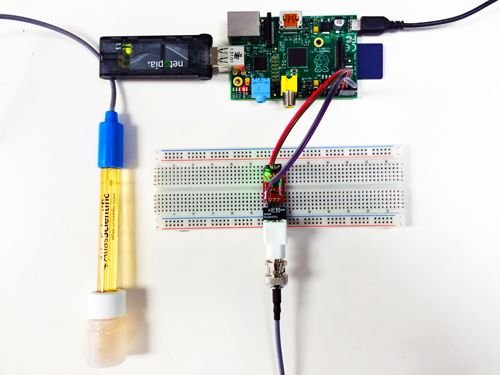
- Same as #2, but using a Wifi dongle on the Pi instead of an ethernet cord (like in the picture above).
Step 1: Hardware You'll Need
- Raspberry Pi w/power cord
- SD Card (minimum 4GB)
- 1 Atlas Scientific Kit (e.g. pH kit)
- Breadboard
- Jumpers (female-to-male)
For Method 1:
- Monitor with HDMI cable
- Keyboard
- Mouse
- Ethernet cord
For Method 2:
- Laptop
- Ethernet cord
For Method 3:
- Laptop
- Wifi Dongle
- Ethernet Cord (for initial connection to setup Wifi)
Step 2: Flash Raspbian Operating System onto your SD Card
Raspbian is our operating system of choice.
There are multiple tutorials for doing this.
Here are a few: eLinux Tutorial; Adafruit Tutorial
Step 3: Method 1
This is the method that involves connecting a monitor, keyboard, and mouse to the Pi and using it like a stand alone computer.
Here is the Quick Start Guide
It says it is optional in that guide to connect to the Internet. We recommend that you do that for this tutorial to download the Atlas Scientific sample code from Github.
Once you have logged in (username: pi; password: raspberry), and the graphical user interface has loaded on your monitor, open LXTerminal.
Skip the following 2 steps and go straight to “Download Libraries”
Step 4: Method 2 – SSH Into Pi From Laptop/Desktop
- Insert SD card into the Pi.
- Connect an Ethernet cord to the Pi and your local router
- Plug in the micro USB power adapter
- Get the IP address assigned to the Pi — there are a few ways to do this:
1) The easiest way is to use the Fing app on your smartphone while connected to your router.
2) You can login into your router to find the IP address assigned to the Pi
3) Another way is plug in a monitor, keyboard, and mouse into the Pi (like in Method1); open LXTerminal; type ifconfig; retrieve the IP address - Now from your laptop/desktop, open your Terminal program and SSH into the Pi.
The default command is usually:
ssh pi@”IP-Address”
The default password is ‘raspberry' - If you don't want to setup Wifi skip the next step to “Download Libraries”
Step 5: Method 3 – Using Wifi on the Pi
After completing Method 2:
Open this file:
sudo nano /etc/network/interfaces
Put in appropriate SSID and Password:
e.g. wpa-ssid “AtlasScientific”
e.g. wpa-psk “WeLoveSensors”
Plug in the Wifi dongle
sudo reboot
Unplug the Ethernet cord from the Pi and router
For more detail: Atlas Scientific and Raspberry Pi