
At a glance
- use a Raspberry Pi to send and receive audio streams over the network
- streaming is based on standard RTP streams
- uncompressed audio streaming over ethernet
- point-to-multipoint broadcasting
- uses PulseAudio
Note: This guide has been written in 2011. Since this time, the software used in this project has changed a lot. The guid won’t work without changes. Take it as a guideline and adapt it wherever necessary.
The following guide will show how to use the Raspberry Pi as a cheap RTP sender. It broadcasts music from the Line input of the sound card to your local network. This can be used for audio distribution in your house.
 Using uncompressed audio a stereo audio transmission uses about 180kByte/s on your LAN. That means the utilization of a 100Mbit/s LAN is less than 2%.
Note that the audio quality of the internal “sound card” of the Raspberry Pi is very unsatisfactory. You should use the HDMI audio output or an external sound card. Interested in a add-on sound board? Check out our Raspberry Pi DAC project HifiBerry Mini .
Do you want to control the volume of external sound sources with your Raspberry Pi? Check out our Quad Volume Control circuit, that is Raspberry compatible!
Schematic setup
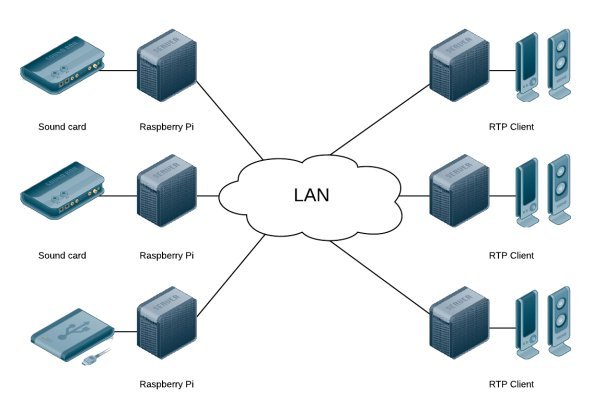
The simplest setup is a point-to-point setup with one sender (the Raspberry Pi with a sound card as line input) and a receiver on the other side (this could be another Raspberry Pi, a PC or a RTP enabled streaming client).
But there are much more interesting (and complex) setups possible. Think about different audio source that can be distributed to different receivers. Every receiver just listens to the RTP stream that it is interested in:
Audio source must not be a sound card with a line input. It could also be a media server that broadcasts music stored on an attached hard disk.
Hardware setup
Unfortunately the Raspberry Pi does not feature a analog or digital sound input. Therefore an additional sound card is needed. I use the Behringer UControl UCA 202. It is cheap, but features the Burr Brown PCM2902 audio chip which provides a good audio quality. This chip does not support sample rates larger then 48kHz. If you want to use 96kHz/24bit audio quality, you have to buy another (much more expensive) sound card.
The sound card will be plugged into one of the USB ports of the Raspberry Pi. The Behringer sound card consumes less then 0.5W power and can be powered directly from the USB port of the Raspberry Pi, no additional powered USB hub is needed. If you use the Ethernet port for connectivity the whole setup consumes less than 2.5 W (5V, 460mA measured). If additional software is running on the Raspberry Pi, the power usage may be a bit higher but it should not be more then 3W.
Software setup
- Boot archlinux
You can download Archlinux for the Raspberry from the Archlinux web site. - Change root password
Do not forget to do this, even if the Raspberry is only connected to your LAN. - Resize root filesystem
#fdisk /dev/mmcblk0
d
2
n
p
2
enter
enter
w
Now reboot. Once rebooted:
#resize2fs /dev/mmcblk0p2
- Set fix IP address
A fix IP address makes it easier to configure the clients. To do this, you have to create 2 files:
/etc/conf.d/networkinterface=eth0
address=192.168.1.5
netmask=24
broadcast=192.168.1.255
gateway=192.168.1.1
For more detail: Audio distribution with Raspberry Pi