
The post was originally posted on http://www.visuality.pl/posts
NodeJS Based Office Door Opener with using Raspberry Pi and Slack.
Sesame
At one of the hackathons we decided to automate our door opening process. It was a pain to do this manually because lots of clients and delivery guys (especially at lunch times) were visiting us. So we have decided to make a door opener that will be controlled by Slack. We settled with the idea, and we had 8 hours to do it!
TL;DR
If you're not a reading person, the project source is open, you can skim the commits(Sesame Commits) and you can clone the project into a Raspberry Pi to have a door opener for yourself. (Sesame Readme)
Time plan
First things first – we needed to make a plan, and since it was a hackathon, we had limited time.
Requirements
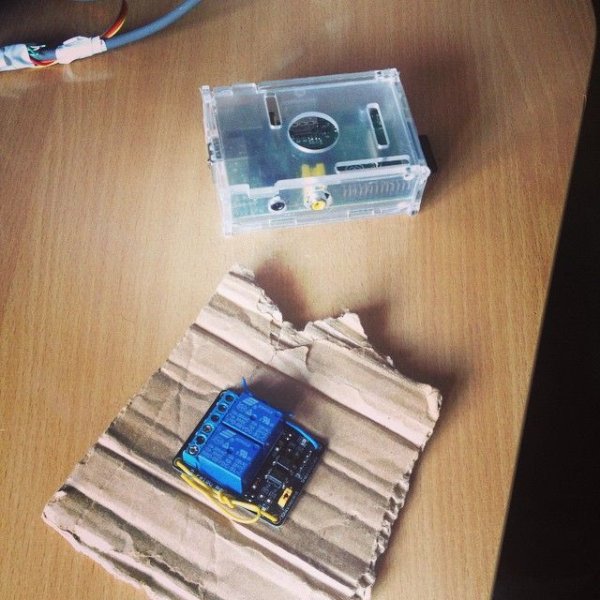
- Raspberry Pi
- Relay Circuit(you can find one at every electronic parts supplier, or order it online – as cheap as $3)
- Your door mechanism should use only a button to open (we're going to press that button programatically)
- Cables

Step 1: Installing Raspbian on Raspberry Pi
Note: I'm using OSX but you can use any operating system – just search equivalent instructions.
We have to prepare our RPi to have a running operating system. I've decided to use Raspbian. I connected a flash drive to my computer and installed Raspbian with following steps.
1. Erase all flash drive with FAT from Disk Utility. (Please do not forget to remember your partition path, for us it was disk1s2 – you do not want to erase any other partition by accident;) )
2. Download latest Raspbian image from Raspberry Pi Website. Download Raspbian
3. Obtain the img file from the downloaded file by extracting it.
4. Unmount the flash drive from Disk Utility.
5. Change pathofyour_image with the image file that you extracted, change N with disk number(N = can be obtained from disk utility verify disk button) and enter the command from terminal, it will take really long time. (for us disk1s2)
6. Remove the flash drive from the computer and plug it to Raspberry Pi. Plug an ethernet cable to Raspberry Pi and power it on.
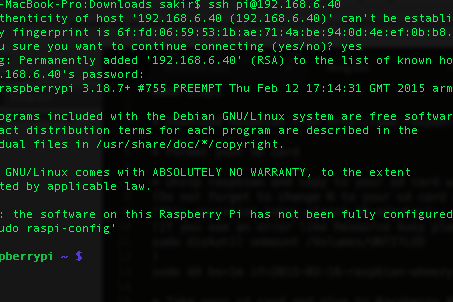
7. Make sure that Green and Yellow lights are on at RPi. Find RPi's IP address.Change 192.168.6.0 with your network IP, be sure that you and RPi are on the same subnet. This command must give an IP address – if everything is alright.
8. Connect to RPi. Change the IP address with the one you have found at the previous step.
The password is: raspberry
Congratulations, first step is done!
Step 2: Connecting relay
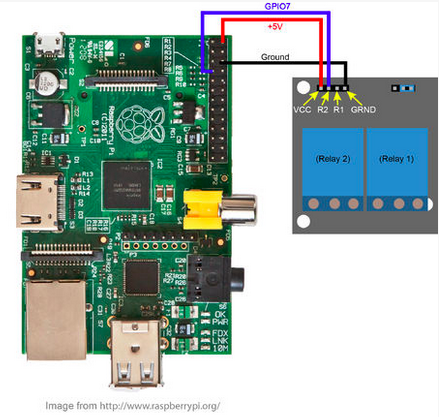
We have a simple relay circuit – relays are like switches but instead of pressing them we're sending 5Vs to complete the circuit. So 5Vs are our button presses which we are going to send through RPi.
Simple relay circuit should have 4 inputs to the circuit, Ground, 5V, Relay1, Relay2. We already have 5V output, and Ground on our RPi, so just connect them to circuit. To make relay work we have to send a signal, so we'll connect our either Relay1 or Relay2 port to one of RPi's GPIO port.
Note: You can try your relay circuit by connecting one of relay ports(R1 or R2) to 5V directly, if you hear a click – it works.
Congratulations, second step is done!
Step 3: Application
We have to send the signal programmatically and for that we preferred to use NodeJS.
Installing nodejs
Install required packages. Write the commands below on RPi SSH Session, this will take some time.
wget http://node-arm.herokuapp.com/node_latest_armhf.deb
sudo dpkg -i node_latest_armhf.deb
Now we have NodeJS installed on our RPi.
pi-gpio pi-gpio is a NodeJS library to access GPIO ports on RPi. Install it with following commands.
git clone git://github.com/quick2wire/quick2wire-gpio-admin.git<br>cd quick2wire-gpio-admin
make
sudo make install
sudo adduser $USER gpio
Great! Now we can control our GPIO ports on RPi, which means we are able to set a port to have 5V. We choose the GPIO port that we've connected our relay to – thanks to that we will be able to send the signal(because signal for relay means giving 5V to R1/R2 on relay board).
Trying relay control
Let's try to control our relay programmatically. Create a directory and inside it install pi-gpio's required packages
npm install pi-gpio
Now open node console by typing this.
node
var gpio = require("pi-gpio");
var pin = 11;
gpio.close(pin);
gpio.open(pin, "output", function(err) {     // Open pin 16 for output
    gpio.write(pin, 1, function() {});
});
gpio.write(pin, 0, function() {
  gpio.write(pin, 1, function() {});
});
You should hear a click sound coming from your relay. If you don't hear it, please check the connections, and pin configuration.
Step 4: Slack
Now it's time to invoke our openDoor function from Slack.
function openDoor(){
  console.log('open called');
  gpio.write(pin, 0, function() {});
  setTimeout(function() {
    gpio.write(pin, 1, function() {});
  }, (1 * 1000));
}
Connecting our device to Slack is very good, because it is a chat application and has user statuses. By using this we will able to track our device status – whether it is working or it has failed due to some problems. Heartbeat is really good option for IoT devices.
Let's create an application that connects to Slack. First you have to create a bot for your door opener. Then install required packages
npm install slack-client
Create a js file, and put the following code inside it. Do not forget to change the token that you've gathered from your bot. Then run “node app.js” – you should see ‘Welcome to Slack' message, and you also should see your bot on Slack
var Slack = require('slack-client');
var token = 'SLACK_TOKEN', // Add a bot at  https://my.slack.com/services/new/bot and copy the token here.
    autoReconnect = true,
    autoMark = true;
var slack = new Slack(token, autoReconnect, autoMark);
slack.on('open', function() {
  var unreads = slack.getUnreadCount();
  console.log('Welcome to Slack. You are @%s of %s', slack.self.name, slack.team.name);
});
slack.on('error', function(error) {
  console.error('Error: %s', error);
});
slack.login();
Now when open message arrives, call openDoor function.
slack.on('message', function(message) {
      var type = message.type,
      channel = slack.getChannelGroupOrDMByID(message.channel),
      user = slack.getUserByID(message.user),
      time = message.ts,
      text = message.text,
      response = '';
  if (user === undefined){
    /* skip channel messages(skip the messages which are not sent to sesame directly) */
    return true;
  }
  console.log('Received: %s %s @%s %s "%s"', type, (channel.is_channel ? '#' : '') + channel.name, user.name, time, text);
if (type === 'message') {
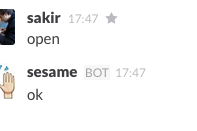
if (text === 'open'){
openDoor(doorTimeout);
response = 'ok';
channel.send(response);
console.log('@%s responded with "%s"', slack.self.name, response);
}
}
});
Step 5: Complete code
var gpio = require("pi-gpio");
var pin = 11;
var Slack = require('slack-client');
var token = 'SLACK_TOKEN', // Add a bot at https://my.slack.com/services/new/bot and copy the token here.
    autoReconnect = true,
    autoMark = true;
var slack = new Slack(token, autoReconnect, autoMark);
slack.on('open', function() {
  var unreads = slack.getUnreadCount();
  console.log('Welcome to Slack. You are @%s of %s', slack.self.name, slack.team.name);
});
/* gpio */
gpio.close(pin);                     // Close pin 16
gpio.open(pin, "output", function(err) {
 // Open pin 16 for output
    gpio.write(pin, 1, function() {});
});
/* Slack */
slack.on('message', function(message) {
  var type = message.type,
      channel = slack.getChannelGroupOrDMByID(message.channel),
      user = slack.getUserByID(message.use
r),
      time = message.ts,
      text = message.text,
      response = '';
  if (user === undefined){
    /* skip channel messages(skip the messages which are not sent to sesame directly) */
    return true;
  }
  console.log('Received: %s %s @%s %s "%s"', type, (channel.is_channel ? '#' : '') + channel.name, user.name, time, text);
if (type === 'message') {
    if (text === 'open'){
      openDoor(doorTimeout);
      response = 'ok';
      channel.send(response);
      console.log('@%s responded with "%s"', slack.self.name, response);
    }
  }
});
slack.on('error', function(error) {
  console.error('Error: %s', error);
});
slack.login();
/* /slack */
function openDoor(){
  console.log('open called');
  gpio.write(pin, 0, function() {});
  setTimeout(function() {
    gpio.write(pin, 1, function() {});
  }, (1 * 1000));
}
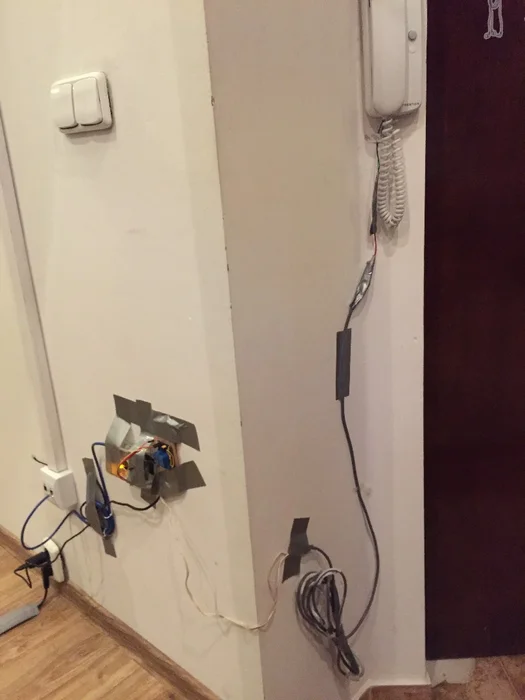
Step 6: Last step: Wiring

It's time to connect our Sesame to the intercom. Ours was Prestige V 456.
So when you pressed this grey button, it was simply connecting two cables inside, just like we were going to do with our Relay. Only thing we needed to know was which cables should be connected. We searched Google for intercom circuit and found the scheme.
Now just wire the pins and see if the door is opening.
Now we have two disconnected cables. Let's wire them to our relay. Each relay has 3 inputs, NC(Normally close), NO(Normally open), C(Common).
Wire the cables to NC and C.
That's it! You're done! Try to send the open command from Slack again!
Step 7: Making It More Stable: After Restart
After each restart of RPi, we have to run our node server again and again. To automate it we added a service, and that service runs our app with forever.
Install Forever
sudo npm -g install forever
Create a file “sesame” and put the following service code inside.
### BEGIN INIT INFO<br># Provides:             sesame
# Required-Start:
# Required-Stop:
# Default-Start:        2 3 4 5
# Default-Stop:         0 1 6
# Short-Description:    Sesame
### END INIT INFO
case "$1" in
  start)
    su pi -c 'forever start -p /home/pi/.forever /home/pi/sesame/app.js'
    ;;
  stop)
    su pi -c 'forever stopall'
    ;;
  *)
  echo "Usage: /etc/init.d/sesame {start|stop}"
  exit 1
  ;;
esac
exit 0
Then add it to boot.
sudo cp sesame /etc/init.d
sudo chmod 755 /etc/init.d/sesame
sudo update-rc.d sesame defaults
Step 8: Mobile

You can either use Slack app on your mobile device to send open message, which is easy, or you can build an api that will send open message to sesame through Slack. When link is clicked, api bot(you need generate another bot on Slack) will send open command.
If you're choosing the second option, it's better to use https connection and a token for your link(https://YOUR-API.herokuapp.com/open/TOKEN). After you've done it you can add the link as bookmark, or if you're iOS user you can use iControl Web to make an application for your door opener. All you have to do is to prepare a json file which has the buttons and links attached to them and send the file via iTunes file sharing. Sample gui.json
{
 "pages": [
    {
      "pageLabel": "Door",
      "controls": [
        {
          "_comment": "Open door",
          "button1": "Open door",
          "cmd1": "https://YOUR-API.herokuapp.com/open/TOKEN",
          "headline1": "headlineLarge",
          "sizeType": "large"
        }
      ]
    }
  ]
}
BONUS: If you've decided to create API
You can hook a keyboard shortcut open_door.rb
Step 9: We're Done!
It works! Now we're using Sesame to open our door for clients, delivery people and also for us when coming to office.
At the same hackathon we've also build neko which based on Github Hubot. For security reasons we don't accept any message to Sesame from anyone but neko bot. So when we want to open the door we're sending the message to neko, and neko sends the message to Sesame. Due to this Sesame's code is simple, secure and reliable.