
Use a TensorFlow SSD MobileNetV2 DNN on the Raspberry Pi plus Pi Camera to build an autonomous car capable of object detection.
Story
This project will show how to transform a (Raspberry Pi + Pi Camera ) powered RC car into one capable of object detection and autonomous driving. To do this we will deploy two deep neural networks. One for object detection and the other for autonomous driving using inference for steering and throttle. An RPi 3 serves as the vehicle computer. Due to limited resources on the RPi only one of the networks can run at a time.
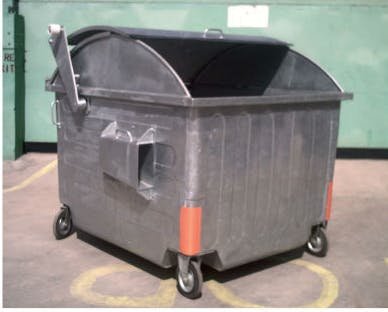
The idea is to train the neural network to identify garbage bins so that the car can pick em up autonomously.

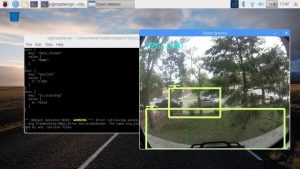
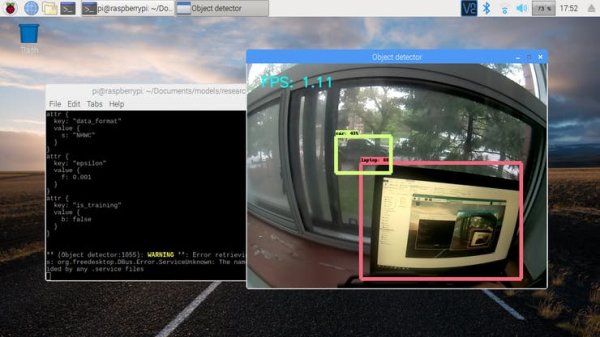
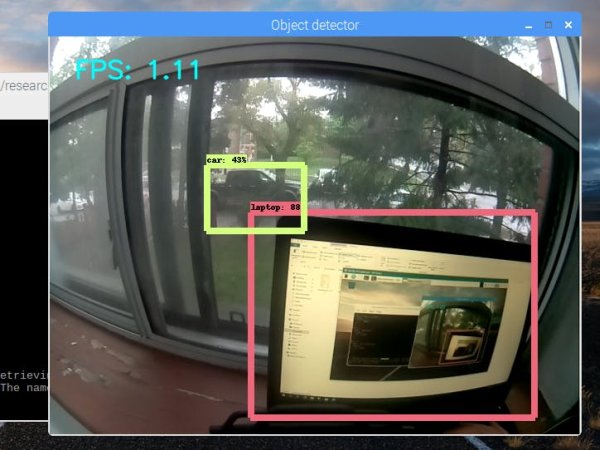
identifying car and laptop
The project consists of two parts. In the first part the plan is to to use a moderate size convolutional network to recognize objects in the input video feed from the Pi Camera. TensorFlow will be used to deploy the CNN model and OpenCV will be used for managing the video feed from the Pi Camera.
In the second part we are going to use behavioral cloning to get the car to navigate autonomously. The modified car will also be augmented with additional sensors such as ultrasonic distance sensor, GPS and 6-DOF IMU as well as implement additional telemetry features.
Introduction
Back in 2017 (a year ago), Google released MobileNet, and earlier this year MobileNetV2. These networks are custom optimized for working on embedded devices like smartphones. Coincidentally the MPU used on RPi 3 falls in this category since it can run either Linux or Android.
The first problem one encounters is the limited RAM and computational capacity of Raspberry Pi 3. Even though this is a quad core MPU it is still not enough when dealing with massive weight files needed by YOLO (You Only Look Once) type networks.
The first solution that comes to mind is to send the image acquired via the Pi Camera via WIFI to an external PC and do the object inference stage there and then send commands to the Donkey Car. In essence we have to contact the mother-ship on every step.This is inefficient not to mention impractical in scenarios when communication with an external laptop is not possible.
I initially tested a VGG16 network which was relatively accurate when detecting garbage bins. However it could not run on the RPi since the weights alone were around 350MB!To test the VGG network refer to the attached code at the end with similar images as input.
Issue:
python KerasVGG_test.py

So to solve the problem of huge weights sizes we are going to run all models on the RPi using slimmer networks. Specifically we are going to use the a MobileNetV2 Single Shot Detector based CNN. This is a DNN which has been optimized to have very small (relatively) weights.
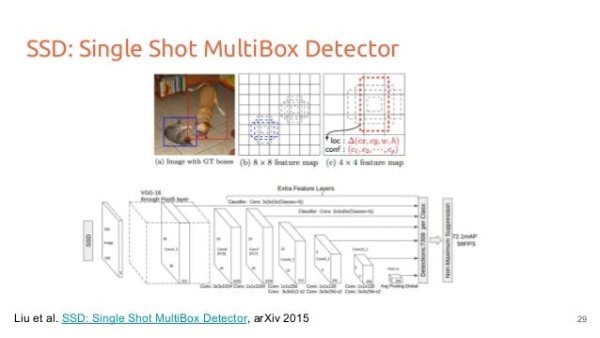
The technique is called transfer learning since we are using a pre-trained network weights.
Before we delve into the software we have to make some hardware modifications.
Hardware
A Magnet car was used for the Donkey Car project. Magnet is an RC (remote controlled) car that operates using a 2.4GHz multi-channel radio. To transform the Magnet into a Donkey car there are a couple of steps that have to be undertaken.
1. Dis-assembly
First remove the top-cover by removing the clips and two screws on the back. You will find a cage with two drivers. Remove this too and then remove the outer top cage.Now you have access to the circuits on the car. From the top once can see the receiver, the ESC (Electronic Speed Controller) and the servo.
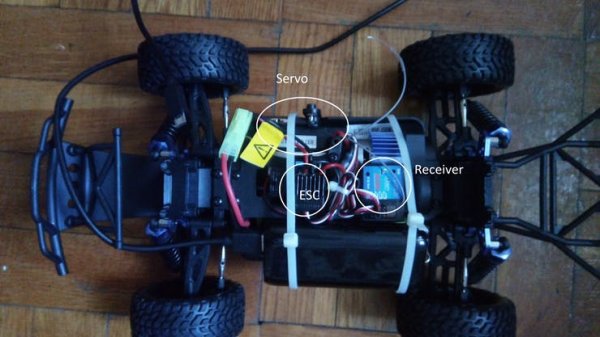
The receiver is a 4 channel receiver with a B/C (battery elimination) circuit. Each channel uses a 3 wire connector. Channels CH3 and CH4 are not used. The ESC takes the battery as input, power switch and the input from the receiver channel 1. The servo is connected to channel 0 of the receiver. The servo is used for steering. The steering angle can be trimmed manually if driving via a joystick or it has to be calibrated.
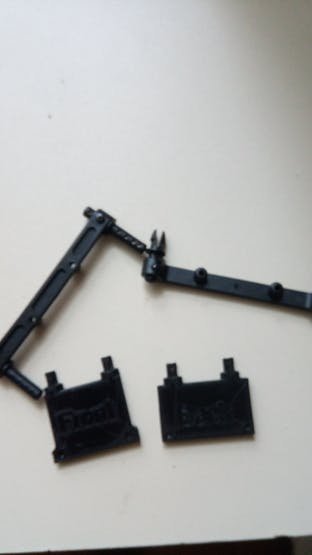
2. Mount the adapters
Two 3D printed plastic adapter are used, after removing the two screws and the body top. You have to screw the two adapters in place of the existing clips by using the same screws.After replacing the two clips with the two 3D printed adapters now we can mount the top wooden Donkey car plate.
Next screw down the camera handle on the base board plate. Then place the plastic threaded parts on each hole. These are used for securing the Raspberry Pi and the servo controller in place.
3. Servo controller and RPi
Mount the RPi and the servo controller on the wooden plate. I ended up using zip-ties for securing the RPi since I did not want to put a metallic screw near the antenna. After screwing down the servo controller connect the I2C bus pins from the RPi to the servo controller. Next, take a small knife and cut the zip-ties that holds together the ESC and servo 3 pin wires.
When connecting to the external servo controller both of the connections to the receiver has to be disconnected from it and connected to channels 0 and 1 of the servo controller which we will later mount on on the DonkeyCar top-plate.
4. Wooden plate
Mount the wooden plate on the adapters.Now use the clips to attach the DonkeyCar plate to the Magnet Chassis adapters.
Mount the Donkey car plate on top and use a short USB cable to connect the USB battery to the RPi. The throttle and steering cables will protrude from the opening in the plate and connect to channel 0 and 1 of the servo controller mounted on the Donkey car plate.
5. Additional sensors
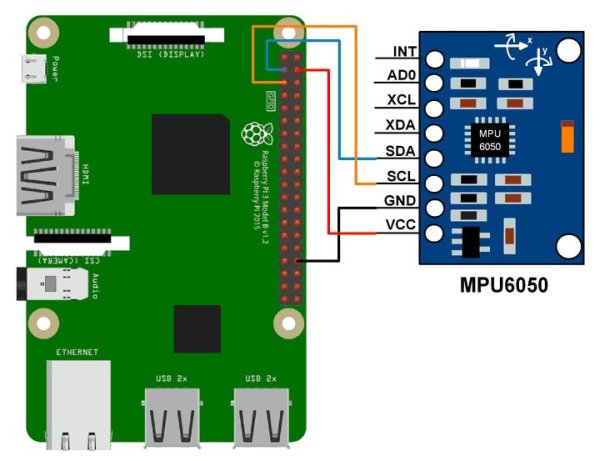
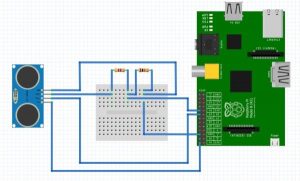
The main issue with the standard configuration is that there is no sensor used to measure speed or distance to obstacles. I added an 6DOF MPU6050 IMU which allows the RPi to measure 3D acceleration and turns, Next I added a GPS to the serial port and also an HCSR04 sensor for distance measurement. The HCSR04 however works via 5V and needs a level shifter.
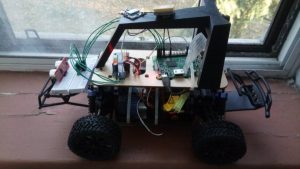
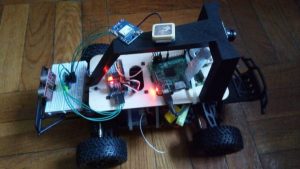
This completes the hardware stage of the unit. The Donkey Car has been fully converted into a 4 wheel vehicle equipped with :
a) Monocular wide angle Camera
b) Servo controller.
c) 6-DOF IMU sensor
d) GPS
e) Distance sensor
All the additional sensors will be time-stamped upon acquisition and used to augment the training vectors for the deep neural network.
To support the extra sensor one has to modify the manage.py script to add this functionality.
To use the IMU, I initially tried a Python Library for FXOS8700 on Debian Stretch. This did not work out of the box due to the repeated start bug of the RPi, so I ended up using an MPU6050 which also comes with a gyroscope.
To test the IMU code use the following snippet below:
from IMU import MPU6050
mu = MPU6050()
a = imu.run()
a #print answer
The following software needs to be from within the virtualenv for the MPU6050:
sudo apt install python3-smbus
pip install mpu6050-raspberrypi
The meta.json file under the tub folder has to be augmented to support logging IMU data.
{“inputs”: [“cam/image_array”, “user/angle”, “user/throttle”, “user/mode”, “imu/acl_x”, “imu/acl_y”, “imu/acl_z”,“imu/gyr_x”, “imu/gyr_y”, “imu/gyr_z”], “types”: [“image_array”, “float”, “float”, “str”, “float”, “float”, “float”,“float”, “float”, “float”]}
The manage.py file also has to be modified as below:
imu = Mpu6050()
V.add(imu, outputs=[‘imu/acl_x', ‘imu/acl_y', ‘imu/acl_z', ‘imu/gyr_x', ‘imu/gyr_y', ‘imu/gyr_z'], threaded=True)
# add tub to save data
inputs = [‘cam/image_array', ‘user/angle', ‘user/throttle', ‘user/mode', ‘imu/acl_x', ‘imu/acl_y', ‘imu/acl_z',‘imu/gyr_x', ‘imu/gyr_y', ‘imu/gyr_z']
types = [‘image_array', ‘float', ‘float', ‘str', ‘float', ‘float', ‘float',‘float', ‘float', ‘float']
Finally I also added a GPS module to the unit. While this cannot be used indoor, it is useful to add for outdoor tests in areas where you can connect to a WIFI network.
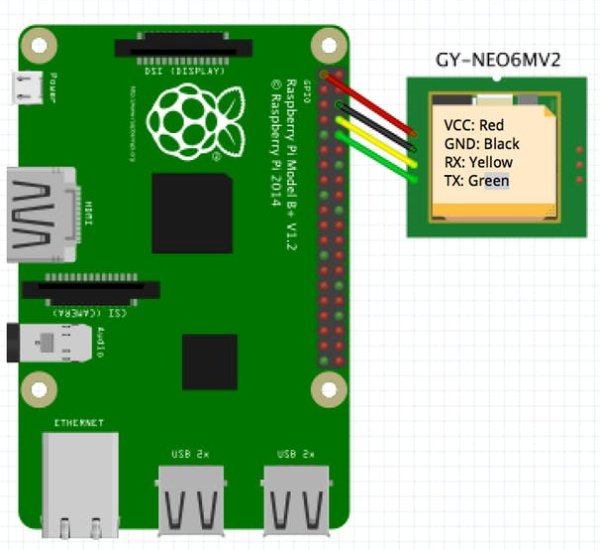
If one needs to log in GPS data the same modification as with the IMU have to be implemented.
To use the HSCR04 distance sensor once has to install the RPI.GPIO library from the python environment.
pi p install RPi.GPIO

This sums up all the hardware modifications. In the end you are going to end up with a DonkeyCar that looks like this:
Software
The idea here is to implement an AI pipeline for object detection running on the RPi. The first step will be to deploy an object detection DNN that will work on the RPi 3 without dependence on external devices. Let's get started by installing the software needed.
1. Install DNN libs
The project uses TensorFlow and OpenCV. In simple terms in order to do inference on the Raspberry Pi we use an already trained network. After the weights are loaded object detection and inference is done for each camera frame.
pip install tensorflow[pi]
pip install matplotlib raspberry
sudo apt-get install libjpeg-dev libtiff5-dev libjasper-dev libpng12-dev
sudo apt-get install libavcodec-dev libavformat-dev libswscale-dev libv4l-dev
sudo apt-get install libxvidcore-dev libx264-devsudo apt-get install qt4-dev-tools
pip3 install opencv-python
One thing that needs to be pointed out is that TensorFlow uses a different file format unlike Keras which has a relatively simple workflow for loading weights as h5 files.
sudo pip3 install keras –upgrade
Clone the official TensorFlow model repository.
git clone –recurse-submodules https://github.com/tensorflow/models.git
and export the path:
export PYTHONPATH=$PYTHONPATH:/home/pi/tensorflow1/models/research:/home/pi/tensorflow1/models/research/slim
Finally when everything is installed and before you restart issue
deactivate #to get out of the virtual env workspace if you are using one
sudo shutdown -h now
Next step is to install the Protobuffer compiler for the weights of the MobileNetV2 SSD.
2. Install ProtoBuffer compiler
Keras uses a different file format from TensorFlow. So we have to deal with Protobuffers which is the native format for TensorFlow.
I installed version 3.5.1
sudo apt-get install autoconf automake libtool curl
wget https://github.com/google/protobuf/releases/download/v3.5.1/protobuf-all–3.5.1.tar.gz
tar -zxvf protobuf-all–3.5.1.tar.gzcd protobuf-3.5.1
./configure
Compiling this will take quite a bit of time (~1.5 hr) on the RPi. The other solution is to cross-compile but we”ll have to keep it simple for now. Issue:
make
Then issue:
make check
sudo make install
cd pythonexport
LD_LIBRARY_PATH=../src/.libs
Finally install the compiler:
python3 setup.py build –cpp_implementation python3 setup.py test –cpp_implementationsudo python3 setup.py install –cpp_implementation
Now export the path :
export PROTOCOL_BUFFERS_PYTHON_IMPLEMENTATION=cpp
export PROTOCOL_BUFFERS_PYTHON_IMPLEMENTATION_VERSION=3
sudo ldconfig
Finally to test the compiler just type:
protoc
Now we are read to rumble. This will allow us to convert the weight into a format that TensorFlow understands.
Read More Detail:Autonomous Driving AI for Donkey Car Garbage Collector