
Adding a much cheaper alternative to the Carter and Kaya designs reference using a Lego EV3 set.
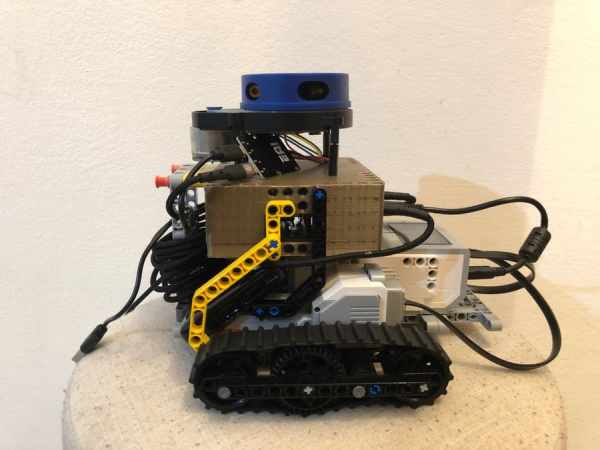
In this project, I will document the construction of a tracked vehicle made with Lego Technic parts and motors, enhanced with LiDAR and controlled by a Jetson Nano board running the latest Isaac SDK. Jump to Part 8 or 10 for a full demo of the autonomous navigation.
The project consists of the fallowing components:
- A NVIDIA Jetson Nano dev board – runs the Isaac Robot Engine
- An EV3 brick – controls the motors (provided in the EV3 31313 Robot Kit)
- Tracked base – made using Lego Technic parts and two large motors (everything necessary is provided in the EV3 31313 Robot Kit)
- YDLIDAR x4 LiDAR
- Pixy2 Camera for vision
Why Isaac SDK and not ROS?
- There are so many tutorials for ROS (Robot Operating System) but almost none for Isaac (besides the ones from the SDK itself)
- Seems to be a better choice for Jetson Nano (was created for this family of hardware)
- Advanced robotics algorithms from planning to perception, most of them GPU-accelerated. This is an important part. Without GPU acceleration Jetson Nano is not different in any way from a Raspberry Pi 4 board
- IsaacSim Unity3D is more photorealistic than Gazebo which will improve the results moving from simulation to reality
Why Lego parts?
- I have lots of them 🙂
- The parts are high quality (good servos)
- I don't have a 3D printer (asked a friend to print a Jetson Nano case compatible with Lego but that's the only part 3D printed)
- No soldering required
Choosing this path does raise some challenges:
- Lego hardware is not supported by Isaac SDK. Only two reference robots exist: Carter and Kaya. Not even the JetBot is supported.
- Isaac SDK can work with only a limited number of hardware components
- Compiling for 3 targets (x86-64, arm64 and armv5tejl)
- Not everything is open-source
PART 1: Getting started
1. Isaac SDK
- Go through the steps described here
- Try to run some of the examples provided in Isaac SDK to check if everything works
- Make sure you use the 2019.3 SDK version!!!
2. Voice recognition (optional)
- Install CUDA 10.0, CUDNN 7.6.3, and TensorRT 6.0
- Install TensorFlow 1.15.0 (hardware accelerated)
3. Ev3dev image
Download and flash the latest image for EV3 (ev3dev-stretch) on a microSD or microSDHC card. MicroSDXC format is not supported by the EV3 brick.
4. ARM cross compiler for ev3dev
$ sudo apt-get install gcc-arm-linux-gnueabi g++-arm-linux-gnueabiThis part was especially hard to setup correctly. Ubuntu 18.04 (host computer and Jetson Nano) is using GLIBC_2.28 while ev3dev is using Debian stretch and GLIBC_2.24. Anything compiled with the default arm-linux-gnueabi-g++ compiler configuration was dependant on GLIBC_2.28 and won't run on EV3. Statically linking didn't work as anything more complex than a hello world was causing segfaults. The solution I found was to dynamically link everything except the math library. You can find more info in the jetson-ev3/toolchain/CROSSTOOL file. Another solution is to use a docker image of Debian 9.
5. Jetson + EV3 workspace
$ git clone https://github.com/andrei-ace/jetson-ev3.git- Edit jetson-ev3/WORKSPACE and set the path to Isaac SDK.
local_repository(
    name = "com_nvidia_isaac",
    path = "/home/andrei/ml/isaac"
)- Edit jetson-ev3/toolchain/CROSSTOOL and set the path to the directory where this file is.
# edit with your path to the toolchain
linker_flag: "-L/home/andrei/ml/jetson-ev3/toolchain"
6. Connect Jetson Nano with EV3
In the next part I will post lots of Linux commands. Because there are three systems involved I will post them exactly as they would look in my terminal, meaning:
andrei@andrei-linux:~/ml/jetson-ev3$ #this is run on my PC
andrei@andrei-jetson:~$ #this is on Jetson Nano
robot@ev3dev:~$ $ #this in on EV3
The IPs of my Jetson Nano are 192.168.0.173 (Ethernet) and 192.168.0.218 (WiFi), so whenever you see a command using those values replace them with yours.
I used a USB A to mini cable to connect the Jetson board with the EV3 brick using these steps.
Try to ssh from the Jetson board:
andrei@andrei-jetson:~$ ssh [email protected]The default password is maker.
7. The ping-pong tutorial
Isaac has a tutorial explaining a very simple Codelet. I suggest doing this tutorial first. It will introduce you to the concepts needed to build any app running on Isaac.
Now go to the jetson-ev3/apps/ev3/ping_pong/ directory. This is a modified version of the previous tutorial, with a twist, we'll send the ping to the EV3 brick.
Most of the files are familiar from the previous tutorial. We will use Cap'n Proto RPC for calls between Jetson and EV3. Cap'n Proto is used heavily for communication between various Isaac components so it makes sense to use it here. For this we need some new files:
- jetson-ev3/apps/ev3/ping_pong/ping.capnp – this defines an interface between a client, which will run on the Isaac Robot Engine, and a server, which will run on EV3.
- jetson-ev3/apps/ev3/ping_pong/PongEv3Server.cpp this is the server which runs on the EV3 brick
- jetson-ev3/apps/ev3/ping_pong/Pong.cpp this was changed to call the Pong server running on EV3
Compile the the ev3_pong server:
andrei@andrei-linux:~/ml/jetson-ev3$ bazel build --config=ev3dev //apps/ev3/ping_pong:ev3_pongCopy it to EV3 using scp first to Jetson and then to EV3.
Build and deploy the ping-pong example to Jetson:
andrei@andrei-linux:~/ml/jetson-ev3$ <YOUR-ISAAC-INSTALL>/engine/build/deploy.sh --remote_user <YOUR-USER-JETSON> -p //apps/ev3/ping_pong:ping_pong-pkg -d jetpack43 -h <YOUR-JETSON-IP>More informations about how to deploy and run your apps on Jetson here.
Run both apps:
robot@ev3dev:~$ ./ev3_pong ev3dev.local:9999
andrei@andrei-jetson:~/deploy/andrei/ping_pong-pkg$ ./apps/ev3/ping_pong
If everything worked you should hear the messages sent by the Ping component into EV3's speaker.
8.Controlling a motor from Isaac
Same principles, just a bit more complex. I used another of the Isaac's tutorials to interact with an EV3 motor:
The tutorial uses a Segway RMP base. As I don't have one lying around or 10000$ to buy one, I created a driver which will control the EV3 motors instead. The code is here.
The server that runs on EV3 is here and can be build and run with the following command:
andrei@andrei-linux:~/ml/jetson-ev3$ bazel build --config=ev3dev //packages/ev3/ev3dev:ev3_control_server
robot@ev3dev:~$ ./ev3_control_server ev3dev.local:9000
I used the virtual joystick from Sight as explained here.
9.DifferentialBase for EV3
Ev3ControlServer server will respond to 2 calls:
- command(cmd :Control) – takes linear and angular speeds as parameters and controls both motors to achieve the requested speeds
- state() -> (state :Dynamics); – returns the real linear and angular speeds of the robot
The kinematics are explained in more detail here and here.
I used the proportional_control_cpp sample app to drive the robot 1 m and report the EV3's Odometry (linear and angular speeds) data in rotary pulses (tacho counts) per second. Using the computed travel distance (by Isaac) and measuring the real distance I came up with a constant to adjust the values reported so they match the real results. This worked well and the results were reproducible many times and not only in straight lines. You can also compute this values by using the radius of the wheel (or track in our case).
Part 2: Building the robot
The base is very similar to Lego's EV3 Track3r, one of the official models for the EV3 kit: https://www.lego.com/biassets/bi/6124045.pdf
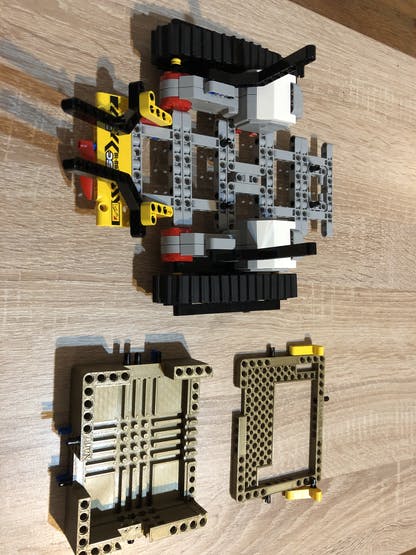
The case for Jetson Nano is from here: https://github.com/3D-printable-lego-technic/PELA-blocks
Part 3: Isaac Apps
An Isaac App is made out of three major parts:
- graph – nodes: This part defines all the components that make the app. A node can also be another graph defined in another file. The “voice_detection” node from the example is a subgraph.
- graph – edges: This part defines the flow of messages between nodes. An edge has a source and a target. For example the detected command from the “voice_detection” node (subgraph) will be sent to component which generates goals.
- configuration – this part configures the nodes of the graph
Example app:
{
  "name": "voice_control",
  "modules": [
    "//apps/ev3/voice_control:voice_control_goal_generator",
    "@com_nvidia_isaac//packages/navigation",
    "@com_nvidia_isaac//packages/planner"
  ],
  "config_files": [
    "apps/ev3/voice_control/model/isaac_vcd_model.metadata.json"
  ],
  "config": {
    "2d_ev3.ev3_hardware.ev3": {
      "isaac.Ev3Driver": {
        "address": "ev3dev.local",
        "port": 9000
      }
    },
    "navigation.imu_odometry.odometry": {
      "DifferentialBaseWheelImuOdometry": {
        "use_imu": false
      }
    },
    "commander.robot_remote": {
      "isaac.navigation.RobotRemoteControl": {
        "angular_speed_max": 0.6,
        "linear_speed_max": 0.3
      }
    },
    "websight": {
      "WebsightServer": {
        "webroot": "external/com_nvidia_isaac/packages/sight/webroot",
        "ui_config": {
          "windows": {
            "Voice Command Detection": {
              "renderer": "plot",
              "dims": {
                "width": 400,
                "height": 200
              },
              "channels": [
                {
                  "name": "voice_control/voice_detection.voice_command_detector/isaac.audio.VoiceCommandConstruction/voice_command_id",
                  "active": true
                }
              ]
            }
          }
        }
      }
    },
    "navigation.shared_robot_model": {
      "SphericalRobotShapeComponent": {
        "circles": [
          { "center": [0.0, 0.0], "radius": 0.075 },
          { "center": [0.02, 0.03464], "radius": 0.055 },
          { "center": [0.02, -0.03464], "radius": 0.055 },
          { "center": [-0.04, 0.0], "radius": 0.055 },
          { "center": [0.0525, 0.09093], "radius": 0.035 },
          { "center": [0.0525, -0.09093], "radius": 0.035 },
          { "center": [-0.105, 0.0], "radius": 0.035 }
        ]
      }
    },
    "navigation.control.lqr": {
      "isaac.planner.DifferentialBaseLqrPlanner": {
        "manual_mode_channel": "commander.robot_remote/isaac.navigation.RobotRemoteControl/manual_mode"
      }
    },
    "navigation.control.control": {
      "isaac.planner.DifferentialBaseControl": {
        "manual_mode_channel": "commander.robot_remote/isaac.navigation.RobotRemoteControl/manual_mode"
      }
    }
  },
  "graph": {
    "nodes": [
      {
        "name": "voice_control_components",
        "components": [
          {
            "name": "message_ledger",
            "type": "isaac::alice::MessageLedger"
          },
          {
            "name": "goal_generator",
            "type": "isaac::VoiceControlGoalGenerator"
          }
        ]
      },
      {
        "name": "voice_detection",
        "subgraph": "apps/ev3/voice_control/voice_command_detection.subgraph.json"
      },
      {
        "name": "2d_ev3",
        "subgraph": "apps/ev3/2d_ev3.subgraph.json"
      },

      {
        "name": "navigation",
        "subgraph": "@com_nvidia_isaac//packages/navigation/apps/differential_base_navigation.subgraph.json"
      },
      {
        "name": "commander",
        "subgraph": "@com_nvidia_isaac//packages/navigation/apps/differential_base_commander.subgraph.json"
      }
    ],
    "edges": [
      {
        "source": "voice_detection.subgraph/interface/detected_command",
        "target": "voice_control_components/goal_generator/detected_command"
      },
      {
        "source": "voice_control_components/goal_generator/goal",
        "target": "navigation.subgraph/interface/goal"
      },
      {
        "source": "2d_ev3.subgraph/interface/base_state",
        "target": "navigation.subgraph/interface/state"
      },
      {
        "source": "navigation.subgraph/interface/command",
        "target": "commander.subgraph/interface/control"
      },
      {
        "source": "commander.subgraph/interface/command",
        "target": "2d_ev3.subgraph/interface/base_command"
      },
      {
        "source": "2d_ev3.subgraph/interface/flatscan",
        "target": "navigation.subgraph/interface/flatscan_for_localization"
      },
      {
        "source": "2d_ev3.subgraph/interface/flatscan",
        "target": "navigation.subgraph/interface/flatscan_for_obstacles"
      }
    ]
  }
}
Example subgraph:
{
  "modules": [
    "@com_nvidia_isaac//packages/audio",
    "@com_nvidia_isaac//packages/ml:tensorflow"
  ],
  "graph": {
    "nodes": [
      {
        "name": "subgraph",
        "components": [
          {
            "name": "message_ledger",
            "type": "isaac::alice::MessageLedger"
          },
          {
            "name": "interface",
            "type": "isaac::alice::Subgraph"
          }
        ]
      },
      {
        "name": "audio_capture",
        "components": [
          {
            "name": "ml",
            "type": "isaac::alice::MessageLedger"
          },
          {
            "name": "isaac.audio.AudioCapture",
            "type": "isaac::audio::AudioCapture"
          }
        ]
      },
      {
        "name": "voice_command_detector",
        "components": [
          {
            "name": "ml",
            "type": "isaac::alice::MessageLedger"
          },
          {
            "name": "isaac.audio.VoiceCommandFeatureExtraction",
            "type": "isaac::audio::VoiceCommandFeatureExtraction"
          },
          {
            "name": "isaac.ml.TensorflowInference",
            "type": "isaac::ml::TensorflowInference"
          },
          {
            "name": "isaac.audio.VoiceCommandConstruction",
            "type": "isaac::audio::VoiceCommandConstruction"
          }
        ]
      }
    ],
    "edges": [
      {
        "source": "audio_capture/isaac.audio.AudioCapture/audio_capture",
        "target": "voice_command_detector/isaac.audio.VoiceCommandFeatureExtraction/audio_packets"
      },
      {
        "source": "voice_command_detector/isaac.audio.VoiceCommandFeatureExtraction/feature_tensors",
        "target": "voice_command_detector/isaac.ml.TensorflowInference/input_tensors"
      },
      {
        "source": "voice_command_detector/isaac.ml.TensorflowInference/output_tensors",
        "target": "voice_command_detector/isaac.audio.VoiceCommandConstruction/keyword_probabilities"
      },
      {
        "source": "voice_command_detector/isaac.audio.VoiceCommandConstruction/detected_command",
        "target": "subgraph/interface/detected_command"
      }
    ]
  },
  "config": {
    "audio_capture": {
      "isaac.audio.AudioCapture": {
        "sample_rate": 16000,
        "num_channels": 1,
        "audio_frame_in_milliseconds": 100,
        "ticks_per_frame": 5
      }
    },
    "voice_command_detector": {
      "isaac.audio.VoiceCommandFeatureExtraction": {
        "audio_channel_index": 0,
        "minimum_time_between_inferences": 0.1
      },
      "isaac.ml.TensorflowInference": {
        "model_file_path": "apps/ev3/voice_control/model/isaac_vcd_model.pb",
        "config_file_path": "apps/ev3/voice_control/model/isaac_vcd_config.pb"
      },
      "isaac.audio.VoiceCommandConstruction": {
        "command_list": [
          "jetson",
          "jetson left",
          "jetson right"
        ],
        "command_ids": [0, 1, 2],
        "max_frames_allowed_after_keyword_detected": 14
      }
    }
  }
}
A subgraph can be reused in many apps. In fact the isaac's navigation stack is used as a subgraph.
Part 4: Running Isaac Apps on EV3
The driver (jetson-ev3/packages/ev3/BUILD) responds to the same commands as the Segway RMP base driver. That means it will work with many apps that work on Kaya or Carter, making it a third option and much cheaper!
I adapted some the apps created to showcase the Carter and Kaya bots:
- joystick app – this controls a DifferentialBase robot with a joystick. It has a LiDAR for generating local maps
- gmapping distributed: ev3 and host from the Kaya robot – this allows to create a GMap using the EV3 robot and YDLIDAR X4.
- full navigation – I added subgraphs for hardware and 2D navigation for the EV3 robot so they can be used by other apps as easy as using either Carter or Kaya.
Part 5: Odometry
For running in autonomous mode is important to have good odometry. This is used to estimate the robot's position over time. Let's adjust it using the ev3 app:
andrei@andrei-linux:~/ml/jetson-ev3$ ./engine/build/deploy.sh --remote_user andrei -p //apps/ev3:ev3-pkg -d jetpack43 -h 192.168.0.173

robot@ev3dev:~$ brickrun ./ev3_control_server ev3dev.local:9000

andrei@andrei-jetson:~/deploy/andrei/ev3-pkg$ ./apps/ev3/ev3 --graph ./apps/assets/maps/map.graph.json --config ./apps/assets/maps/map.config.json
We need to estimate two things:
- linear speed
- angular speed
The formulas for linear and angular speeds are:
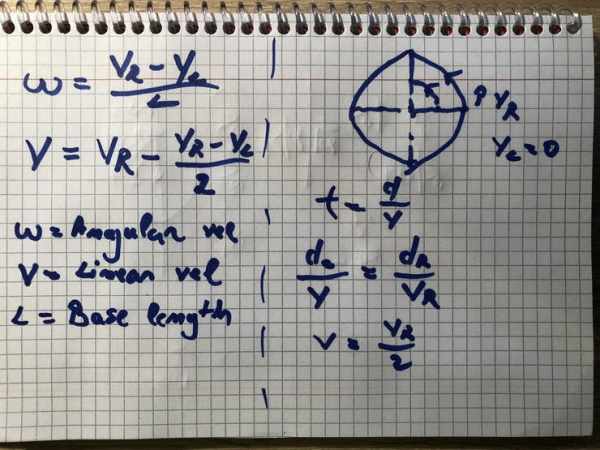
Finding the angular speed is easy: is the difference of the right and left motors divided by the base length.
Finding the linear speed is a bit more complex. We have 3 cases:
- when both motor speeds are equal – the linear speed is equal with the right speed (and left speed)
- when the left motor speed is opposite to the right motor speed, the linear velocity is 0, the tank will spin in place
- when the left motor speed is 0 (the case described on the right). The linear speed is half of the right speed (the robot's centre travels on a smaller arc).
Angular speed experiment:
We will use the manual control to rotate the robot 360 degrees in place. This is done by moving the left and right motors at opposite speeds. Knowing the speeds of both motors we can compute the angular speed.
Let's try it:
Angular and linear speeds experiment:
I will drive the tank around, and at the end try to get it back on the starting location. The odometry data should be as close as possible to 0 at the end if we are computing the speeds correctly.
Part 6: Getting everything together
Ok, so we got so far just to have an expensive RC tank? No, we can use all the different parts from Isaac now. Issuing voice commands for example and get the robot to move autonomously. Check the voice_control for an example of this.
It uses the audio and machine learning gems from Isaac. What is a gem? As stated in the manual: “GEMs: A collection of robotics algorithms from planning to perception, most of them GPU-accelerated.”
I trained my own RNN following the steps explained in this tutorial. Just make sure you have a lot of data, especially for the unknownkeywords/silence/random noise case.
I trained mine to recognise 3 words: “jetson”, “left” and “right”. You can find the saved model here. With these 3 words we can compose 2 commands: “jetson left” and “jetson right”.
The detection part is described here, in it's own subgraph, ready to be used and reused.
Basically what it does is to listen to the microphone and if one of the commands is picked up it will output a voice_command_id. It uses the previously trained RNN for that.
We can take that detected_command and pass it to our own Codelet:
{
"source": "voice_detection.subgraph/interface/detected_command",
"target": "voice_control_components/goal_generator/detected_command"
}
from the Codelet we can generate a Goal and publish it:
auto proto = rx_detected_command().getProto();
int id = proto.getCommandId();
auto goal_proto = tx_goal().initProto();
goal_proto.setStopRobot(true);
goal_proto.setTolerance(0.1);
goal_proto.setGoalFrame("robot");
ToProto(Pose2d::Rotation(90), goal_proto.initGoal());
tx_goal().publish();
This sets a goal to rotate the robot to the left with 90 degrees. We can set different goals in different frames. It could have been to go to a coordinate in the “world” frame, like the coordinates of the kitchen. It could have been setting a Pose2::Translate(1.0, 0) in robot's frame to advance the robot with 1 meter.
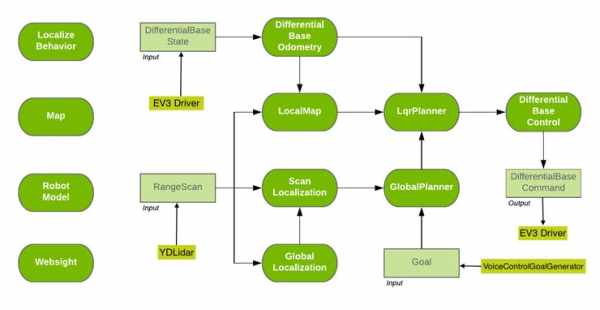
And from there we pass the goal to the Global Planner.
{
"source": "voice_control_components/goal_generator/goal",
"target": "navigation.subgraph/interface/goal"
}
Where all the magic happens:
Unfortunately it will only work in 10 W mode, not 5 W, which is a bit too much for my battery. In 5W mode the inference takes too long:
I tried with smaller RNNs and increasing from 2 available cpu cores (nvpmodel -m 1) to 3 but didn't help much. It decreased the time to 30ms for the inference, still too long for accurate results.
Part 7: Mapping
To create a map we need to run one instance of Isaac on Jetson and one on the host computer. Mapping takes a lot of resources, more than Jetson Nano can handle.
andrei@andrei-linux:~/ml/jetson-ev3$ ./engine/build/deploy.sh --remote_user andrei -p //apps/ev3:gmapping_distributed_ev3-pkg -d jetpack43 -h 192.168.0.218

andrei@andrei-jetson:~/deploy/andrei/gmapping_distributed_ev3-pkg$ ./apps/ev3/gmapping_distributed_ev3

andrei@andrei-linux:~/ml/jetson-ev3$ bazel run apps/ev3:gmapping_distributed_host
Don't forget to change the file apps/ev3/gmapping_distributed_host.app.json with your Jetson IP:
"tcp_subscriber": {
"isaac.alice.TcpSubscriber": {
"port": 5000,
"host": "192.168.0.218"
}
}
Source: Autonomous Tank