| Hardware components: | ||||||
 |
|
× | 1 | |||
|
× | 1 | ||||
|
× | 1 | ||||
 |
|
× | 1 | |||
 |
|
× | 1 | |||
|
× | 1 | ||||
|
× | 1 | ||||
 |
|
× | 1 | |||
 |
|
× | 2 | |||
 |
|
× | 1 | |||
| Software apps and online services: | ||||||
 |
|
|||||
 |
|
|||||
 |
|
|||||
 |
|
|||||
| Hand tools and fabrication machines: | ||||||
 |
|
|||||
Introduction
Most wireless outlets like Wink and SmartThings cost around $70, and then each additional outlet can cost another $50! Older remote control outlets, like this one from Etekcity, can be as cheap as $5 an outlet!
The problem is, they don't have all those fancy voice and Wi-Fi features the new ones do, that's what this tutorial is going to help you solve!
We'll be using a Raspberry Pi (any model will do, but the pins might be different!), a 433 Mhz Transmitter/Receiver to communicate with the wireless outlets, and some Female-Female Wire Jumpers. You'll also need an AWS account to setup the Alexa, IoT and Lambda portions. Altogether it should cost about $50 for everything!
There's no hard language dependency, all of the libraries I use are basic and written in multiple languages. I normally write everything in Javascript, but this tutorial will be Python to better match other Raspberry Pi tutorials.
All IDs in this tutorial were deleted after completion, so don't worry about everyone being able to see my authentication secrets!
Preparing the Raspberry Pi Operating System
We start with the Raspberry Pi's operating system. Your Pi may have come with an SD card with the operating system already good-to-go, or you might have an SD card with NOOBS. Either of those will work, but you can also follow the official tutorials to prepare your own SD card. For the next step I'll assume you have the operating system installed and your Pi booted up.
Connecting to the Pi
You can easily get started using a Keyboard/Mouse/Monitor, but you will be able to do everything using just SSH so all you really need is an Ethernet cable. Here's a longer tutorial on how to do things using only an Ethernet cable and Adafruit has a tool, but on my Mac it was as simple as plugging one in and starting SSH in Terminal (default password is raspberry ):
$
The authenticity of host 'raspberrypi (10.10.10.74)' can't be established.
ECDSA key fingerprint is SHA256:NcxFUmKkMfan0WozFOVFli9qDmBnwP5MC1ZkrgK29pM.
Are you sure you want to continue connecting (yes/no)? yes
Warning: Permanently added 'raspberrypi,10.10.10.74' (ECDSA) to the list of known hosts.
pi@raspberrypi's password: raspberry
The programs included with the Debian GNU/Linux system are free software;
the exact distribution terms for each program are described in the
individual files in /usr/share/doc/*/copyright.
Debian GNU/Linux comes with ABSOLUTELY NO WARRANTY, to the extent
permitted by applicable law.
Last login: Fri May 27 11:50:32 2016
pi@raspberrypi:~ $
Installing Dependencies
Once you're there we can begin installing our first dependency: pi-switch-python, which in turn has its own dependencies. Their page will have the most up-to-date instructions, but the main commands are below for convenience. Note libboost can take a LONG time, mine took half an hour!
From now on I won't include the output of the commands, just the current directory, and the commands themselves (everything after the dollar sign)
~ $ cd wiringPi
~/wiringPi $ ./build
~/wiringPi $ sudo apt-get update
~/wiringPi $ sudo apt-get install python-dev libboost-python-dev python-pip
~/wiringPi $ sudo pip install pi_switch
Installing AWShome
The final installation step is the actual AWShome library, which just needs to be cloned:
~/wiringPi $ cd ~
~ $ git clone https://github.com/rajington/AWShome
Wiring up the Components
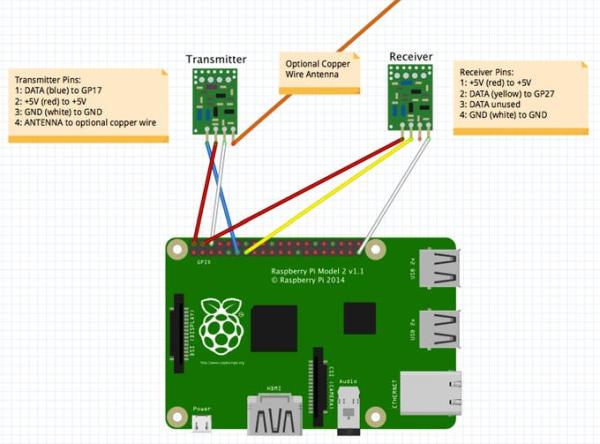
Both the schematic and the picture below use matching colors. I used a breadboard and a Pi Cobbler to make it easier to show, but they aren't necessary if you use Female-Female jumpers.
Finding the Remote Codes
When the Etekcity remote's buttons are pressed, it emits a small radio signal. Once you've put batteries in the remote and wired up your Pi, you're ready to discover the actual codes the remote sends so we can send them without the remote. Simply run the included codes.py helper and it will display them on the screen. For each button you plan on using, record the code, remembering that on and off have different codes and that codes will repeat the longer you hold down the button. I've included the 10 codes that came with my remote, but yours might be different.
~ $ cd AWShome/
~/AWShome $ sudo ./codes.py
Listening for RF codes...
Received code 283955
Received code 283955
Received code 283964
Received code 283964
Received code 284099
Received code 284099
Received code 284108
Received code 284108
Received code 284419
Received code 284419
Received code 284428
Received code 284428
Received code 285955
Received code 285955
Received code 285964
Received code 292099
Received code 292099
Received code 292108
Received code 292108
Configure the AWS CLI
Once you've registered and can login to the AWS console, you can get the credentials to configure awscli . Below is an example:
~/AWShome $ sudo aws configure
AWS Access Key ID [None]: AKIAIOSFODNN7EXAMPLE
AWS Secret Access Key [None]: wJalrXUtnFEMI/K7MDENG/bPxRfiCYEXAMPLEKEY
Default region name [None]: us-east-1
Default output format [None]: ENTER
Although
awsclidoesn't require sudo, our script does and it'll be looking for credentials under the root account.
Create the Things using AWS IoT
We're now ready to create some thing s using AWS IoT. Each thing will be a different remote outlet, and it helps to give them friendlier names than outlet-1 and outlet-2, here I create two:
~/AWShome $ sudo aws iot create-thing --thing-name floor-lamp
~/AWShome $ sudo aws iot create-thing --thing-name table-lamp
You can also create the things using the web interface.
Configure AWShome
The last step is to configure the awshome.py file to use the names you created above. Edit the file and add the new things at the bottom. I've created two additional lines for the two things I created earlier using the remote codes I found earlier:
if __name__ == "__main__":
    iot = createIoT()
    rf = createRF()

    # Create your switches here, using the format:
    #   OnOff(<THING NAME>, <ON CODE>, <OFF CODE>, rf, iot)
    #
    # The codes should be 6 digits and can be found using "codes.py".
    #
    # Example (from my remote):
    #   OnOff('outlet-1', 283955, 283964, rf, iot)
    #   OnOff('outlet-2', 284099, 284108, rf, iot)
    #   OnOff('outlet-3', 284419, 284428, rf, iot)
    #   OnOff('outlet-4', 285955, 285964, rf, iot)
    #   OnOff('outlet-5', 292099, 292108, rf, iot)
    OnOff('table-lamp', 283955, 283964, rf, iot)
    OnOff('floor-lamp', 284099, 284108, rf, iot)

    print('Listening...')

    while True:
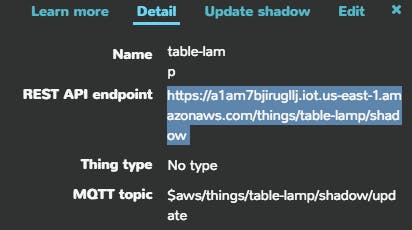
You must also update the endpoint with the one specific to your things, visible by selecting any thing from the IoT dashboard:
# creates thhe AWS IoT
def createIoT():
   iot = AWSIoTMQTTShadowClient('AWSHome', useWebsocket=True)
   # update this with your own endpoint from the IOT dashboard
   iot.configureEndpoint('a1am7bjirugllj.iot.us-east-1.amazonaws.com', 443)
   iot.configureCredentials(os.path.join(os.path.dirname(os.path.realpath(__file__)), 'VeriSign-Class 3-Public-Primary-Certification-Authority-G5.pem'))
   iot.configureConnectDisconnectTimeout(10)  # 10 sec
   iot.configureMQTTOperationTimeout(5)  # 5 sec
   iot.connect()
   return
Testing IoT
We can now actually test to see that IoT is all working! First we download the required certificate file that AWS IoT requires.
~/AWShome $ wget https://www.symantec.com/content/en/us/enterprise/verisign/roots/VeriSign-Class%203-Public-Primary-Certification-Authority-G5.pem
Next we run awshome.py so our things get populated with some state. If your outlets were currently on, they will initialize to off the first time you run the program.
$ sudo ./awshome.py
Turning table-lamp OFF using code 283964
Turning floor-lamp OFF using code 284108
Listening...
Read More: AWShome – Home automation using RPi + Alexa + IoT


