Device, sensors and systems connecting together are driving the next generation of applications creating the Internet of Things (IoT). robomq.io provides an open standard based platform to connect your devices and sensors to the back end applications, systems, processes and people, enabling you to build the next big thing.
Raspberry Pi, a popular programmable device, is a good representative example for device integration. The Raspberry Pi is a credit-card sized microcomputer that plugs into your HDMI monitor or a TV and a keyboard. It is a popular prototyping platform similar to other microprocessors like BeagleBone, Arduino etc. The instruction below can be used with these other platforms as well.
If you are new to Raspberry Pi, there may be few setup steps before you can integrate it with robomq.io. You’ll need an input device, a keyboard, a USB power supply and a monitor (this is optional, since you can still operate it using ssh). Figure 1 is a picture of the Raspberry Pi model B+, with a case for protection.
After you have finished setting up your raspberry pi, you’ll start to play with the 40 GPIO pins on it. These pins can be used to provide power (+5V or +3.3V), read data (signal pins) or read voltage level (for analog components), write data (for digital components) or write voltage level (for analog components) and provide ground wiring (GND pins). Using these pins, you can plug in electronic components like sensors, LED lights, matrix display modules etc. And with an electric relay, you can even control larger electrical components like servomotors and heavy machinery. The request-reply messaging model of robomq.io can be used to monitor the sensor environment and react to it via control message.
We are going to build a basic intruder detection system using PIR motion sensor and camera. PIR sensor is a simple analog sensor which gives a high voltage output when something moves in its range. Figure 2 and 3 are the PIR motion sensor and a 5MP camera that can be used with Raspberry Pi. Just a reminder, if you never tried to run a camera on your raspberry pi before, you may need to enable the camera module.
Select “Enable camera” and hit “Enter”, then go to “Finish” and you'll be prompted to reboot.
The principle of the intruder detection system is that when a moving object gets detected by the motion sensor, it will trigger the camera to take a picture. Then the “sensorProducer “ module (we will talk about this module in detail later in this blog) will send this picture to robomq.io. On the receiving side, we will create an HTML consumer which will subscribe to robomq.io and receive messages from it. The receiver will be embedded in a HTML webpage and will display the picture as and when the intruder is detected. It is a very simple interuder detector app. The emphasis is not on a fancy app but the demonstration of the fact that robomq.io can enable building complex applications, while it taks care of middleware plumbing.
The whole project is divided into several steps. But don’t worry, each step will be explained in the detail as we progress. Let’s have a quick listing of the steps to get the big picture first:
- Wire up PIR motion sensor and camera to the Raspberry Pi
- Install necessary libraries on Raspberry Pi
- Write the intruder detection program and Integrate the intruder detection program with robomq.io
- Create an HTML page to display intruder’s picture
Without further adieu, let’s dive into these steps:
Wire up PIR motion sensor and camera to raspberry pi
| Figure 5: Basic Intruder Detector |
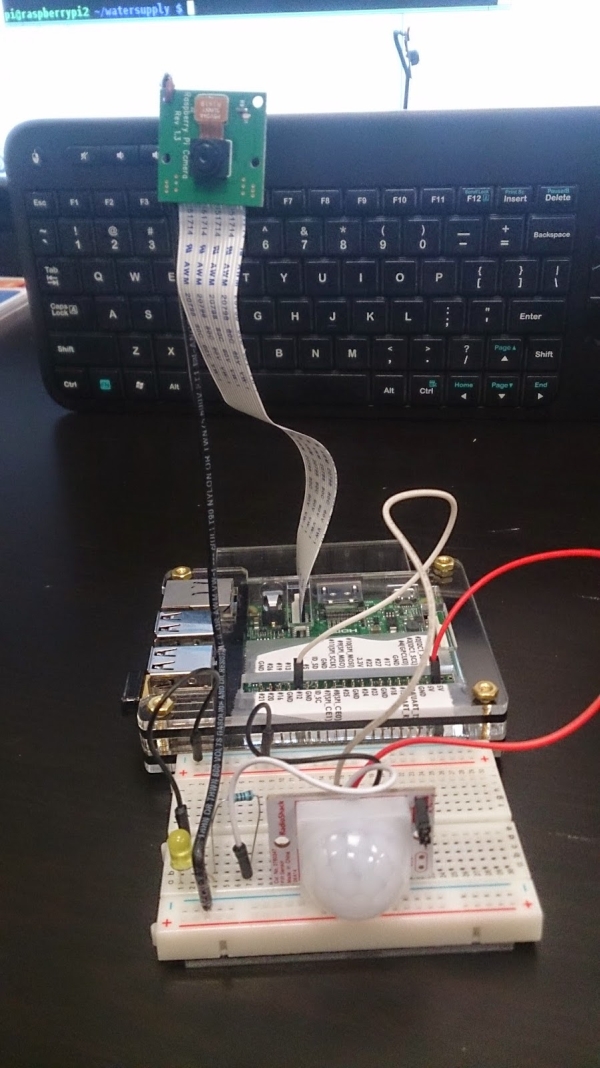
It is quite easy to connect the camera. Look carefully on the Raspberry Pi and look for word “CAMERA” beside a port. Simply plug in the camera cable to the port. For the PIR motion sensor, connect the following using connector wires:
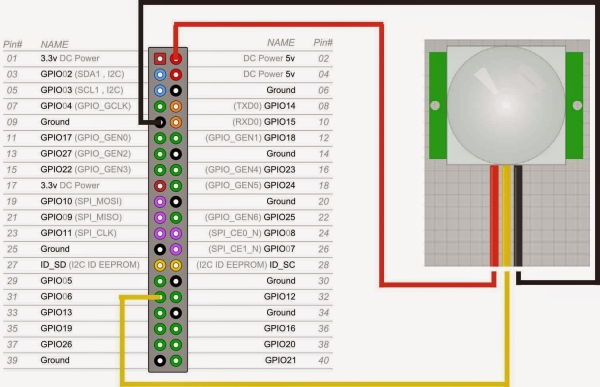
1) “vcc” pin on PIR sensor to +5V pin on Raspberry Pi
2) “OUT” pin on PIR sensor to #6 pin on Raspberry Pi
3) “GND” pin on PIR sensor to GND on Raspberry Pi
Figure 4 is the schematic diagram of how to wire the PIR motion sensor. The finished basic intruder detector may look something like the Figure 5 on the right.
- Install necessary libraries on Raspberry Pi
You need to install three libraries on the Raspberry Pi, which are not installed by default.
First is the “RPi.GPIO” module, which is the library to work with GPIO pins on Raspberry Pi. Second is “picamera” module to control camera operations. The third library, “sensorProducer”, is needed to integrate the intruder detection program with robomq.io. This is a very small client side library provided by robomq.io. It takes care of sending messages to robomq.io hub on the cloud using industry standard protocols.
Run the command below to install “RPi.GPIO” module:
$ sudo pip install RPi.GPIO
Run the command below to install “picamera” module:
$ sudo pip install picamera
To install “sensorProducer” module , run the following command:
$ sudo pip install https://s3.amazonaws.com/public.robomq/packages/sensorProducer.tar.gz
Write the intruder detection program which is integrated with robomq.io
Before you proceed further, you will need a free trial account on robomq.io. If you don’t have one, click here to get one for free now!
We have a documentation page and a GitHub repository to provide you with the explanation and the example code on how to get your devices and applications integrated with robomq.io.
Docs page: http://robomq.readthedocs.org/en/latest/deviceIntegration/
GitHub page: https://github.com/robomq/robomq.io
For this step you will configure the “sensorProducer” module, that you installed in step 2, with your trial account credentials to enable connection and communication with the robomq.io hub.
Edit the producer.config file, which is located in the directory where sensorProducer is installed:
$ sudo vi /usr/local/lib/python2.7/dist-packages/sensorProducer/producer.config
Change “host” to “trial.robomq.io”, set “vhost” to your free trial account vhost name, “username” to your username, and “password” to your password. All of this information is provided as part of your trial account. You will see two other attributes in the config file, “Device ID” and “Coordinate”. These attributes are used to give an ID and the location to the intruder detection device. For this example, just give “Device ID” a random name of your choice like “Device123”, and for “coordinate” give a random pair of latitude and longitude coordinate like [46,-79].
Now let’s write a program to collect data from the PIR motion sensor and the camera. For Raspberry Pi programming, we recommend Python, as it is easy to read and to get started even for novice programmers.
Let’s first import the necessary modules; “time” for getting the timestamp, “RPi.GPIO” for controlling GPIO pins, “picamera” for controlling the camera, and “base64” to encode and decode the taken picture into a base64 encoding format. Module “sensorProducer” is in charge of connecting to the robomq.io broker and provides utility functions to send and receive data. We also need to the “io” module is for handling input-output for the image stream.
import time import RPi.GPIO as gpio import picamera import base64 from sensorProducer import producerMQTT as producer import io
In this example we have used MQTT (MQ for Telemetry) protocol for messaging. You also have the options of using AMQP (Advanced Message Queue Protocol) or STOMP (Simple Text Oriented Message Protocol). The “sensorProducer” module has utilities for these protocols as well. If you are interested in trying those other two protocols, simply add “from sensorProducer import producerAMQP as producer” or “from sensorProducer import producerSTOMP as producer” for AMQP and STOMP respectively instead of importing producerMQTT as shown above.
Now we are going to define the pin number of the PIR motion sensor, which should be #6 since we plugged the motion sensor OUT pin to #6 on Raspberry Pi (see step 1). We will set this pin to read mode to get notified of the intrusion events. After this define the camera and its resolution.
gpio.setmode(gpio.BCM) mpin = 6 gpio.setup(mpin,gpio.IN) camera=picamera.PiCamera() camera.resolution=(350, 200)
Finally, we define the logic in the main while loop. “gpio.wait_for_edge” takes cares of detecting the voltage rise and fall on pin #6. When motion is detected in motion sensor’s range, the voltage on Pin #6 changes from “low” to “high”. At that point the program gets the timestamp, and triggers the camera to take a picture to send it as stream to robomq.io. The “base64” module will transform the image to base64 format then put it as an element of the JSON object being sent to robomq.io. The “producer” module will send this JSON message to the robomq.io broker. The program also prints the message on the console for debugging or verification when the intrusion event is detected.
For more detail: Build an Intruder detector with Raspberry Pi and robomq.io


