
The Porta-Pi Mini Arcade is a desktop-sized, fully functional, mini arcade cabinet measuring just under 13 x 9 x 10 inches (HxWxD).
This Porta-Pi Arcade turns your Raspberry Pi in a mini arcade machine. Of course you could stuff any other retro console inside, but the RPi is so versatile, powerful and awesome that I stuck with it to build this mini arcade.
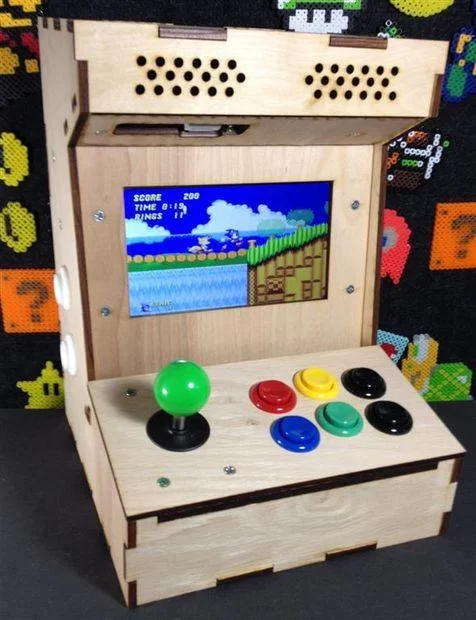
The Porta-Pi Arcade Kit features:
- Precision Laser Cut Cabinet, made from 0.25 inch Oak Plywood .
- 7″ (800×480 HDMI/VGA/Composite) LCD screen
- (1) Commercial arcade joystick (micro-switch style)
- (10) Commercial arcade buttons and micro-switches
- Speakers (3″ mid-range) with amplifier PCB (2W, Stereo Class D)
All running off a 5v 2A power supply!
Step 1:
Start with an idea, and test it out.
I started with a proof of concept shown above. I made this from 1/2″ plywood using a template I made with a cereal box. It was a little crude but I was proud of it, and everyone who saw this chunky machine loved it. I then, decided to make another one, but this time pour my heart into a new design. I also tried to engineer it so I could build another if I wanted… That was the hard part.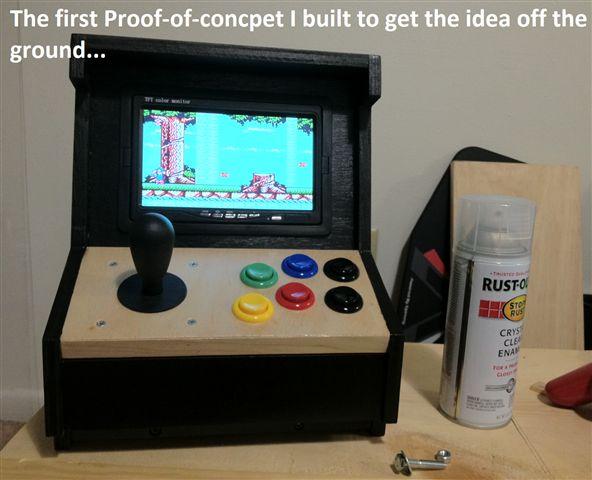
The cabinet design took over 200 hours of drafting, prototyping, and ‘improving'. But like any good design, the cabinet fits common off-the-self commercial arcade parts, an OEM 7″ tablet screen, and other common parts. This mini arcade can be laser cut, assembled, glued, and wired in under 8 hours. (I've built over 60 of these so far). Getting that build-an-arcade-in-a-day time took over 11 months of constant tinkering, designing, and engineering. A couple thousand hours of work over the course of 2 years. The video (next page) shows how the laser cut pieces are assembled (you can also build this design with 1/4″ acrylic plastic). The rest of the video shows how to install and wire the monitor, LCD driver board, speakers, amplifier, arcade buttons, 8 way joystick, and raspberry pi.
Software
So what about the software?! The software was an entire other story that took months and months to figure out. Back in 2012 I started messing with Retro Pie (an awesome compilation of retro emulators with a slick front end for the Raspberry Pi computer). After months of troubleshooting and frustrating nights with Linux, I got a stable image with the code needed to run the arcade controls hardwired into the Raspberry Pi's GPIO pins. I have the image available for download at my blog! You dont want to go through the headaches I went through; so I saved you the trouble 🙂 Be sure to stop by the petRockBlog and see their great work with RetroPie.
Step 2: Gather Your Materials
Download the BOM to see what items are needed to build this mini arcade.
 PortaPi Arcade BOM.pdf195 KB
For more detail: Build your own Mini Arcade Cabinet with Raspberry Pi