How to build your own Amazon Echo using a Raspberry Pi and ReSpeaker 2-Mics HAT.
Story
Introduction
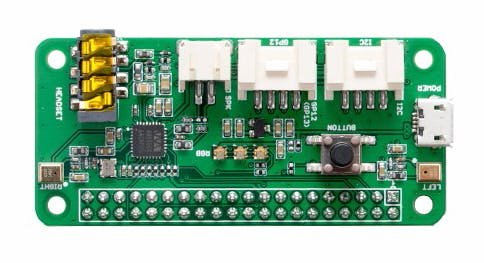
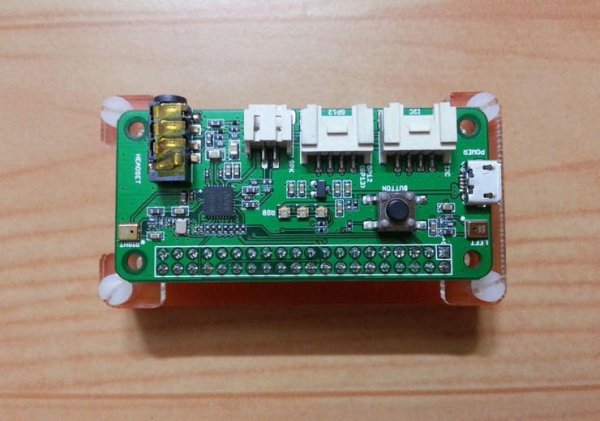
ReSpeaker 2-Mics Pi HAT is a dual-microphone expansion board for Raspberry Pi designed for AI and voice applications. This means that you can build a more powerful and flexible voice product that integrates Amazon Alexa Voice Service, Google Assistant, and so on.
The board is developed based on Cirrus WM8960, a low power stereo codec. There are 2 microphones on both sides of the board for collecting sounds and it also provides 3 APA102 RGB LEDs, 1 User Button and 2 on-board Grove interfaces for expanding your applications. What is more, 3.5mm Audio Jack or JST 2.0 Speaker Out are both available for audio output.
Features
- Raspberry Pi compatible (Support Raspberry Pi Zero, Raspberry Pi 1 B+, Raspberry Pi 2 B and Raspberry Pi 3 B)
- Dual-Microphones
- 2 Grove Interfaces: support GPIO and I2C
- Programmable Button and LED: one button and three LEDs
- Audio codec onboard
- Two types audio output socket : 3.5mm Audio Jack, JST2.0 Speaker Out
- Far field support (up to 3 meters)
Hardware Overview
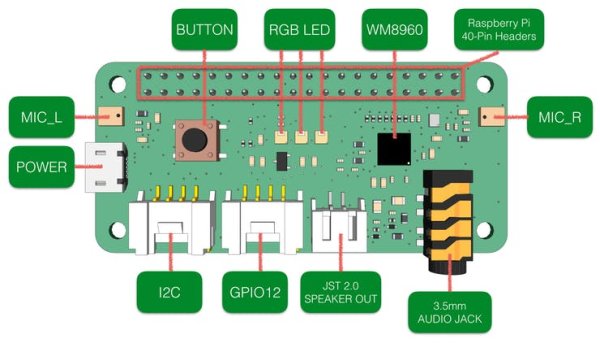
- BUTTON: a User Button, connected to GPIO17
- MIC_L & MIC_R: 2 Microphones on both sides of the board
- RGB LED: 3 APA102 RGB LEDs, connected to SPI interface
- WM8960: a low power stereo codec
- Raspberry Pi 40-Pin Headers: support Raspberry Pi Zero, Raspberry Pi 1 B+, Raspberry Pi 2 B and Raspberry Pi 3 B
- POWER: Micro USB port for powering the ReSpeaker 2-Mics Pi HAT, please power the board for providing enough current when using the speaker.
- I2C: Grove I2C port, connected to I2C-1
- GPIO12: Grove digital port, connected to GPIO12 & GPIO13
- JST 2.0 SPEAKER OUT: for connecting speaker with JST 2.0 connector
- 3.5mm AUDIO JACK: for connecting headphone or speaker with 3.5mm Audio Plug
What is the purpose of this project?
In this project we will learn, how build your own AVS using a Raspberry Pi and ReSpeaker 2-Mics Pi HAT. In this project, because of the minimality and the new experience, I used the Raspberry Pi Zero W and latest version of Raspbian Jessie.
Step 1: Connect ReSpeaker 2-Mics Pi HAT to Raspberry Pi
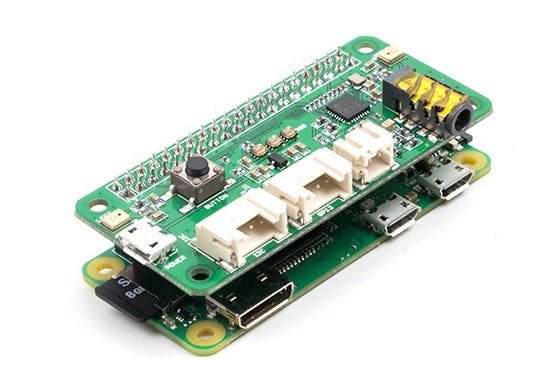
Mount ReSpeaker 2-Mics Pi HAT on your Raspberry Pi, make sure that the pins are properly aligned when stacking the ReSpeaker 2-Mics Pi HAT.
Step 2: Setup the driver on Raspberry Pi
While the upstream wm8960 codec is not currently supported by current Pi kernel builds, upstream wm8960 has some bugs, Seeedstudio team fixed it. we must build it manually.
Get the seeed voice card source code :
git clone –depth=1 https://github.com/respeaker/seeed-voicecard
cd seeed-voicecard
sudo ./install.sh
reboot
Check that the sound card name matches the source code seeed-voicecard :
pi@raspberrypi:~ $ aplay -l
**** List of PLAYBACK Hardware Devices ****
card 0: seeedvoicecard [seeed-voicecard], device 0: bcm2835-i2s-wm8960-hifi wm8960-hifi-0 []
Subdevices: 1/1
Subdevice #0: subdevice #0
Next apply the Alsa controls setting :
sudo alsactl –file=asound.state restore
If you want to change the Alsa settings, You can use following command to save it :
sudo alsactl –file=asound.state store
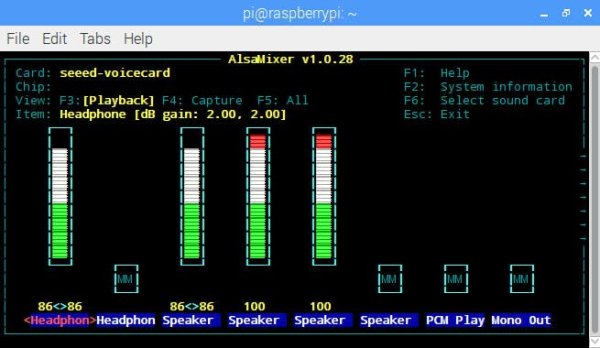
Before the test, configure sound settings and adjust the volume with alsamixer :
pi@raspberrypi:~ $ alsamixer
The Left and right arrow keys are used to select the channel or device and the Up and Down Arrows control the volume for the currently selected device. Quit the program with ALT+Q, or by hitting the Esc key. (More information)
For test, you will hear what you say to the microphones (don’t forget to plug in an earphone or a speaker) :
arecord –f cd -Dhw:0 | aplay -Dhw:0
Step 3: Setting up AVS on a Raspberry Pi
In this section, we need to install the Amazon Alexa Voice Service on the Raspberry Pi. See the full description and installation method from here.
Step 4: Start the Alexa Voice Service
Before you run the Alexa Voice Service (according to step 7), It is necessary to Changing the audio output to headphone jack. To do this, just enter the following command (More Information) :
sudo amixer cset numid=3 1
Step 5: Talk to Alexa
You can now talk to Alexa by simply using the wake word “Alexa”. Try the following:
- Say “Alexa”, then wait for the beep. Now say “what's the time?”
- Say “Alexa”, then wait for the beep. Now say “what's the weather in Seattle? “
Step 6: How to use User Button (Optional)
There is an on-board User Button, which according to the Seeedstudio description, is connected to GPIO17 (or WiringPi 0). There is an easy way to use a button (instead of speaking “Alexa”) to trigger Alexa Voice Service.
Open GPIOWakeWordEngine.cpp file from the following path with text editor (for example nano):
cd Desktop/alexa-avs-sample–app/samples/wakeWordAgent/src/
sudo nano GPIOWakeWordEngine.cpp
Then modify Line 11 as the following code and save (GPIO_PIN 0 in WiringPi Library is the same as GPIO17):
static const int GPIO_PIN = 0;
It is necessary to recompile again as the following code:
cd Desktop/alexa-avs-sample–app/samples/
cd wakeWordAgent/src && cmake . && make -j4
In the end, to test, we use the following command (Just note that it is necessary before executing the following command, run AVS web service and sample app according to step 7) :
cd wakeWordAgent/src && sudo ./wakeWordAgent -e gpio
Step 7: How to use the on-board APA102 LEDs (Optional)
As described by Seeedstudio, 3 APA102 RGB LEDs connected to SPI interface. In this section, to control the LEDs, We will use the Pi4J project. Actually Pi4J is intended to provide a friendly object-oriented I/O API and implementation libraries for Java Programmers to access the full I/O capabilities of the Raspberry Pi platform. In the first step, please enable SPI According to the following instructions:
sudo raspi-config
Now Go to Interfacing Options, Go to SPI, Enable SPI, exit the config menu and reboot.
According to my personal experience, to do this, we need to use the latest snapshot builds. version 1.1 is not compatible with the latest version of the Raspberry Pi kernel.
To download snapshot builds in your Maven project, you must include the following repository definition in your pom.xml file. Open pom.xml file from the following path with text editor (for example nano):
cd Desktop/alexa-avs-sample–app/samples/
sudo nano pom.xml
Now add following lines to pom.xml:
<repositories>
<repository>
<id>oss-snapshots-repo</id>
<name>Sonatype OSS Maven Repository</name>
<url>https://oss.sonatype.org/content/groups/public</url>
<snapshots>
<enabled>true</enabled>
<updatePolicy>always</updatePolicy>
</snapshots>
</repository>
</repositories>
It is also necessary that add following lines to pom.xml. The following dependency is all that is needed to include Pi4J (core library) in your Maven project.
<dependency>
<groupId>com.pi4j</groupId>
<artifactId>pi4j-core</artifactId>
<version>1.2-SNAPSHOT</version>
</dependency>
In the next step, Open AVSController.java file from the following path with text editor :
cd Desktopsamplesmaincomalexa/avs
sudo nano AVSController.java
Now add following lines to AVSController.java (to the top of the file) :
import com.pi4j.io.gpio.GpioController;
import com.pi4j.io.gpio.GpioFactory;
import com.pi4j.io.gpio.GpioPinDigitalOutput;
import com.pi4j.io.gpio.Pin;
import com.pi4j.io.gpio.RaspiPin;
Also add following lines to AVSController.java to AVSController class :
private GpioPinDigitalOutput dat;
private GpioPinDigitalOutput clk;
private int[] data;
public int WIDTH;
Then add following lines to AVSController.java (for example, after the initializeMicrophone function), Number 3 Here is the number of LEDs.
initapa102 (GpioFactory.getInstance(), RaspiPin.GPIO_12, RaspiPin.GPIO_14, 3);
In the next step, add following lines to AVSController.java (for example, before the recordingStarted function) :
public void initapa102 (GpioController gpio, Pin data_pin, Pin clock_pin, int n)
{
WIDTH = n;
dat = gpio.provisionDigitalOutputPin (data_pin);
clk = gpio.provisionDigitalOutputPin (clock_pin);
data = new int[n];
// Set all off to start with.
for (int i = 0; i < WIDTH; ++i)
data[i] = 0;
// And push that out to the devices.
show ();
}
public void set (int n, int r, int g, int b, int bright)
{
if (n < 0 || n >= WIDTH ||
r < 0 || r > 255 ||
g < 0 || g > 255 ||
b < 0 || b > 255 ||
bright < 0 || bright > 31)
throw new IllegalArgumentException (“Invalid parameter”);
data[n] = (bright << 24) | (r << 16) | (g << 8) | b;
}
public void clear ()
{
// Set all off to start with.
for (int i = 0; i < WIDTH; ++i)
data[i] = 0;
// And push that out to the devices.
show ();
}
public final void show ()
{
// Transmit preamble
for (int i = 0; i < 4; ++i)
write_byte ((byte) 0);
// Send data
for (int i = 0; i < WIDTH; ++i)
write_led (data[i]);
// And latch it
latch ();
}
private void write_byte (byte out)
{
for (int i = 7; i >= 0; –i)
{
dat.setState ((out & (1 << i)) != 0);
clk.setState (true);
clk.setState (false);
}
}
private void write_led (int data)
{
write_byte ((byte) (0xe0 | ((data >> 24) & 0x1f)));
write_byte ((byte) (data));
write_byte ((byte) (data >> 8));
write_byte ((byte) (data >> 16));
}
private void latch ()
{
// Transmit zeros not ones!
dat.setState (false);
// And 36 of them!
for (int i = 0; i < 36; ++i)
{
clk.setState (true);
clk.setState (false);
}
}
Aslo add following lines to recordingStarted function, This command turns on the lights.
set(0, 255, 0, 0, 31);
show();
set(1, 0, 255, 0, 31);
show();
set(2, 0, 0, 255, 31);
show();
Then add following lines to recordingCompleted function, This command turns off the lights.
clear();
Aslo add following lines to onAlexaSpeechStarted function, This command turns on the lights during Alexa response.
for (int x = 0; x < 3; ++x)
{
set(x, (x+1)*8, (x+1)*26, (x+1)*70, 31);
show();
}
Then add following lines to onAlexaSpeechFinished function, This command turns off the lights after Alexa response.
clear();
Finally, we need to save the file and recompile with the following command :
cd Desktop/alexa-avs-sample–app/samples/javaclient
mvn install
In the end, to test, run AVS web service and sample app according to step 7.
Read More Detail: Build Your Own Amazon Echo Using a RPI and ReSpeaker HAT


