
In this project, we took the tried-and-true robot costume and gave it some life with the Raspberry Pi, GrovePi, and a handful of Grove sensors. The costume is a standard robot costume, but with a candy-counting machine attached that talks!

When a piece of candy is placed in the robot, it flashes its LEDs, thanks the candy donor for the piece of candy, and announces the candy count. We use the Raspberry Pi for brains, the GrovePi and assorted sensors to detect candy, and a battery powered speaker to do the talking. The whole project takes about 2 hours to build.
You should be able to use cardboard boxes from around the home. The size of these are going to vary depending on your child’s size, and your expected candy haul.
The Build
We started by wrapping the small box and the large box with the silver duct tape. Originally we were planning on using silver spray paint, but decided that the fumes might be bad for our 2-year old. The tape worked well and gave it a bit of a rough look.
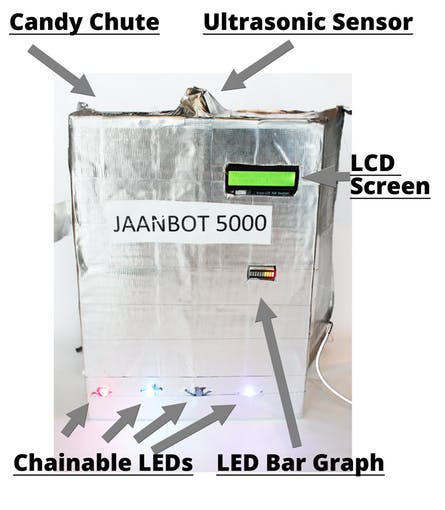
Next in the small box, we cut a small flap in the top, about 4″ x 4″ for the candy chute. We bent this into the box, and taped it to the bottom of the box at an angle. This provides a protective area to keep the candy from dropping in on the electronics.
Make Some Holes
Next, we made some holes. First, we poked 4 small holes along the bottom for the chainable LEDs. We secured them to the box with some thin wire we had laying around.
We made another hole, big enough for the RGB LED screen to fit through. We secured the RGB LED screen with some clear packing tape on the back of the display, holding it in place. We made a similar hole for the bar-graph LED display, below it.
Finally, we added the Ultrasonic Sensor. This will be our candy detection sensor: as a hand with candy in it goes towards the candy chute, it triggers the Ultrasonic sensor. We mounted this at a slight 45 degree angle and wrapped it in silver duct tape to make sure it didn’t move around and trigger false alarms. We will mount the Pi and GrovePi in the small box with more clear packing tape. We built a small cradle for the bundle on the side, below the candy chute.
We also made a slot for the USB Battery charger at the bottom. This needs to be securely held in place: it’s the heaviest item and if it breaks loose, combined with the kinetic energy of your 2 year old, it will do some damage.
Read More: Candy Counting Robot with the Raspberry Pi