This is a comprehensive guide for building and using my Google Assistant Powered Candy Machine. It can be split up into these parts:
Making and Using the Raspberry Pi with Google Assistant
Coding and Setting up the Particle Photon
Making an IFTTT Applet
Creating the Wooden Box and the Mechanical Parts
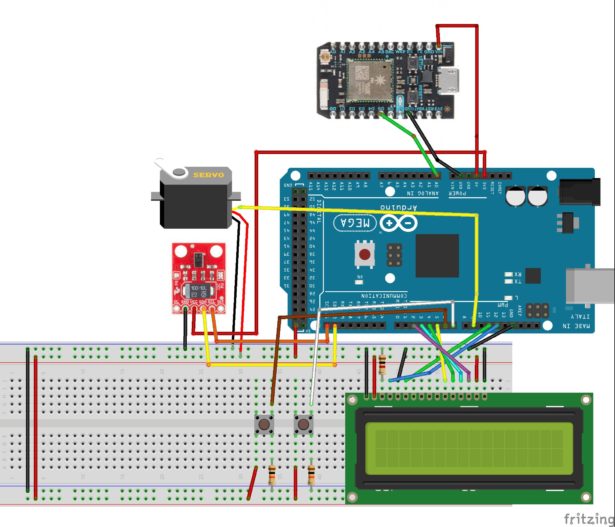
Coding the Arduino Mega 2560
Installing the Electronics
Testing and Usage
Making and Using the Raspberry Pi with Google Assistant
First, I had to set up my Google Assistant. I don't have a fancy new Android phone that comes with it, nor do I want to go online to query the API. Thankfully, the wonderful people at Google have engineered a solution. They created an SDK in Python that can run as a service on the Raspberry Pi. Bundled with the Voice HAT and a mic array, along with a speaker and button, it is now possible to either clap or push the button to speak to the Google Assistant. I have been beta testing this device for about 2 months now, and it works very well. All you need to do is plug in the microphone sensor and button.
After that, load the python files and run the service after adding your API credentials and the API to a new project in the Google Developers Cloud. Now, whenever you push the button or clap (with the right setup) you should be able to say “hello” and it will respond.
Coding and Setting Up the Particle Photon
The first step to making your Particle Photon talk is creating a new project in the Particle build IDE. After it is created, copy and paste the provided code into the IDE. Save it and then flash it to your Photon. Now in the Particle Console you should be able to call the function and make the light blink. If that works, you are ready to create the IFTTT applet.
Making an IFTTT Applet
The first step is to head on over to ifttt.com and sign in.
Then, click on “My Applets” and make a new applet. Go ahead and select the “this” part.
Now, select the Google Assistant service and choose “Say a simple phrase”. Put whatever you want in the fields. I chose “Give me some candy”, “I want some candy”, and “Can I have some candy?” for my queries. For the response I set it to say “Follow the on screen instructions to receive your treat.”
That should be it for the applet. To test it, say your phrase into Google Assistant and see if the light blinks on your Photon. If it does, well done!
Creating the Box and Mechanical Parts
This is the longest part of the project. It took me about 2 days to create, but it should be shorter for you because everything has been figured out by myself already.
First, 3D print all of the parts. You will need 1 auger (the 2 halves glued together), and then 2 of each- the button holder, the button, and the switch holder. After printing, assemble the buttons with the tact switches and make sure they work. Solder on wires with 10k pulldown resistors to complete the button assembly.
Lay Out Components
I laid out my components and the cardboard prototype for reference.
Create Dispenser
Now for the difficult part- creating the actual dispenser. I used about one piece of 2'x2'x.5″ plywood for the structure. Here are some of the parts drawn out:
Build
I then cut the wooden pieces out and screwed them together to form a basic box. The front wall had an LCD cutout and two places for the buttons.
I attached the auger to the servo, slipped the 1.5″ PVC pipe T joint on it, and then screwed the servo onto the wall. I also attached a hinge and a door to the side so that everything in the back can be easily accessed.
I took a protein shake mixing bottle and cut a 1.25″ hole into the bottom so it would line up with the top of the PVC pipe. It is also removable.
I am an experienced technical writer holding a Master's degree in computer science from BZU Multan, Pakistan University. With a background spanning various industries, particularly in home automation and engineering, I have honed my skills in crafting clear and concise content. Proficient in leveraging infographics and diagrams, I strive to simplify complex concepts for readers. My strength lies in thorough research and presenting information in a structured and logical format.
This website uses cookies to improve your experience. We'll assume you're ok with this, but you can opt out if you wish.ACCEPTCheck Privacy Policy
Manage consent
Privacy Overview
This website uses cookies to improve your experience while you navigate through the website. Out of these, the cookies that are categorized as necessary are stored on your browser as they are essential for the working of basic functionalities of the website. We also use third-party cookies that help us analyze and understand how you use this website. These cookies will be stored in your browser only with your consent. You also have the option to opt-out of these cookies. But opting out of some of these cookies may affect your browsing experience.
Necessary cookies are absolutely essential for the website to function properly. This category only includes cookies that ensures basic functionalities and security features of the website. These cookies do not store any personal information.
Any cookies that may not be particularly necessary for the website to function and is used specifically to collect user personal data via analytics, ads, other embedded contents are termed as non-necessary cookies. It is mandatory to procure user consent prior to running these cookies on your website.