
Back in late February I saw this post on the Raspberry Pi site.
http://www.raspberrypi.org/school-weather-station-…
They had created Raspberry Pi Weather Stations for Schools. I totally wanted one! But at that time (and I believe still as of writing this) they are not publicly available (you need to be in a select group of testers). Well, I wanted on and I didn't feel like shelling out hundreds of dollars for an existing 3rd party system.
So, like a good Instructable user, I decided to make my own!!!
I did a little research and found some good commercial systems I could base mine off. I found some good Instructables to help with some of the Sensor or Raspberry PI concepts. I even found this site, which was pay dirt, they had tore down an existing Maplin system:
http://www.philpot.me/weatherinsider.html
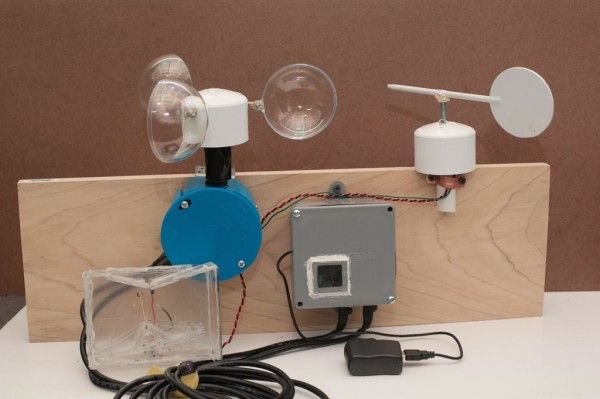
Fast forward about a month and I have a basic working system. This is a complete Raspberry Pi Weather system with just the base Raspberry Pi hardware, camera, and some assorted analog and digital sensors to make our measurements. No buying pre-made anemometers or rain gauges, we are making our own! Here's it's features:
- Records info to RRD and CSV, so can be manipulated or exported/imported to other formats.
- Uses the Weather Underground API to get cool info like historical highs and lows, moon phases, and sunrise/sunset.
- Uses the Raspberry Pi Camera to take a picture once a minute (you can then use them to make timelapses).
- Has webpages that display the data for the current conditions and some historical (last hour, day, 7 days, month, year). The website theme changes with the time of day (4 options: sunrise, sunset, day and night).
All of the software for record and displaying the information is in a Github, I've even done some bug tracking, feature requests in there as well:
https://github.com/kmkingsbury/raspberrypi-weather…
This project was a great learning experience for me, I got to really dive into the capabilities of the Raspberry Pi especially with the GPIO, and I hit some learning pain points as well. I hope you, the reader, can learn from some of my trials and tribulations.
Step 1: Materials
Electronics:
- 9 Reed Switches (8 for the Wind Direction, 1 for the Rain Gauge, optionally 1 for the wind speed instead of a Hall Sensor), I used these: https://www.sparkfun.com/products/10601
- 1 Hall Sensor (for the Wind Speed, called an anemometer) – https://www.adafruit.com/product/158
- Temperature
- Humidity (lots of Humidity sensors come with a Temperature sensor), I used the DHT11: https://www.adafruit.com/product/386
- Pressure (the BMP came with a temperature sensor in it as well), I used the BMP180: https://www.adafruit.com/product/1603
- Photoresistor
- GPS Chip or USB GPS.
- 4 strong magnets (2 for anemometer, 1 for Direction, 1 for Rain Gauge), I used the rare earth magnets, highly recommended).
- A handful of assorted resistors, I have this pack which has proved extremely handy over time: https://www.sparkfun.com/products/10969
- MCP3008 – to convert analog to digital inputs for the Raspberry Pi – https://www.adafruit.com/product/856
Hardware
- Raspberry Pi – I used the B+
- Wireless adapter
- Pi Camera
- A solid 5V power adapter (this turned out to be painfully annoying, I eventually got the Adafruit one, otherwise the camera pulls too much juice and can/will hang the Pi, it's here: https://www.adafruit.com/products/501)
Materials:
- 2 Thrust Bearings (or skateboard or roller-skate bearings will work too), I got these on Amazon: http://amzn.com/B0034G64XE
- 2 Waterproof Enclosures (I used an electrical enclosure from the local big box store), doesn't matter much, just need to find a good size enclosure that's going to have enough space and protect everything).
- Some PVC Pipe and End Caps (various sizes).
- PVC mount brackets
- Couple sheets of thin Plexiglass (nothing too fancy).
- plastic standoffs
- mini screws (I used #4 bolts and nuts).
- 2 Plastic Christmas Tree Ornament – used for the anemometer, I got mine at the local Hobby Lobby.
- Small dowel
- Small piece of plywood.
Tools:
- Dremel
- Glue Gun
- Soldering Iron
- Multimeter
- Drill
Step 2: Main Enclosure – Pi, GPS, Camera, Light
The main enclosure houses the PI, the Camera, the GPS and the light sensor. It is designed to be waterproof since it houses all the critical components, the measurements are taking from the remote enclosure and that one is designed to be exposed/open to the elements.
Steps:
Pick an enclosure, I used an electrical junction box, various project boxes and waterproof cases will work just as well. Key point is it has enough space to hold everything.
My Enclosure contains:
- The raspberry pi (on standoffs) – Needs a WIFI chip, don't want to be running Cat5e into the backyard!
- The Camera (also on standoffs)
- The GPS chip, connected via USB (using a sparkfun FTDI cable: https://www.sparkfun.com/products/9718) – The GPS provides latitude and longitude, which is nice, but more importantly, I can get accurate time from the GPS!
- two ethernet/cat 5 jacks to connect the Main enclosure to the other enclosure that houses the other sensors. This was just a convenient way of having cables going between the two boxes, I have roughly 12 wires, and the two cat5 provide 16 possible connections, so I have room to expand/change things around.
There is a window in the front of my enclosure for the Camera to see out of. The case with this window protects the camera, but I did have issues where the red led on the camera (when it's taking a photo) reflects off the plexiglass and shows up in the photo. I used some black tape to mitigate this and try and block it (and other LEDs from the Pi and GPS), but it's not 100% yet.
Step 3: ‘Remote Enclosure' for Temperature, Humidity, Pressure
This is where I stored the Temperature, Humidity, and Pressure sensors as well as the “hook ups” for the rain gauge, wind direction and wind speed sensors.
It's all very straightforward, pins here connect via the ethernet cables to the required pins on the Raspberry Pi.
I tried to use Digital sensors where I could and then any Analog are added on to the MCP 3008 it takes up to 8 analog which was more than enough for my needs, but gives room to improve / expand.
This enclosure is open to the air (it has to be for accurate temperature, humidity and pressure). The bottom holes are popped out, so I gave some of the circuits a spray of a Silicone Conformal Coating spray (you can get it online or a place like Fry's Electronics). Hopefully it should protect the metal from any moisture, though you have to be careful and not use it on some of the sensors.
The top of the enclosure is also where the wind speed sensor fits. It was a toss up, I could have put the wind speed or wind direction on top, I didn't see any major advantages of one over the other. Overall you want both sensors (wind dir and speed) high enough where buildings, fences, obstacles don't interfere with the measurements.
For More Detail : Complete DIY Raspberry Pi Weather Station with Software