
This instructable helps you to setup raspberry pi for the first time without hdmi monitor .By the end of this tutorial you can see the raspberry pi desktop screen from your server laptop.
difficulty level:- 1/5
Not required any technical knowledge
My current project: (Check this)
IOT enabled NFC Shopping
Working Video: https://www.youtube.com/watch?v=6t5t8SaKrW4
Instructables: http://www.instructables.com/id/IOT-Enable-NFC-shopping/
Step 1: Requirements
- software:-
- Raspbian image–934mb
- Putty—484kb
- DHCP Server–100kb
- Xming—-2.2mb
- Sd card formatter–6mb
- Windows Disk Imager–12mb
- hardware:-
- A Raspberry Pi Model A/B/B+
- An Ethernet cable
- USB power cord
- PC with an Ethernet adapter (here i'm using windows 8 )
- SD card 8Gb with Adapter
Step 2: Preparing SD card
Download the SD formatter (link provided in step 1)
Place SD card in card reader and connect it to your PC.Open SD formatter , choose the SD card location and format it (before formatting make sure you choose format size adjustment ON in options).
Download the image file of the Raspbian (zip file)
Download and open Windows Disk imager then choose the raspbian image file (extract the zip file) and click write.It takes some time (keep calm and watch the progress bar).
Congrats!!! you have successfully done with the SD card ,now move forward to see ,how to boot the raspberry pi.
Step 3: Time to power up your raspberry pi !
Insert your SD card in the adapter and place it in the SD card slot of the PI.
Power up the raspberry pi with power cord. (make sure red led PWR in PI glows).
now get read to connect the PI with ethernet cable.
Step 4: Ethernet connection to PI !!
connect the pi with ethernet cable.
Setting Static IP address for Raspberry PI
open controlpanel > network and sharing center > change adapter settings >ethernet (it will be Local area network in win7)
properties of ethernet > choose the manual ip
change the ip and subnet mask as below .
ip: 192.168.1.1 (usually IP address of pi is 192.168.X.Y)
Subnet mask: 255.255.255.0
check the ip config (you can skip this section):-
open cmd prompt and type “ipconfiig” and verify the ipv4 in ethernet section
double check the connection by pinging the network
type ping 192.168.1.1 in cmd prompt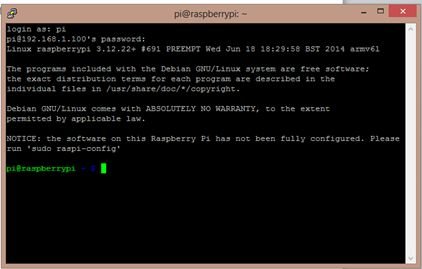
Step 5: Creating server in PC
download dhcpsrv2.4
Refer the images for clear understanding.
Open “dhcpwiz”, choose the ethernet and click next (don't change any supported protocols).
Change the ip-pool range from 192.168.1.100 to 110 ,click the write INI file and tick the “overwrite the existing file”
check that the status of service is running and firewall exceptions is configured , if not check the admin option.
Finally tick the “run DHCP server immediately” option and click finish.
Now open “dhcpsrv” and click the “Continuous as tray app” (you can see the app running in the taskbar).
If raspberry pi is powered , disconnect the power connection and power up it again.
Wait till “assigning ip address 192.168.1.100 to client b8.xx-xx-xx-xx-xx ” notification is displayed near the tray icon of the taskbar.
If you see the above statement , 85% of your job is complete …cheers!!!
For more detail: Complete tutorial for a raspberry pi beginners.