
Learn how to connect your Raspberry Pi to the AWS cloud for the first time!
IoT and connected device are becoming ubiquitous.
Every day we work with companies all over the world who need help building everything from smarter vending machines to automotive head-up displays and heavy lifting equipment. No matter the industry, in recent years we’ve seen that powering the best customer experiences and most reliable applications means leveraging cloud solutions like AWS IoT Core. For anyone getting started working with cloud services from a hardware background, however, there’s a potentially intimidating journey ahead that requires learning a lot of new concepts and best practices.
In this article I wanted to share my own experience and help bridge the gap between those cloud computing and computing hardware skillsets.
In this tutorial, I’ll show you how to connect your Raspberry Pi Device to AWS IoT Core in order to communicate with it securely from the cloud. I’ll cover everything from the hardware and peripherals you’ll need to use the AWS IoT Core console UI to control your Raspberry Pi, and everything in between!
Time to Gather Your Materials
Before getting started, let’s get set up – here’s what you’ll need to work through this tutorial:
Hardware:
Let’s start with the basics:
- A Raspberry Pi 4 – I’m using one sold in the kit here and it comes boxed up with a bunch of useful additions like heat sinks, power cables, a fan, enclosure, and a micro SD card. This makes it a cinch to get started with and, while I have the 4GB starter kit, any of the three options at the link would be fine.
Here are some other great options for starter kits:
The following are included in the starter kits but could also be sourced separately:
- A microSD card with 8GB of space or more
- A power cable for the Pi
- An HDMI to micro HDMI cable
- A microSD card reader for your computer. You can get a USB adapter like the one in the kit or an SD card adapter like this. If you have a new Mac computer you may want to get one like this.
You’ll also need:
- A USB mouse
- A USB keyboard
- A monitor with an HDMI port to display the Raspberry Pi’s Screen
- Something to integrate with the GPIO pins in your Raspberry Pi later when we configure the Raspberry Pi to interact with the cloud. In my case, I’ll be using a kit like this. That contains everything I need including a breadboard, LEDs, resistors, jumper wires a Raspberry Pi extension board and forty pin cable extension.
Software and Accounts:
In addition to the hardware above, you’ll also need an Amazon Web Services (AWS) Account. You can create one here. After you create the account, make sure to save your login details somewhere as we’ll need them later.
As well, if you don’t get one of the kits specified, you will also need one of the following:
Gather it all together, create your accounts and let’s get started imaging the microSD card.
Step 1: MicroSD Card Set Up
If you are using the Raspberry Pi kit above, you will have a pre-imaged microSD card with the Rasberry Pi OS already flashed to it. But, if you are not using the kit, you will need to image your microSD card before you put it in the Raspberry Pi.
Here are the steps to think about before you image the microSD card:
- Ask yourself if your microSD card has already been imaged – if you got it with the kit above it probably has, and you can skip this section. If you’re using an unrelated microSD card it probably hasn’t so you can proceed here.
- Heads up: make sure that there is nothing on the microSD card you want to keep. Imaging the microSD card will erase everything that was on the SD card before so make sure you’re not storing anything important like a family photo album or other important files on it before you start!
- Move anything that’s on the MicroSD card that you want to keep around to another location, since we’ll be completely overwriting the SD card.
Now we can image the SD card! Start by plugging the microSD into your machine using the adapter if you haven’t already. We need to use one of the following tools mentioned earlier: Etcher or The Raspberry Pi Imager. Both of them should work fine for our purposes.
Using the Raspberry Pi Imager to Flash the MicroSD Card
Want to go with the Raspberry Pi Imager? You can download it for free here.
Once you’ve installed it for your OS you can run it and should see a window like this:
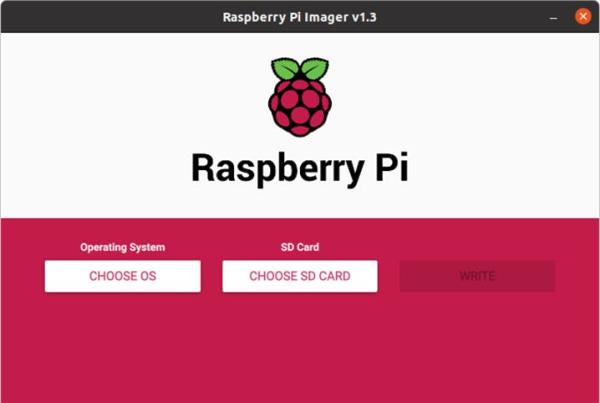
From there, select which OSyou’d like to install to the microSD card by pressing “Choose OS”. On the next screen you’ll be able to pick which operating system you’d like to flash your microSD card with:
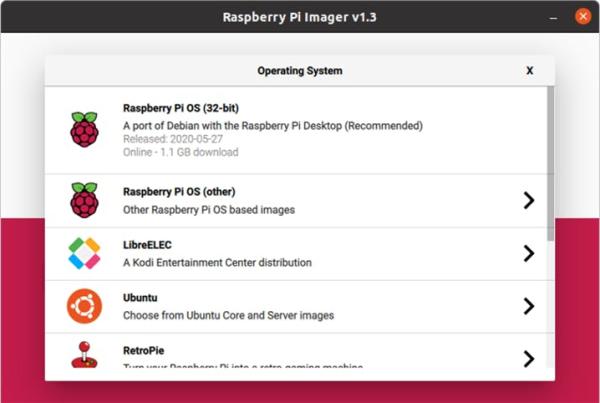
We’ll be using Raspberry Pi OS (32-bit). Now press “Choose SD Card” and if we have our microSD card plugged in it should load that as an option which we can select.
From there, press “Write” and wait for the microSD card to finish flashing. When it’s done, you’re ready to use the SD card in your Raspberry Pi!
Using Etcher to Flash the MicroSD Card
Alternatively, you might try Etcher.
Etcher is free tool that you can use on most operating systems in order to flash an SD card. To use Etcher, you can download it for free here.
After you install Etcher, you’ll also need to download the image for Raspberry Pi OS too. To get the latest version you can go here.
I suggest the option that comes “with desktop and recommended software” if you’re just getting started. From there, you’ll then plug in your microSD card into your computer using the adapter and open Etcher.
Flashing the drive should be as simple as following the three steps Etcher prompts you to do:
- Selecting the image (in this case the file we just downloaded from Raspberrypi.org)
- Select the drive (in this case the SD card that we just connected to the computer)
- Flash! Just press the flash button and Etcher should start flashing the microSD card with Raspberry Pi OS
When the process is finished you should be able to use the microSD card with your Raspberry Pi!
Step 2: Setting Up Hardware and Installing the Raspberry Pi OS
Before we connect the Raspberry Pi to AWS, we need to finish the process of booting up the machine and installing some dependencies. If you’re working with one of the Raspberry Pi kits I linked above, here is an excellent video on how to get your Raspberry Pi setup inside the enclosure, how to add the heat sinks, install the fan, and get the operating system setup for the first time.
One thing to note here is that we will eventually be taking the Raspberry Pi back out of this enclosure in a little bit if we want to integrate it with other things like the bread board and LEDs in the kit. For right now though, it will help us get started.
If you’re not working with the kit above, you’ll still need to insert the microSD card to the Raspberry Pi, connect the USB mouse and keyboard, and also the micro HDMI to your monitor. Most of these steps are also in the video and you can follow along.
All done and we can boot up our Raspberry Pi and finish setting it up as shown in the video. After the OS installs on the device, and we connect the Wi-Fi network and set the other basic settings, we can apply the updates and then reboot the device.
Step 3: Creating an IoT Thing in the AWS IoT Thing Registry
The next step for us is to register this IoT Device inside of AWS and get the credentials that will allow us to connect with the cloud.
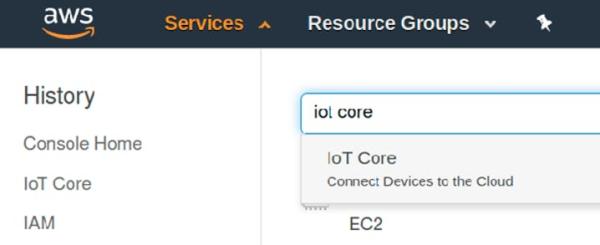
Start by signing into your AWS Account on the Raspberry Pi. Open the Raspberry Pi OS web browser and go to aws.amazon.com then click on“create account” or “sign in”. On the create an account page there should be an option to sign into an AWS Account where you can enter your credentials.
Once signed in, then navigate to the “Services” dropdown and search for “IoT Core”:
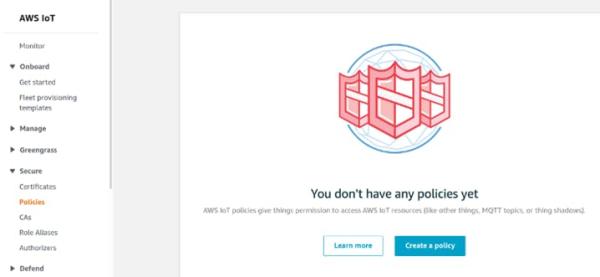
In the IoT Core console, go to Secure, choose Policies and click to “Create a policy”:
This will allow us to create a policy that will give our IoT device permissions to act on things inside of the AWS cloud. We’ll be able to access the IoT Core MQTT Topics that allow us to send and receive data between the device and the cloud.
Let’s call our new policy raspi-policy.
We’re going to give it some broad permissions in this tutorial which, in a production environment, we would scale back substantially to only what the device needs. In this case though, we’re still experimenting and want to be able to support any actions we might like to try out. Thus, we’ll set the Action as “iot:*” and the resource as “*” along with selecting the “Allow” checkbox.
Your screen should look like the image below:
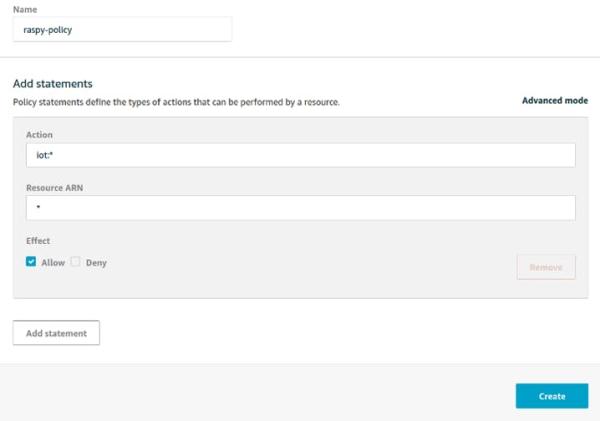
Let’s break this down a little:
- The Allow checkbox means that this policy will allow specific actions on AWS cloud resources. We could also set a policy that explicitly denies permissions to AWS but by default AWS denies all actions unless granted explicitly.
- The “iot:*” action means that we are talking about ALL actions under the AWS IoT service umbrella. The asterisk indicates the “all” part here.
- The Resource ARN indicates what specific AWS resources we can perform these IoT actions on. In this case, we’re referring to any AWS resource.
For the purposes of this device that is living on our desk at the moment this might be acceptable. But you might be starting to see how this policy would be too broad to be applied in a production setting. If we kept it without modification it might let any of our devices make requests to other device’s or interfere with things they shouldn’t!
For our demo though we can leave these values and the allow checkbox as shown above and press “Create”.
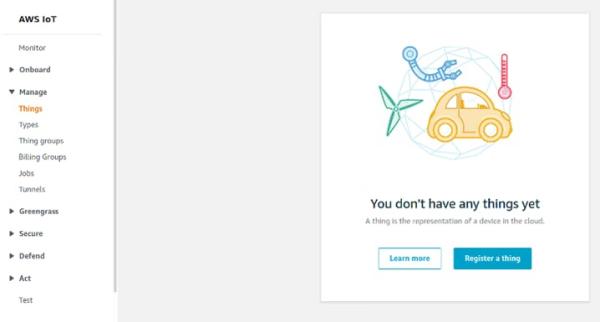
Next, we’ll go to Manage > Things and press “Register a Thing”:
AWS IoT Core provides lots of great tooling for managing IoT “Things” that can help us sort things in to “Types” or “Groups” and use these settings to determine permissions these things might require and how we might want to interact with them. This can also be combined with some more appropriate permissions (as mentioned above) to help secure an IoT environment.
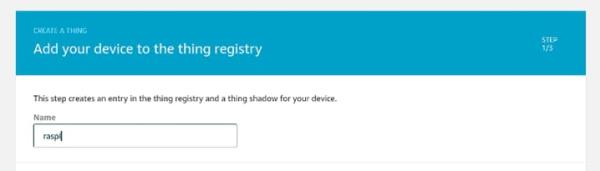
For right now though, we’ll use the easiest method of getting started and click “Create a Single Thing” and name our thing “raspi”:
We won’t bother with thing types, groups or attributes for now, and instead we’ll click next and press on.
Step 4: Securing Our Connection to AWS IoT
The next page offers the option to add a certificate for our thing and it’s why I suggested you log into AWS while still on the IoT device. For the device to speak to the cloud we’ll need the certificate installed locally.
At this point it might make sense to briefly summarize how public key cryptography works, how it applies to IoT devices and how that differs from typical web-based public key scenarios.
Securing Websites with Public Key Cryptography
If you have a website and you wish to allow your users to connect securely, you can request a certificate for your website from a Issuing Certificate Authority, or CA. This CA goes through a very stringent process to securely create a public and private key and store the private key securely. There is then a second layer called a Root CA, which signs the issuing certificate authority’s certificate.
These Root CAs then work with hardware and software vendors like web browsers and consumer electronics like laptop manufacturers in order to bundle public keys in with the devices they sell. This allows a person to visit your website, review the website certificate you provide, see who signed it, review that CA certificate and check it against the Root CA certificate that was already bundled on their machine. After confirming the Issuing Certificate Authority’s certificate is good it will then use that certificate to verify yours and then establish a connection with your site using that information.
While we’re ignoring a few other layers of public key infrastructure (PKI) around how revoking certificates works and newer changes to PKI related to public listings of issued certificates, this is essentially how securing website works online. But what happens when you are making the devices yourself?
Public Key Cryptography and Securing IoT Devices
Let me start by saying that there are other mechanisms for trying to implement security on IoT devices. Tokens or access keys can be used or embedded on devices to perform some of the same operations.
However, these methods rely on symmetrical encryption and are generally considered less secure because the key must be protected on both the cloud and the device. Additionally, when using access keys or tokens like this, they are more likely to be abused and stored in plaintext or hardcoded in software which makes them more accessible to attack vectors. For these and other reasons, a public key cryptography approach is preferred
When connecting our device to AWS IoT we can use public key cryptography to do so. Within that, we have a few options for generating certificates:
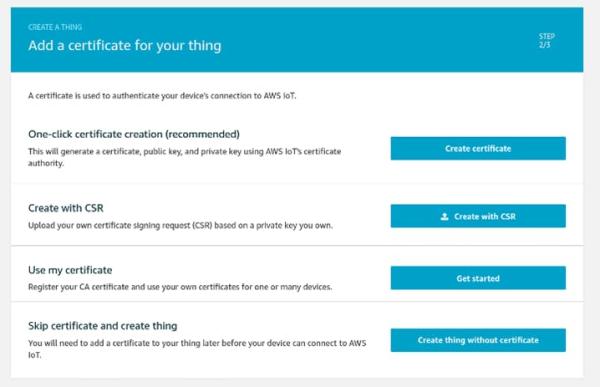
Let’s see how these options work:
- One-clickcertificate creation (recommended) – AWS generates a public/private key that we’ll be using for our device. It then takes the public key and makes a Certificate Signing Request or CSR that it signs with its own CA Private Key to generate a certificate we can use on our device. This all happens in the background and then AWS allows us to download the public/private key and the certificate it created for us so we can authenticate our device later on – simple! We also download a Root CA certificate from AWS that we use to authenticate our connection with AWS.
- Create with Certificate Signing Request – With this approach, we have our own public and private key already, either on a personal computer or maybe provisioned already on our IoT device. We then use our keys to create a CSR on our end before sending that CSR to AWS. AWS will then send us back a certificate which we can use in combination with our private key on the device. But like the first option, this requires us to have permissions to call AWS APIs for every new certificate we want to generate.
- Use my Certificate – In this option, we can register our own certificate authority certificate so that we can sign one or many kinds of devices. Then, we can use that certificate to sign new certificate requests without having to make a request to AWS. This is the most common approach when working on production services where we are creating a large number of devices and we want to provision a unique certificate for each.
For right now, given that we’re only provisioning one device and that we’re not deploying this device into the wild beyond our home networks, we’ll go with the first option.
After we make our one click, we should download all the created certificates to our Raspberry Pi device:
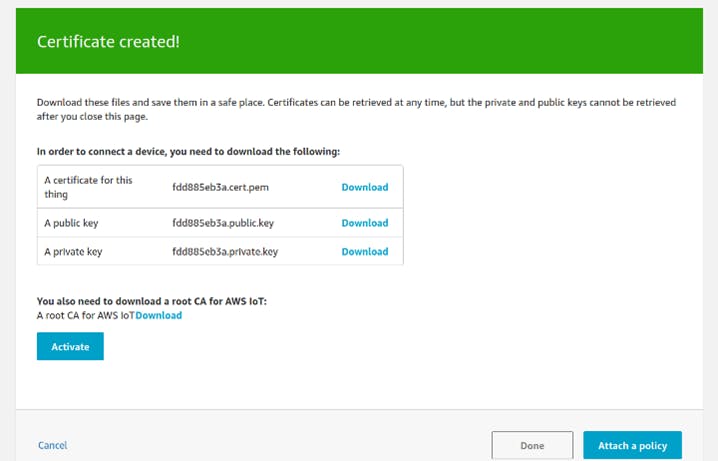
Download all three of these files and then make sure to press “Activate”. Because AWS has already used the public key to help generate a certificate for us we will mainly be using the certificate and the private key to authenticate and sign our requests to AWS.
Also, on this page we need to open the link for the root CA download which is right above the “Activate/Deactivate” button:
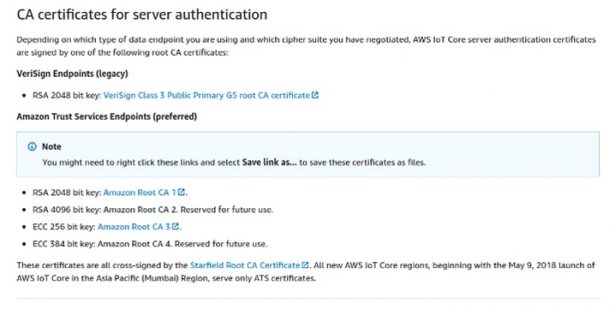
From this page, download the Amazon Root CA 1. Right click the link and click “Save link as” and save it to the Raspberry Pi. This certificate allows us to trust AWS IoT itself.
Once you’ve downloaded the Root CA certificate along with the three other certificates, you should have a total of four files on your Raspberry Pi. Go back to the “Certificate created!” page and make sure to press “Activate” if you haven’t already.
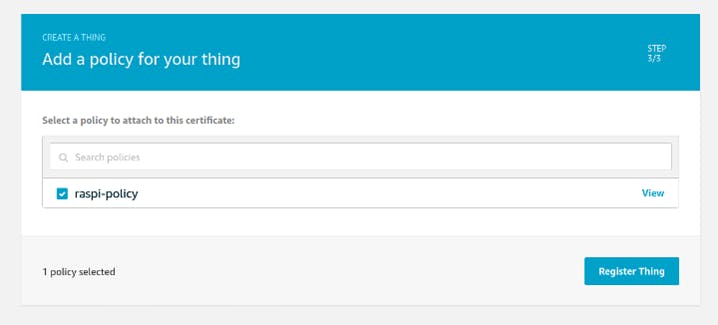
Then you can press the “Attach a policy” button. On this page, select the checkbox next to the “raspi-policy” we created earlier and then press “Register thing”:
Now we should have the certificates we need on our device to have it start communicating with AWS and it should show up in the Things portion of IoT Core:
And now we need to download some dependencies and – finally – write some code!
Step 5: Installing Dependencies on Our Raspberry Pi
In this tutorial, we’ll be using Python 3 but if you’d like to see a demo in another language, just leave a comment below!
Fortunately for us, Raspberry Pi OS should come with Python 3 installed on it already. If you’re working with another operating system on the Raspberry Pi, you will want to install Python 3 with at least version 3.5 or later. Raspberry Pi OS also comes with git installed so if you’re using a different operating system, you’ll want to install that too.
The next step will be to install the AWS IoT SDK for Python. Before this, however, we’ll need to gather some dependencies that are not included on our Raspberry Pi OS. We’ll do this by running the following commands and pressing Y when prompted to add the dependencies to our system:
sudo apt-get update
sudo apt-get install cmake
sudo apt-get install libssl-dev
After we run these commands, we should be able to use pip3 to install the AWS IoT SDK:
pip3 install awsiotsdkThis installation process might take a few minutes but when it’s finished, we can get the code we need for this tutorial. To do this, run:
git clone https://github.com/Witekio/aws-iot-core-raspberry-pi-demo.gitStep 6: Syncing Our Raspberry Pi with an AWS IoT Shadow
Now that we have the code, we’ll need both of the code files to be placed in the same directory as our certificates.
cd raspberry-pi-aws-iot
mv ~/Downloads/<your-certificate-name>-certificate.pem.crt .
mv ~/Downloads/<your-certificate-name>-private.pem.key  .
mv ~/Downloads/AmazonRootCA1.pem .
Note : replace “<your-certificate-name>” with the actual first part of your certificate names.
At this point, we might also want to make sure we change the permissions on the downloaded files to make them readable only to the current user. We can do this by running the following commands in the same directory as the certificates are now:
chmod 400 <your-certificate-name>-certificate.pem.crt
chmod 400 <your-certificate-name>-private.pem.key
chmod 400 AmazonRootCA1.pem
Remember to replace all of the parts with <these> in them!
Of course, in a production scenario, we probably wouldn’t provision these files in this way. Instead, we’d have a process for storing sensitive information like this inside something like a Trusted Platform Module or TPM. This allows us to be more confident that the certificates can’t be stolen off the device and used in some other system. While devices might still be compromised, with a TPM it becomes much harder to steal the keys and use them elsewhere without being noticed.
The last thing we’ll need to get before syncing our device to the cloud is the endpoint URL for our Thing. In order to find the endpoint URL you can click into the details of your new AWS IoT Thing and look under the “Interact” section. Note that in this section there are both an HTTPS URL and an MQTT section:
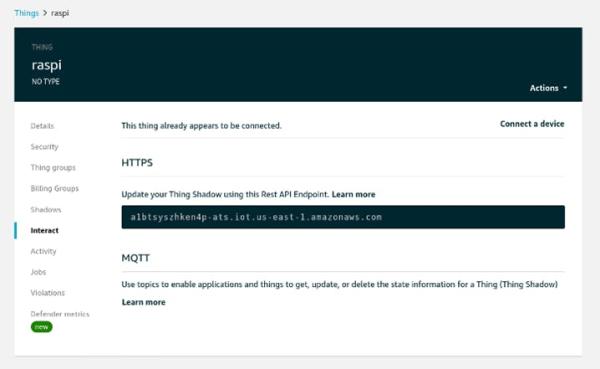
This is because AWS IoT supports connections using multiple protocols including HTTPS, MQTT and MQTT over WebSocket – for a full list you can refer to the documentation here.
On this page, copy the endpoint value under HTTPS down and use it, along with the names of the certificates you have in the present directory, to replace the “<your-certificate-name>” and “<endpoint>” sections of this command:
python3 shadow.py --endpoint <endpoint>-ats.iot.us-east-1.amazonaws.com \
--cert <your-certificate-name>-certificate.pem.crt \
--key <your-certificate-name>-private.pem.key \
--root-ca AmazonRootCA1.pem \
--thing-name raspi \
--shadow-property light
After you update it, it would look something like this:
python3 shadow.py --endpoint a1btsyszhken4p-ats.iot.us-east-1.amazonaws.com \
--cert fdd885eb3a-certificate.pem.crt \
--key fdd885eb3a -private.pem.key \
--root-ca AmazonRootCA1.pem \
--thing-name raspi \
--shadow-property light
Before you run this command, go over to the “Shadows” section of your “raspi” thing and click “Classic Shadow”. You should see this:
Run the command above and see what happens !
You should see an output that describes the process of syncing with AWS IoT and then a prompt that allows you to update the state of the device from the device itself. Type in “OFF” and press enter. Then see what happens to the IoT Code Shadow state:
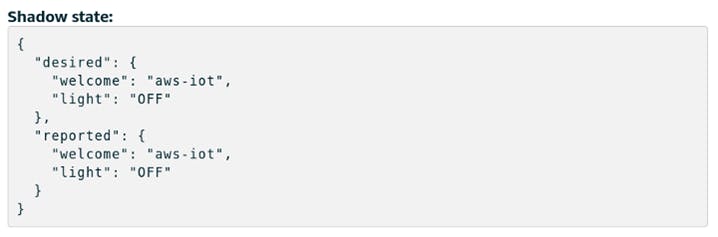
Now, just click the “Edit” option in AWS IoT Core and update your shadow by editing the “Desired” property of “light” to “ON”. You should see the device report the new updated state in the terminal!
If you’re still with me, it means we’ve successfully connected our device to AWS IoT Core. In the background what’s happening here is that our “shadow” has a desired and reported value. When we update the desired value the script running on the device polls an MQTT topic provided by AWS IoT Core to see if anything has changed. If it sees a new “desired” value then it knows it needs to update the state on the device. This triggers the script on the device to update the “reported” value in the MQTT shadow for the device. In the long run, this will allow us to act on changes to the desired or reported state of a device and manage connections between the cloud and devices more effectively, especially in situations when network access cannot be maintained – something common for many IoT devices.
Now we need to set up our hardware and have the cloud control an LED on our device!
Step 7: Hardware Configuration and GPIO Testing
For this demo, I’ll be using some of the equipment that came in the Raspberry Pi kit linked in the first section of this tutorial. Specifically:
- A breadboard
- A Raspberry Pi GPIO Extension Board
- A 40-pin extension cable
- One red LED
- One 10K Ohm resistor
- Two jumper wires
For the hardware portion of this tutorial, we’ll be remotely controlling one of the Raspberry PI’s GPIO pins to provide power for an LED when the “light” property of the device is set to “ON”. For the moment, shutdown and unplug your Raspberry Pi so you can setup the breadboard and the LED.
We’ll be using the same pin configuration as the first project shown in the Freenove Ultimate Starter Kit for Raspberry Pi here.
You can download the project details and tutorial in PDF format from here.
Inside that ZIP file is a Tutorial.pdf file that includes the hardware configuration for the project we’re doing from page 52 to page 55 in “Chapter 1 LED”. If you haven’t done much work with hardware before, make sure that you read the instructions carefully and be sure to pick an appropriate resistor for your LED. In my case, the 10K Ohm resistor was appropriate for the red LED.
Source: Connecting a Raspberry Pi IoT Device to the AWS Cloud