
The title of the article can be as well as ‘Let’s build robots using stepper motors and the Raspberry Pi,’ because everything you need is a good example of where you can learn how to control the spin direction, speed, and the rotation of a stepper motor using a fruit-named single board computer, a controller board, and one or more stepper motors.
Having played with LEDs, switches, or any other components that can be embedded into a robot is a plus and can contribute to improve your electronic and programming skills in order to interface stepper motors with Raspberry Pi.
To get the motion of the electric motors, you have to build an entire system where several components such as a motor drive board, stepper motor, single board computer, wires and a programming language has to be combined to return a functional motion system able to move a robot with accuracy and on the right path.
A stepper motor is controlled by multiple electromagnetic coils able to work individually to provide a precise rotation of the motor divided into steps. There are several reasons to use stepper motors in robotic projects including here an accurate position, abilities to spin forward and backwards in discrete steps or in a continuous rotation, and the ability to be controlled with or without feedback.
The Raspberry Pi is a single board computer with support to connect and control directly a wide range of components and modules. Your focus in interfacing stepper motors with RPi is the GPIO pins that can be found in number of 2×13 header pins including SPI, I2C, serial UART, 3.3V and 5V power. If for an Arduino board you might control motors using the 5V power level, the RPi allow you to use the 3.3V logic pins.
How to control a stepper motor with Raspberry Pi
My mission with this article is to provide you as much information to control the stepper motors with a wide range of programming languages supported by the Raspberry Pi, as well as in as many methods to fit on any project.
Using simple programming lines, you can control the certain pulse signal that will drive the motor in steps to a certain angle. At the same time, you can control the speed of the stepper rotate by controlling the number of the pulse. All of these controls use the GPIO pin states, which can be LOW or HIGH. When the state of a pin is HIGH, the motor is engaged in rotation and with the proper sequence and timing you achieve motor rotation.
How to program the RPi and what components you need to use in order to control one or more stepper motors can be found here:
- Raspberry Pi – Stepper Motor Control & Breakout Board – from this tutorial you can learn how to control a stepper motor running Java on Raspberry Pi and using the components from a Stepper Motor Breakout Board kit;
- JavaFX on Raspberry Pi: Some fun with stepper motor – this guide shows you how to use a user interface application to control a stepper motor. The application is called JavaFX UI, which is an application able to control the GPIO pins of the Raspberry Pi;
- Adafruit’s Raspberry Pi Lesson 10. Stepper Motors – you can control a stepper motor using different components and different methods. In this tutorial you can find how to control a stepper motor using one of the L293D or ULN2803 motor drivers. In the same tutorial you can find a few tips and trick that can help you to understand when a motor drive such as ULN2803 is better to use compared with L293D. As an example, the ULN2803 has several spare outputs that can be used for something else;
- Controlling a stepper motor with the Raspberry Pi and Piface – using simple digital interface compatible RPi, your work can become easier. In this guide has defined the concept of ‘Pi-Face Digital Interface’, a complete resource to control motors, lights, and many more components that can be found in a robot. The electronic board is a credit card-sized device able to sense inputs, fully compatible with Python, capable of onscreen simulator, user friendly, and a real protection for the Pi;
- Stepper Motor Control In Python – this tutorial shows you how to control the 28BJY-48 stepper motor with the ULN2003 motor drive board. The programming language used is Python, while the entire example is a simple exercise to catch the skills to embed components;
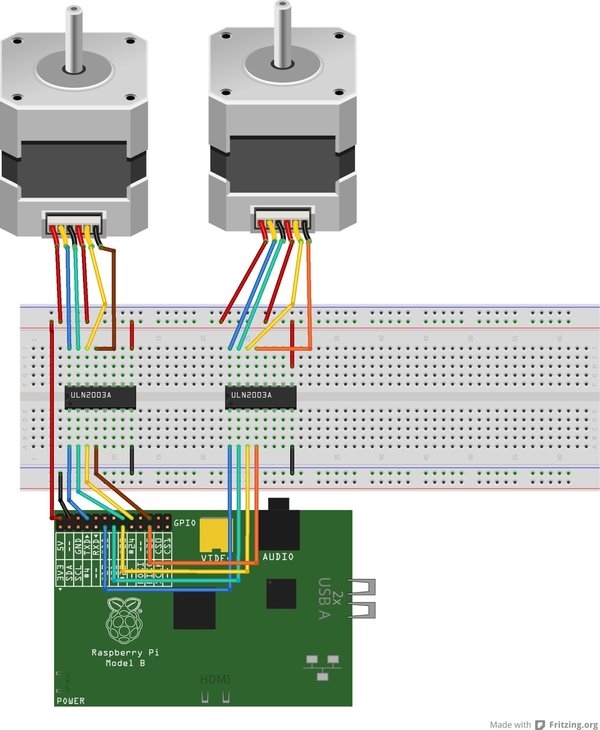
- Raspberry Pi, Unipolar Stepper motors, ULN2003 Darlington Pairs, USB Gamepad, Python – with this example, we enter into the area of real-life applications were in a vehicle are embedded two stepper motors controlled with a RPi and a USB Gamepad/Joystick;
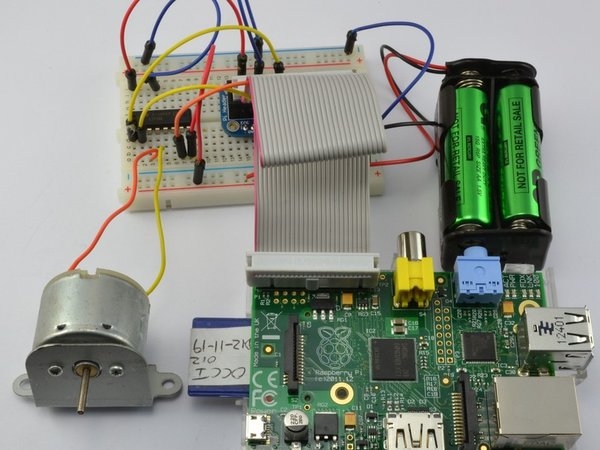
- [link removed] Tutorial : Control a DC motor with Raspberry Pi – this tutorial is a comprehensive source to learn how to control the speed and the direction of a stepper motor using a dual H-bridge motor driver integrated circuit (L293D);