
Step 1: Components needed
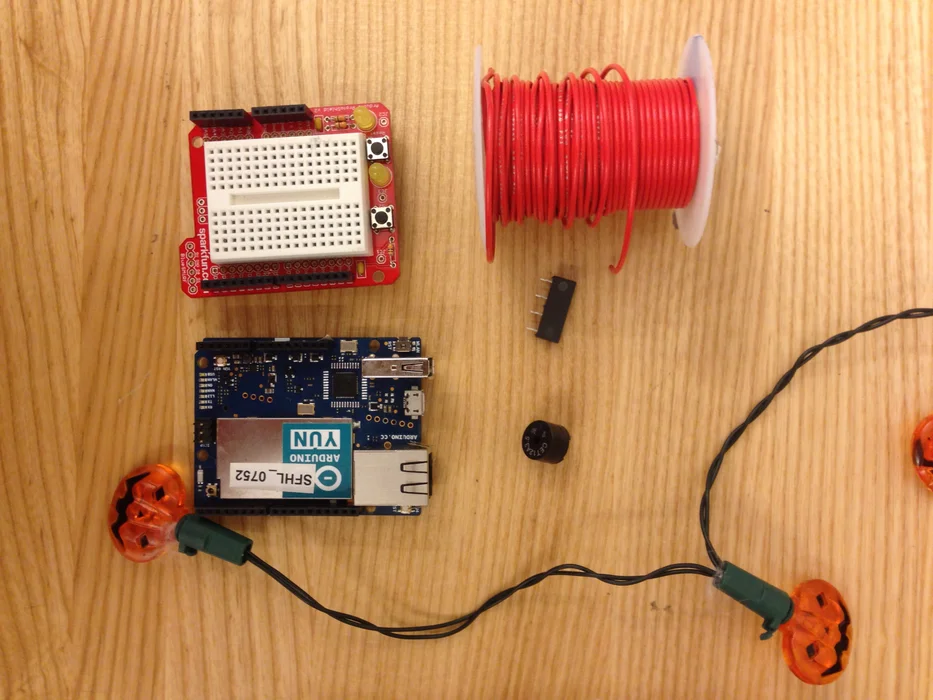
- An Arduino Yun (Wifi Enabled!) – You could use another Arduino with a Wifi Shield though.
- A Protoshield with (or without) a tiny breadboard
- a regular breadboard will work as well, but will be less compact.
- If you want to solder more, you can just use a small circuit board instead.
- A 5V relay
- A piezo buzzer
- Wires
- A battery operated Christmas decoration (It's not even Thanksgiving, so I'm using a Halloween decoration)
- A Temboo account (explained in next steps)
- A Twilio account
Step 2: Break open your decoration
- I took apart the battery case and pulled the circuit out.
- Separated the battery case from the circuit, marking the positive and negative wires.
- The decoration was powered by 3 1.5V batteries = 4.5V. We won't need it, we can power it with the Yun's 5V.
- My Decoration circuit used a push button switch to turn on and toggle between modes (short clicks) and to turn off (long click and hold)
Step 3: Solder wires to the decoration
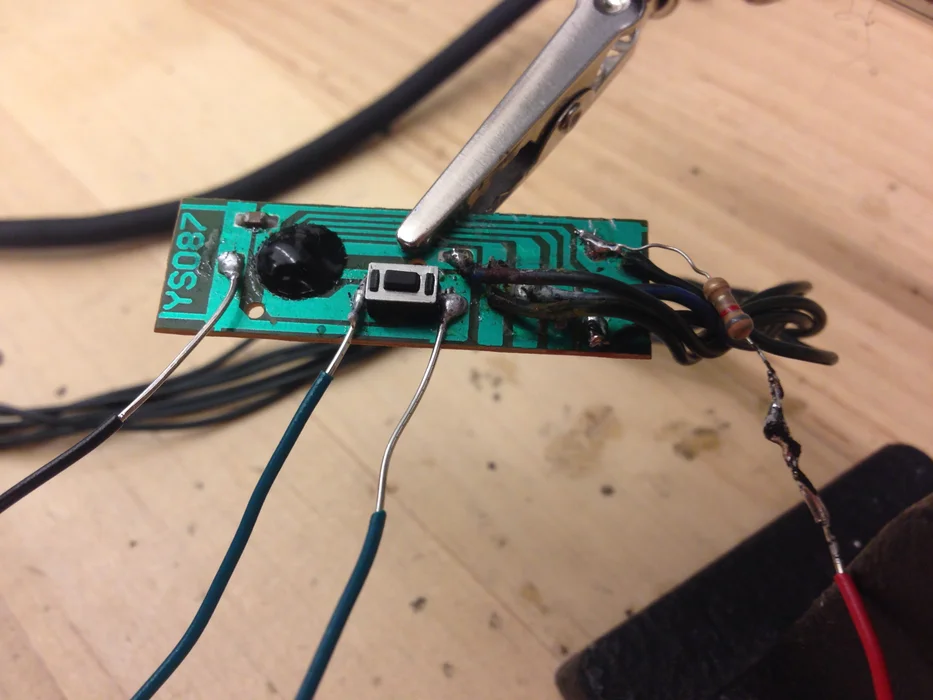
- I soldered new wires to where the batteries positive and negative leads went to:
- The red wire connected to the resistor that came in the decoration.
- The black wire to where the negative lead was connected to.
- I connected two wires to the switch to later connect to the relay.
You can turn your decoration on and off with only the +/- leads if it turns on automatically when powered, but I wanted to be able to toggle between modes using Arduino (not in this Instructable though).
Step 4: Heat-shrink tubing

I used heat-shrink tubing to cover the exposed parts of the wires.
- Electrical tape would do…
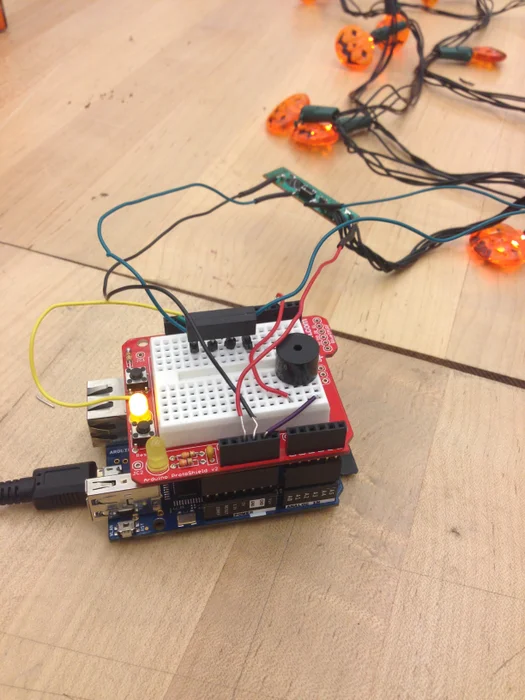
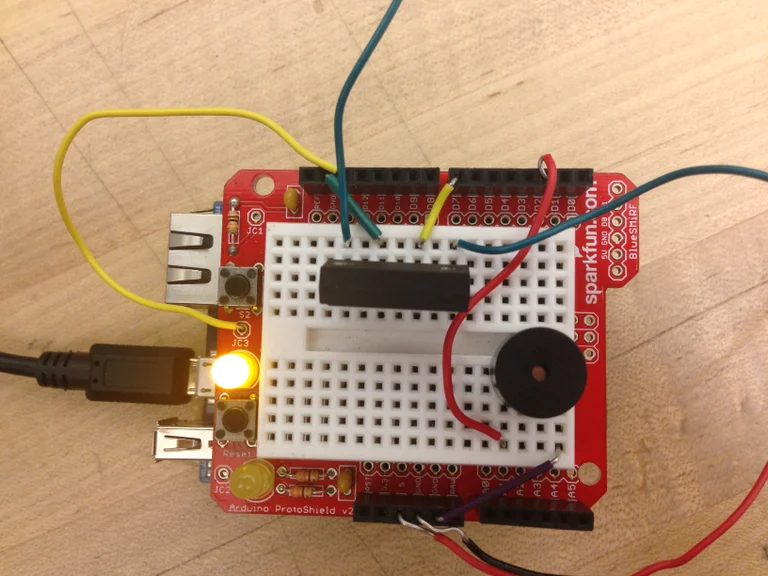
Step 5: Wire it!
Attached is the schematic in PNG and PDF.
- The Protoshield's LED is wired to D13 and uses the built in resistor and GND connection.
- If you're not using the Protoshield's LED, connect the LED to a 330Ω resistor and the GND.
- The LED is for debugging. It's on whenever the decorations lights are on.
- The buzzer's purpose is to give an audible signal when the lights go on or off. It is wired to D2 and GND.
- The relay is where the magic happens!
- According to your specific relay's specs (look them up, you'll need it!) you'd have to wire 2 of the pins to the toy's switch and the other 2 to GND and D7.
- Relays are basically electromagnetic operated switches – if I run 5V through the coil pins, the magnetic force closes the switch circuit.
- When I run power from D7, the relay closes the circuit and simulates a button press on my decoration switch.
- My relay has the model name on its side – COTO 9007-05-00
- Googling it gave me the schematics on the data sheet: http://media.digikey.com/pdf/Data%20Sheets/Coto%20…
- According to that, I know to connect the toy to the switch at pins 1 & 4, and D7 and GND to the coil at pins 2 & 3.
Step 6: Set up your Arduino Yun
The Yuns are finicky. I'm not going to get into details here on how to set one up but PLEASE read these:
- The Yun's hardware – http://arduino.cc/en/Main/ArduinoBoardYun
- This is critical to read.
- Very important – The Yun Does not have a voltage regulator. It has to be powered by no more than 5V or it will be damaged.
- Guide to the Arduino Yún – http://arduino.cc/en/Guide/ArduinoYun
- You need to connect the Yun to your wifi network, to be able to read text messages.
- You can also program the Yun over wifi, but that's not necessary.
- My code assumes you are programming the Yun over wifi, and the “serial” monitor uses the wifi connection (with Bridge and Console).
- If you wanted to monitor the Yun over the USB cable you'd have to change the Console commands to Serial commands.
- You don't need much more from the Yun for this project.
Step 7: Cloud Services 1 – Temboo
- You're going to need to sign up for both Temboo, a service that's integrated with Arduino and lets you use web services and resources.
- Go the Arduino Yun set up page for Temboo – https://temboo.com/arduino/yun/. This will be helpful for future projects and has some guides and tutorials to get you started.
- Create an account on Temboo.
- Go the library – https://temboo.com/library/
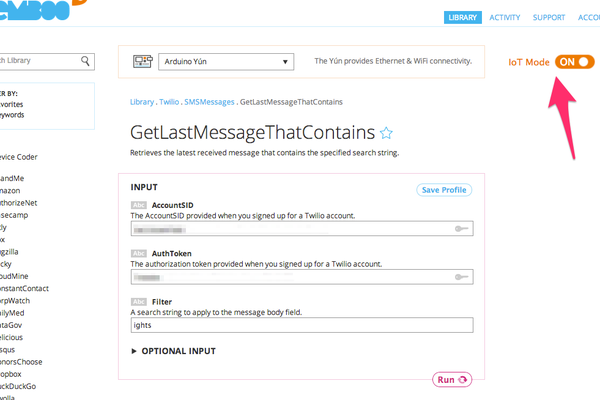
- We're going to use the GetLastMessageThatContains call from Twilio's library – https://temboo.com/library/Library/Twilio/SMSMessa…
- Make sure that the IoT Mode is set to on.
- Scroll down to the Header File box and follow the instructions:
- In your Arduino IDE create a new tab called TembooAccount.h
- Copy the information from this box to that tab and save.
- We'll provide you with the code to put in the main sketch tab in one of the future steps.
Step 8: Cloud Services 2 – Twilio
- Sign up for a free account at Twilio – https://www.twilio.com/try-twilio
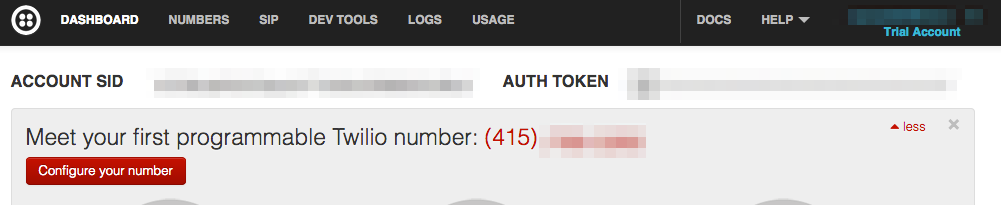
- Claim a free phone number.
- After you've set up, go to the Dashboard and copy the Account SID to use in the Sketch later.
- Do the same with Auth Token.
Remember the phone number, this is where you'd be texting your commands.
Step 9: Let's Put in the Sketch
- I'm assuming you got your Arduino connected to your wifi.
- You already have the new tab for TembooAccount.h, right?
- In the main sketch tab copy the code below. It's annotated and should be easy(ish) to understand. Email me for clarifications and questions.
- Put your Auth Token ID and SID account ID below, where these placeholders are:
- PUT_AUTH_TOKEN_HERE
- PUT_ACCOUNT_SID_HERE
#include <Bridge.h>
#include <Temboo.h>
#include "TembooAccount.h" // contains Temboo account information, as described below


int numRuns = 1;   // Execution count, so this doesn't run forever
int maxRuns = 4320;   // Maximum number of times the Choreo should be executed - 4320 is Every 10 minutes, for a month.
int ledPin = 13; // Led for debug
int buzzerPin = 2;  // buzzer's connected to pin 2
int lightsPin = 7; // The pin where your Xmas lights are connected to.
int timeToWait = 600000; //Delay between calls


String bodyMsgLast = "none"; // This variable holds the last text message read.


void setup() {

  //DEBUG MODE - comment out this segment for production
  //maxRuns = 10; //debug maxruns
  //timeToWait = 10000; //debug time to wait
  //END DEBUG MODE

  //Set Outputs
  pinMode(ledPin, OUTPUT);
  pinMode(lightsPin, OUTPUT);
  pinMode(buzzerPin, OUTPUT);


  //Turn lights off on boot up
  digitalWrite(lightsPin, HIGH);
  delay(5000); //simulates a button press for 5 seconds
  digitalWrite(lightsPin, LOW);
  delay(1000);


  //Console setup (Should be serial for non Yun arduinos)
  Bridge.begin();
  Console.begin();
  //  while (!Console); //Waits for Console to connect before starting. Disabled by default.


}


void loop() {
  if (numRuns <= maxRuns) { //Run only if haven't passed the max amount of runs
    Console.println("Running GetLastMessageThatContains - Run #" + String(numRuns++)); // prints Run number


    TembooChoreo GetLastMessageThatContainsChoreo;


    // Invoke the Temboo client
    GetLastMessageThatContainsChoreo.begin();


    // Set Temboo account credentials
    GetLastMessageThatContainsChoreo.setAccountName(TEMBOO_ACCOUNT);
    GetLastMessageThatContainsChoreo.setAppKeyName(TEMBOO_APP_KEY_NAME);
    GetLastMessageThatContainsChoreo.setAppKey(TEMBOO_APP_KEY);


    // Set Choreo inputs
    GetLastMessageThatContainsChoreo.addInput("AuthToken", "PUT_AUTH_TOKEN_HERE"); //Twilio Authentication Token
    GetLastMessageThatContainsChoreo.addInput("Filter", "ights"); // Filter for incoming messages holding this word
    GetLastMessageThatContainsChoreo.addInput("AccountSID", "PUT_ACCOUNT_SID_HERE"); //Twilio account ID
    GetLastMessageThatContainsChoreo.addInput("ResponseMode", "simple"); //Response Mode


    // Identify the Choreo to run
    GetLastMessageThatContainsChoreo.setChoreo("/Library/Twilio/SMSMessages/GetLastMessageThatContains");


    // Run the Choreo; when results are available, print them to Console
    GetLastMessageThatContainsChoreo.run();
    String bodyMsg; // This contains the whole Message
    while (GetLastMessageThatContainsChoreo.available()) {
      char c = GetLastMessageThatContainsChoreo.read();
      Console.print(c);
      //c is one character at at time from the whole message. It's being printed to the console.


      bodyMsg += c; //The characters are being fed to the bodyMsg string
    }


    if (bodyMsg != bodyMsgLast) { //Only runs if this message is different than the one stored.
      if (bodyMsg.substring(17, 19) == "on") { //This only works if the 17th to 19 letters are "on"".
        // This works if you're seinding the message "Lights on"
        // Characters before Lights on are other info from Twilio


        // Turn lights on
        digitalWrite(ledPin, HIGH); //turns on debug LED
        digitalWrite(lightsPin, HIGH);
        delay(800);
        digitalWrite(lightsPin, LOW); //Simulated button press for less than a second
        Console.println("Lights are on");
        tone(buzzerPin, 2000, 3000); //beeps for 3 seconds
      }  else if (bodyMsg.substring (17, 20) == "off") { //reads "off" from a message saying "Lights off"
        digitalWrite(ledPin, LOW); //turns off debug LED
        tone(buzzerPin, 4200, 1000); //beeps
        digitalWrite(lightsPin, HIGH);
        delay(5000); //simulates a 5 second button press to turn the lights off
        digitalWrite(lightsPin, LOW);
        delay(1000);
        Console.println("Lights are off");


      }


      bodyMsgLast = bodyMsg; //Copies this message to the Last message variable
    } else {
      Console.println("Identical to Last"); //if identical, do nothing.
    }
      Console.println();
      Console.println("Waiting...");
      delay(timeToWait); // wait a period between GetLastMessageThatContains calls


  } else {
    Console.println ("Done. Restart me for another run");
    abort();
  }
}
Step 10: Running the Code
- The Arduino checks for text messages received on your account every 10 minutes, 24/7 for a month.
- This comes up to 4320 API requests a month. You might have to upgrade your accounts for this much traffic on Twilio and Temboo (hey, spending money is part of a long Christmas tradition).
- For testing it out, you should enable debug mode by uncommenting the lines between //DEBUG MODE and //END DEBUG MODE
- In the debug mode it will only run 10 times, with 10 seconds between calls to Temboo and Twilio.
- Upload your sketch to your Arduino!
- The lights might turn on for one short run or two.
- It then checks the last message on your Twilio number.
- If the last message is “Lights off“, the Arduino will turn / keep the lights off.
- If the last message is “Lights on“, it will turn / keep the lights on.
- If the message is the same as it was last time the Arduino checked, it won't do anything.
- To Monitor the Arduino's functions, you can open the Serial monitor on the Arduino IDE. It will connect to the Arduino over the network to show you the debug messages:
- (Test number, Full response (6 lines), Identical to Last – if no change from last message, Waiting)
Note – after you see the done message, restart your Arduino (or re-upload the code) to restart the program.
Running GetLastMessageThatContains - Run #9
Response
Lights off
TotalPages
1
HTTP_CODE
200
Identical to Last


Waiting...
Running GetLastMessageThatContains - Run #10
Response
Lights off
TotalPages
1
HTTP_CODE
200
Identical to Last


Waiting...
Done. Restart me for another run
Step 11: Test It Out – Lights On
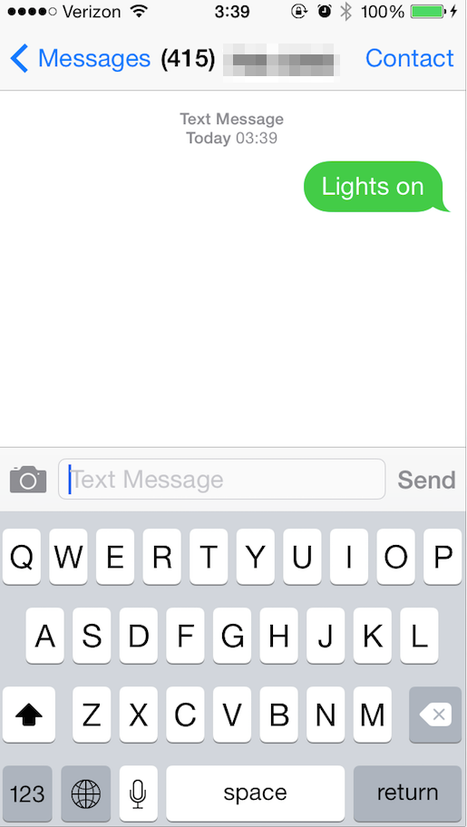
As long as your program is running (not finished and waiting restart), you can control the lights.
Send the text message “Lights on” (case sensitive, no quotes) to the Twilio number you got assigned.
Within 10-20 seconds on debug mode, and 10-20 minutes on production mode (default), the lights will turn on.
Step 12: Test It Out – Lights Off
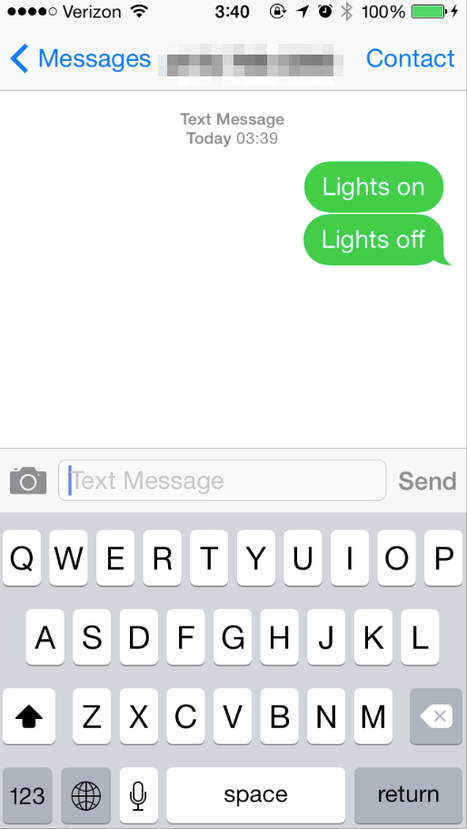
As long as your program is running (not finished and waiting restart), you can still control the lights.
Send the text message “Lights off” (case sensitive, no quotes) to the Twilio number you got assigned.
Within 10-20 seconds on debug mode, and 10-15 minutes on production mode (default), the lights will turn off.
Source: Controlling your Christmas lights with Text Messages