
This tutorial is using the Raspian Wheezy OS, Jesse has a similar installation but will not be the exact same. This is an easy tutorial on how to create a WordPress Site on Raspberry Pi. Comments? Questions? Post below!
1. Install Apache2
First we have to instal the apache2 package on our Raspberry Pi by typing the following command into the terminal:
2. Test the Web Server
Apache has already put a HTML file in our web folder. We can view this page from our computer by navigating to the IP address of our Raspberry Pi from another computer on the network. To find out the Pi’s IP address, type
at the command line (or read more about finding your IP address) in Raspberry Pi’s documentation.
My IP address is 192.168.1.11 and this is what I see when I go to it
3. Find Default Home Page and Remove It
This default web page is just a HTML file called ‘index.html’ located in Head there now by running the command
You should see our index.html file. You can edit this file but we remove it for now because we do not need it.
4. Install PHP + Packages
Install the PHP and Apache packages with the following command:
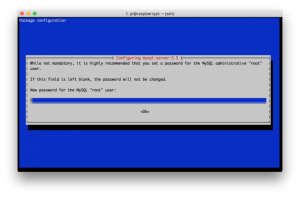
4. Install MySQL
Install the MySQL packages with the following command:
After this command is executed, you should see this screen. Enter a password for the ‘root’ user.
After it finishes installing (takes a few minutes) then we can continue.
4. Download WordPress Files to to your Raspberry Pi
Head to the /var/www folder to download WordPress. Run these commands:
Extract WordPress files to the current (empty) folder.
5. Setup WordPress Database with MySQL
Now we will setup a database that will communicate with our WordPress instance. Run the following commands:
Hit enter, and then hit Ctrl-D to exit the MySQL prompt.
6. Go to IP Address of Raspberry Pi
WordPress now makes the installation extremely easy. Because we have our files in the correct www folder, have created our database, we can now head to the IP address of our Raspberry Pi to complete the installation. My IP address is 192.168.1.11. This is what you should see when you navigate:
After you hit ‘Let’s Go!’, enter our details from above:
7. Copy wp-config File
The next screen will show you the wp-config file. Copy it to your clipboard and prepare to paste it back on your Raspberry Pi to finish installing the WordPress instance.
On your Raspberry Pi run the commands:
Paste the contents then hit Ctrl-X to exit and save. Then back on the front end you can hit ‘Run the Install.’
For More Details: Create a WordPress Site on Raspberry Pi