
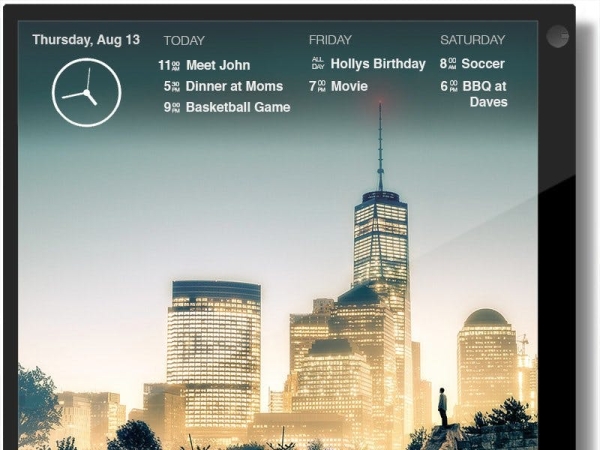
DAKboard is a wifi connected wall display for your photos, calendar, news, todo and weather.
Have a spare monitor lying around or a new Raspberry Pi but don’t know what to do with it? Perfect! Follow our instructions below to create a beautiful wall display running DAKboard, powered by a Raspberry Pi!
Things You’ll Need
- Monitor with HDMI input (preferably an IPS panel!) (roughly $200, depending on size)
- Short HDMI cable (1 foot is perfect, but 3 feet works too) ($7, Amazon)
- Raspberry Pi computer (plus wifi dongle, if using the Pi version 1 or 2) ($36, Amazon)
- 8GB+ SD/Micro SD card ($7, Amazon)
- Micro USB charger (for Raspberry Pi) ($7, Amazon)
- Power Extension Cord ($7, Amazon)
- Photo Frame Wire ($4, Amazon)
Sign up and configure DAKboard
If you haven’t already done so, sign up and configure DAKboard. In the configuration screen, go to “Account” and click the “Generate” button next to “Private URL”. Note this URL, as we’ll need it later when configuring the Raspberry Pi.
Download and install Raspbian OS
I recommend downloading NOOBS, which is a simplified Raspbian OS installer: https://www.raspberrypi.org/downloads/noobs/
Once downloaded, follow the setup guide to get the OS onto your SD card, and the Raspberry Pi up and running: https://www.raspberrypi.org/help/noobs-setup/
After following the NOOBS setup instructions, you should now have your Raspberry Pi running but we’ll need to update a few settings to optimize it to run DAKboard.
Configure the Raspberry Pi
We’ll want our Raspberry Pi to boot directly into a browser running DAKboard in fullscreen mode, without having to press the keyboard or click the mouse! So, you’ll either want to open the terminal application if you’re in the Raspberry Pi desktop, or SSH into your Raspberry Pi.
Run raspi-config to configure some system options:
raspi-configIn here, choose to:
- Boot to desktop
- Enable SSH server (optional, if you want to connect from another computer)
- Set the proper timezone
Exit and choose to reboot later. Set your Wifi network name and password:
sudo nano /etc/wpa_supplicant/wpa_supplicant.confAnd change your SSID and PSK:
network={
 ssid="YOUR_NETWORK_NAME"
 psk="YOUR_WIFI_PASSWORD"
}
If you’re going to be mounting your display vertically (portrait orientation), change the rotation configuration:
sudo nano /boot/config.txtAnd add:
display_rotate=1You’ll also want to check and make sure that disable_overscan=1 and no other overscan configs are uncommented here. Now lets reboot so our network settings will take effect and we can access the internet:
sudo rebootOnce the RPi is back up, go back into a terminal and we will need to install a couple apps, and have DAKboard load automatically on boot.
sudo apt-get install chromium unclutter vimChromium isn’t included in the Raspbian Jessie repository (as of 12/9/2015). Instructions to download and install on Raspbian Jessie are here. And lastly we’ll want to force the screen to stay on, and load the Chromium browser running DAKboard on boot:
Raspbian Wheezy:
sudo nano /etc/xdg/lxsession/LXDE-pi/autostart
@xset s off
@xset -dpms
@xset s noblank
@chromium --noerrdialogs --incognito --kiosk https://dakboard.com/app/?p=YOUR_PRIVATE_URL
Raspbian Jessie:
sudo nano ~/.config/lxsession/LXDE-pi/autostart
@xset s off
@xset -dpms
@xset s noblank
@chromium-browser --noerrdialogs --incognito --kiosk https://dakboard.com/app/?p=YOUR_PRIVATE_URL
Now, reboot one last time, and when the RPi comes back up, we should see DAKboard running in full screen!
Turn the monitor on and off automatically (optional)
To turn the monitor on/off on a daily schedule, grab this script and put it in /home/pi/rpi-hdmi.sh. Next, make it executable:
chmod +x /home/pi/rpi-hdmi.shNow we’ll need to add a cron entry to call this script at the desired time, so open the cron editor:
crontab -eAnd add the following lines at the bottom of the file:
# Turn HDMI Off (22:00/10:00pm)
0 22 * * * /home/pi/rpi-hdmi.sh off
# Turn HDMI On (7:00/7:00am)
0 7 * * * /home/pi/rpi-hdmi.sh on
The first number (0) is the minutes and the second number on each of those lines (22 and 7) is the hour in 24 hour time. So in this example, the monitor would turn off at 10:00pm and back on again at 7:00am. Adjust the time for your needs.
Keep in mind: this does not turn the Raspberry Pi off! It just turns off the monitor, saving energy and hopefully extending the life of your monitor. The Raspberry Pi is still on and running however.
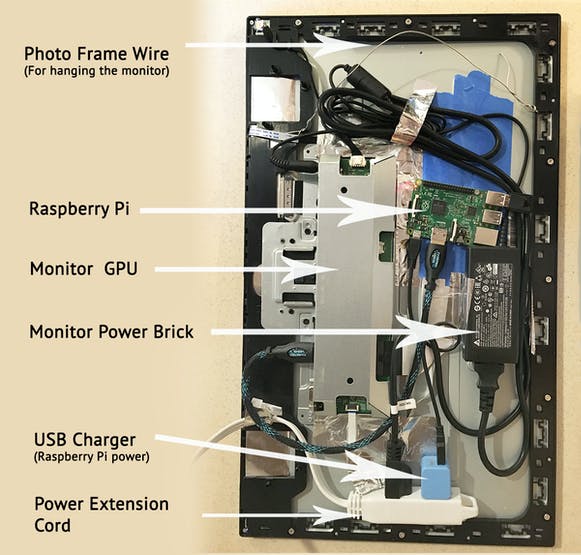
Install hardware on the back of the monitor
I used a Dell S S2340L 23-Inch (Amazon) monitor for a few reasons:
- First, it’s an IPS display, which means if you’re going to be hanging it vertically on the wall, you’ll still be able to see it when viewing at an angle greater than 90 degrees!
- Second, the HDMI and power connections on the back of the monitor face down, not straight out. This is crucial if you’re going to be mounting it to the wall, because if they face out, the monitor will stick out from the wall much further.
- And third, the plastic case is perfect for this setup. There’s almost no bezel on the front, and the back cover pops off easily, leaving the frame which I then attached the photo frame wire to use for hanging!
When you’re all done, plug it in, hang it on your wall and enjoy!
Code:
sudo nano /etc/xdg/lxsession/LXDE-pi/autostart
@xset s off
@xset -dpms
@xset s noblank
@chromium --noerrdialogs --incognito --kiosk http://dakboard.com/?p=YOUR_PRIVATE_URL