
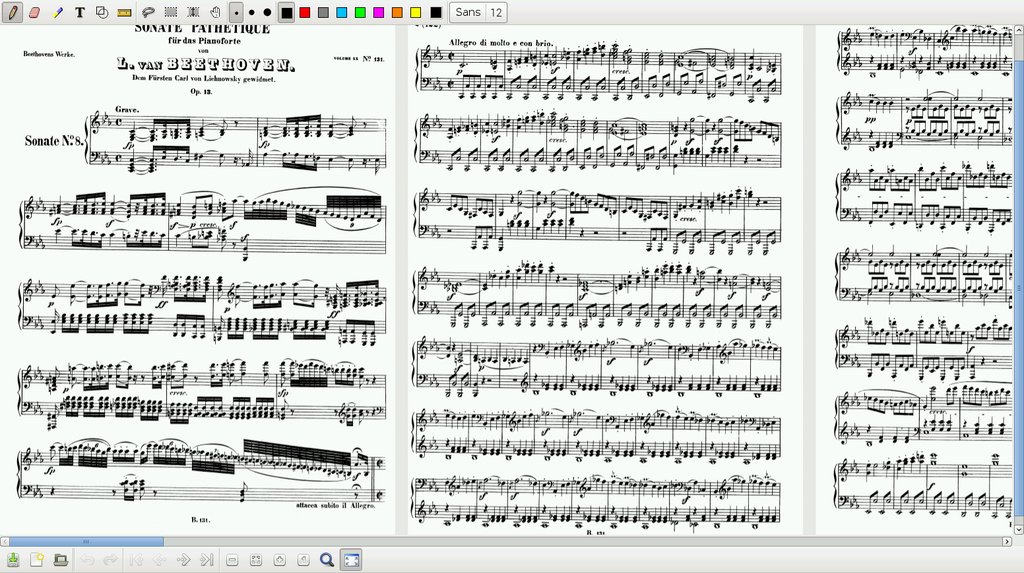
IMSLP is one of the greatest things to happen in the classical music world in recent memory. For those who don't know, IMSLP.org is an online library of any and all sheet music that is no longer under copyright protection. You can find pretty much anything written by Beethoven, Bach, et al up until early 20th century stuff. I personally have expanded my repertoire to include pretty much any common-practice period piece I could get my hands on while also creating a bit of a storage problem for all of my newly-printed scores (many of which I play once or twice and then move on to another piece). I've been scheming for some time to find a digital solution in the form of an electronic music stand. As it turns out, there are a number of ways to reach this common goal now (including several sheet music reading apps for iPad and Android), and this is but one of them.
With an extremely simple hardware setup and a few software tweaks to the pi, I've found an solution that I am very satisfied to use. Beyond the “music stand” capabilities of this setup, I have also set up (and continue to work on) a composition sketching environment. In it's most current version it's only real ability is to sketch scores by hand using a standard stylus, however I am attempting to develop handwriting recognition into it.
Current features:
- Display sheet music using a modified version of the program Xournal, which allows for PDF annotation and drawing
- Digital library management using Calibre
- Composition sketchbook (also using Xournal)
- Ability to download scores directly from IMSLP onto Raspberry Pi for immediate use
Planned features:
- Handwriting (note) recognition, playback, and MIDI/Music-Xml export
- On-screen metronome
- Mounting solution for accessibility in a variety of environments
- Big buttons in corners for page turning
- Option for hardware device (such as a foot pedal) for page turning

MATERIALS
Hardware
- Raspberry Pi B+
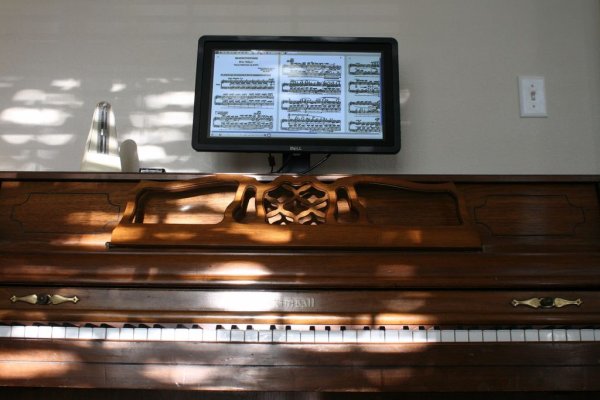
- Dell E2014T Touch Screen Monitor (note: I chose this monitor so I could have two full-size pages up at once. There are many other suitable touch screen monitors out there, many of which are actually pretty light-weight and portable)
- HDMI cable
- Stylus (optional, but even the super cheap ones work great)
- USB keyboard for initial setup
Software
- Raspbian OS
- Calibre
- Xournal (version 0.4.8 has the features needed for this to work. must be downloaded and compiled from source)
- tightvncserver (allows remote desktop session from your computer)
- xinput_calibrator-0.7.5
- Other suggestions: Geany (IDE), raspberry-ui-mods (latest version of desktop UI), epiphany browser (better internet browser), some sort of on-screen keyboard
Step 1: Hardware and OS Setup
By far the easiest step. I used a Raspberry Pi B+ and a Dell E2014T monitor. At the time when I was ordering the parts, the Pi2 was not yet released, but I would imagine one could just as easily use that with the added benefit of faster document loading. Otherwise, I think it has to be the B+ because of the available connectors.
The Dell monitor seemed pretty much perfect for me. I've seen many digital music stands that only put up one page at a time, but I knew for certain I wanted to have a 2-page display. Of course, the Dell monitor is much bulkier than some other options. As a result, I feel quite comfortable using it in my home studio and even putting it on top of my piano, but I wouldn't necessarily haul it to a gig. Whichever monitor you choose, the steps to get it working should be the same.
First you need to install Raspbian. It's included in the NOOBs package. If, like me, your Pi came with a flash card that already had NOOBs on it, you can just put in the card and get going. If not, you will need to find it online and follow the instructions on getting it set up properly. You will need a USB keyboard to get things set up, which you can simply plug into one of the ports on the pi. There should also be a USB cable from the monitor you can plug into the pi. This will be necessary later for touch-screen capabilities.
I will not describe here how to set up Raspbian. If you have any trouble, there are numerous online resources on the topic. When given the option, you will want to make sure you tell it to always boot into the desktop.
Once you've successfully installed the OS, we will need to get our hands dirty with aptitude.
NOTE: At this point, you will be able to test the touch screen. Mine worked out of the box, but the calibration was way off. If yours is a little off as well, you can either plug in a mouse for the next few steps or jump to the step about xinput_calibrator-0.7.5.
Step 2: Xinput_calibrator-0.7.5 – How to Calibrate the Touchscreen
These instructions are pulled directly from user mzilikazi on this page: http://forums.debian.net/viewtopic.php?f=7&t=59138
1. Click the link and save this file to your hard drive
https://github.com/downloads/tias/xinput_calibrato…
2. Now, [in the terminal, go to the directory to which you just downloaded the file and] unpack the tar.gz file:
unp xinput_calibrator-0.7.5.tar.gz
3. Now there is a new directory named xinput_calibrator-0.7.5 Change into that directory:
cd xinput_calibrator-0.7.5
4. Now you actually build the software:
./autogen.sh –with-gui –prefix=/usr
./configure –prefix=/usr
make
5. If you get no errors you should be able to run the application right from the directory you're in:
src/xinput_calibrator
6. Normally the next step is make install but on a Debian system you want to avoid that when possible. You can do either:A) Not install the package and run it from the directoryB) Use checkinstall
sudo apt-get install checkinstall
checkinstall
NOTE: I always use make install. I'm not sure what the issue might be. Also, it may go without saying, but all of these commands in italics are to be entered into the terminal.
Once you have successfully installed xinput_calibrator, run it. There will be four places on the screen you have to touch and after that you should have a perfectly calibrated touchscreen. Also, don't be a dummy like me – unplug your mouse before running the calibrator unless you want some really confusing complications.
Step 3: Install Tightvncserver (optional, but extremely beneficial)
The way Linux works, at least for me, is:
- Find a piece of software you want
- Remind yourself that in most cases you don't just download the binary and run it like in Windows or OSX
- Cross your fingers and hope it's in your repositories for apt-get
- It's not.
- Track down the source code and download it
- Attempt to ./autogen (this is just a ritual – you of course realize it will be days before ./autogen will actually work. And by then you'll be so worn down you probably won't even notice when it does work.)
- Try to decipher the errors and install the dependencies
- Search every phrase in the error message by trial and error until you find something that seems like it will work
- It won't.
- Discover that one dependency is not available for your architecture
- But the source is.
- Download the source, go back to step 6, repeat until your eyes bleed
- Success! At 3AM! You will have to get up and go to work in 4 hours!
This is almost the exact process I went through when trying to build Xournal from source. Eventually I figured out that one of the dependencies is not available for the Pi architecture unless you build it from source yourself. It took me weeks to build Xournal, but finally I did. Then, one day, I installed a repository that broke my pi, and had to go back to scratch. Fortunately, I had saved all of the source I downloaded and the second time it only took me a couple of days. Still, welcome to Linux!
This is the ritual you have to go through to get some things working on Linux. What can make it even more painful is the slow speed of the pi. If you're trying to compile things while looking up errors on your browser on the pi, you're gonna have a bad time. That's why this step, tightvncserver, is optional but oh so beneficial.
With TightVNC, you can log into your pi from any computer on your home network and control it exactly as you would from the pi itself. The biggest benefit here is that you are only running it in a window and you can switch back to your normal, delightfully fast browser to quickly (ha!) find solutions to errors.
Just like with the previous step, I don't feel the need to write a new set of instructions when there are several out there I can just point you to. Here's the one I used: http://computers.tutsplus.com/tutorials/take-control-of-your-raspberry-pi-using-your-mac-pc-ipad-or-phone–mac-54603
Step 4: Xournal 0.4.8 setup
This was the hardest step for me, but you are going to benefit from my experience with the bang-your-head-against-the-desk-frustrating-roadblocks so hopefully it won't be so bad.
If you are new to Linux, I would advise you to take it slow and research any part of this process you don't understand. Likewise look up any errors that come up while installing the software. I've used Linux before, but getting this software to compile took me weeks thanks to some specific problems between the dependencies and the pi's architecture.
There are two big benefits of using Xournal instead of another PDF reader:
- Horizontal loading of pages, just like a book of sheet music
- Ability to annotate by drawing on the document. Can even be saved.
Xournal 0.4.8 source: http://sourceforge.net/projects/xournal/files/xournal/0.4.8/
- Download the tar.gz file to your pi. Unpack it in the terminal using the command:
tar -zxvf xournal-0.4.8.tar.gz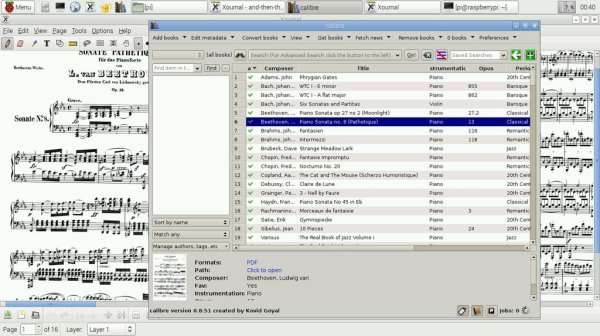
libgnomecanvas-2.4.0 source: http://ftp.gnome.org/pub/gnome/sources/libgnomecan…
- Download the tar.gz file. Same steps as above.
- Run ./autogen.sh in the terminal from the directory where you unpacked Xournal
- It won't work the first time, but at the end it will give you a tidy list of dependencies. Install each of these separately through apt-get except for libgnomecanvas.
- If apt-get can't install the dependency, use apt-cache search [dependency title] to find the exact spelling you will need to install it.
- Once you have everything except libgomecanvas installed, go to the next step.
- Run ./configure in the terminal from the directory where you unpacked libgnomecanvas
- Like before, look for any missing dependencies and apt-get install them.
- Once it configures cleanly with no errors, run make, then make install
- Install libgnomecanvas from apt-get
- “Wait a minute…” I hear you saying. “Didn't you just make us install this from source because you said it's not in aptitude?” Well, yes. I can't really explain it. If I only install this, Xournal won't compile. If I only install the source version, Xournal won't compile. But if I make libgnomecanvas 2 from source then install it from apt-get, it works. I don't recall the exact name of this one, but you can find it with the command apt-cache search libgnomecanvas Look for the one with -dev at the end of the file.
- At this point, you *should* be able to run ./autogen.sh for Xournal to completion. If not, do some research into the kinds of errors you are getting.
- Run make in the terminal
- Run sudo make desktop-install
If all of that worked, then congratulations! You just did what took me a month to figure out how to do! Try opening Xournal and see how it works. For the horizontal viewing mode, go to the view menu and select ‘horizontal'. I've made some changes to the config file that fit my personal preferences for the layout of buttons and such. I will try to post it here soon, but you can also edit the config yourself if you're feeling adventurous. I have mine set to always open in full screen, the navigation buttons are on the bottom of the screen instead of the top, and some other small things as well.
Step 5: Calibre
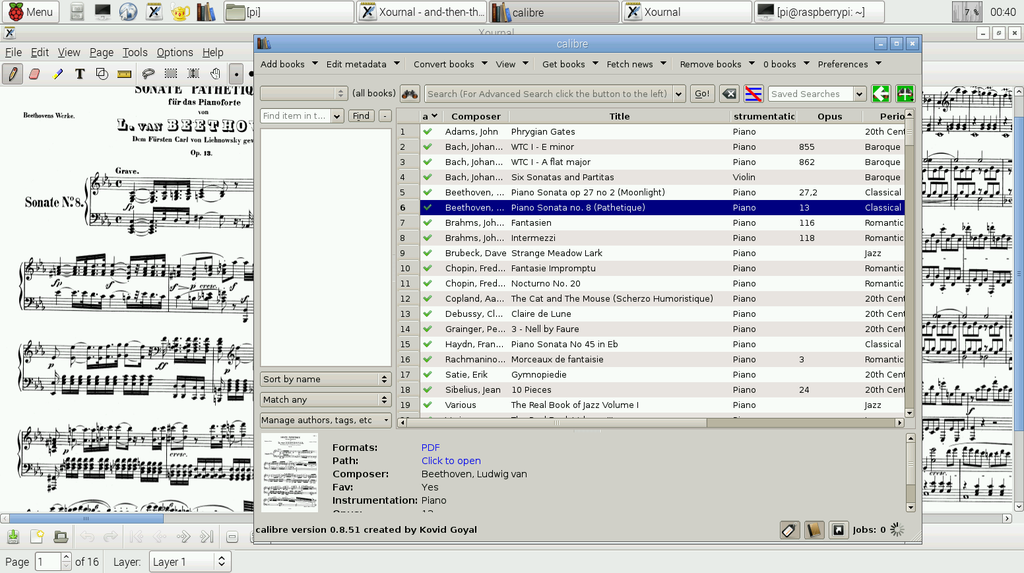
I have organized my digital score library using Calibre. Calibre allows you to keep any data you want for your scores so you can organize by composer, title, date, opus, instrumentation, period, whatever. You can also open the score directly from Calibre into Xournal.
Calibre is available on apt-get. If this doesn't work:
sudo apt-get install calibre
Then you can try:
apt-cache search calibre
and it will tell you what the actual name of the package is.
You can easily go into the settings and add your own categories. I'm pretty weird, so instead of using the “Author” column for composers' names, I added my own “Composer” column.
You can create your library by dragging the score files from the file manager onto the Calibre window or by adding them from the menu in the program itself. Either way, you will probably have to do a LOT of work cleaning up the metadata to make sure it's organized the way you want.
To open a score, click the “View” button. If it does not open into Xournal automatically, try entering this into the terminal:
xdg-mime default xournal.desktop application/pdf
If it doesn't work after that, you may need to track down another solution.
If you're trying to open the score and get an error having to do with %20, you will need to follow the directions on this page: http://www.mobileread.com/forums/archive/index.php/t-172186.html
(scroll down to flups' response from 12-29-2013, 05:38 PM and follow those directions)
Step 6: Composition Sketchbook and Other Further Modifications
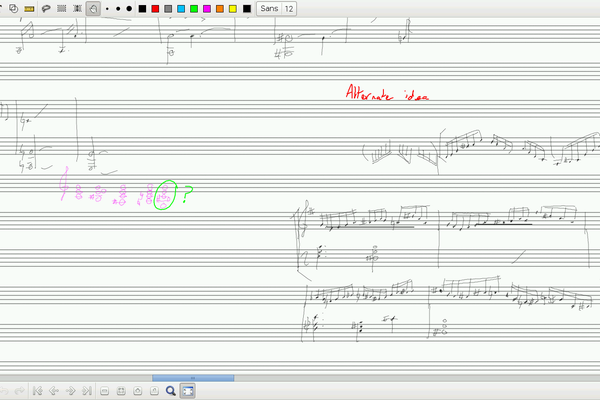
I've been tweaking the source code for Xournal so that it gives the option to display blank staff lines on the page. I'm not ready to release the file yet that will allow you to do the same, but you can do pretty much the same thing a different way. Under one of the menus there is an option to set a background image. If you make an image file with staff lines, you can set it as background this way and start sketching out your pieces!
I would also recommend installing Geany, a great IDE for coding, raspberrypi-ui-mods, which make the desktop UI look like the one I'm currently using, and epiphany-browser for a better web browsing experience.
Step 7: Final Words
I hope you enjoyed reading this, and I hope I didn't leave out any crucial details! I've had a lot of fun setting this up and I think there are probably a lot of people out there who could really benefit from this in the same way I have. Once I make some headway with the handwriting recognition, I'll put out the code so you can have that as well.
Thanks for reading and may the source be with you!