
This guide shows you how to use the MATRIX Creator or MATRIX Voice with ODAS, a library for direction of arrival, tracking, and much more.
What is ODAS?
ODAS stands for Open embeddeD Audition System. This is a library dedicated to perform sound source localization, tracking, separation and post-filtering. ODAS is coded entirely in C, for more portability, and is optimized to run easily on low-cost embedded hardware. ODAS is free and open source. Find more at: https://github.com/introlab/odas
Required Hardware
Before getting started, let's review what you'll need.
- Raspberry Pi 3 (Recommended). Not tested yet in Pi 2 Model B.
- MATRIX Voice or MATRIXCreator – Raspberry Pi does not have a built-in microphone, the MATRIX Voice/Creator have an 8 mic array – Buy MATRIX Voice/MATRIX Creator.
- Micro-USB power adapter for Raspberry Pi.
- Micro SD Card (Minimum 8 GB) – An operating system is required to get started. You can download Raspbian Stretch and use etcher.io to flash the image onto your SD Card.
- A USB Keyboard & Mouse, and an external HDMI Monitor – we also recommend having a USB keyboard and mouse as well as an HDMI monitor handy. You can also use the Raspberry Pi remotely through SSH, see this guide from Google.
- Internet connection (Ethernet or WiFi). Note: Pi 3 has built-in WiFi.
Let's get started
Make sure you have the Raspberry Pi running with your MATRIX board and SD card image with Raspbian flashed before starting. Install the following commands into your Raspberry Pi's terminal.
1. Installing MATRIX Software
Add Repository & Key
 curl https://apt.matrix.one/doc/apt-key.gpg | sudo apt-key add -
echo "deb https://apt.matrix.one/raspbian $(lsb_release -sc) main" | sudo tee /etc/apt/sources.list.d/matrixlabs.list
Update Packages & Install
sudo apt-get update
sudo apt-get upgrade
Install MATRIX Dependancies (one at a time)
sudo apt install matrixio-creator-init
sudo apt install libmatrixio-creator-hal
sudo apt install libmatrixio-creator-hal-dev
Reboot Your Device
sudo rebootInstall MATRIX Kernel Modules
sudo apt install matrixio-kernel-modulesReboot Once More
sudo reboot2. Installing ODAS
Install Required Dependancies (one at a time)
sudo apt-get install g++ git cmake
sudo apt-get install libfftw3-dev
sudo apt-get install libconfig-dev
sudo apt-get install libasound2-dev
sudo apt install libjson-c-dev
Clone & Build Our ODAS Repository
cd ~/
git clone https://github.com/matrix-io/odas.git
cd odas
git checkout yc/add-matrix-demo
mkdir build
cd build
cmake ..
make
3. Run the demo!
We need to run two applications. The first is called odaslive, this app performs all of the audio processing. The second we need to run the matrix-odas app that receives the results and use them to draw colors into the MATRIX Everloop.
Run matrix-odas:
cd ~/odas/bin
./matrix-odas &
Run odaslive in the same terminal:
for MATRIX Voice:
./odaslive -vc ../config/matrix-demo/matrix_voice.cfgfor MATRIX Creator use:
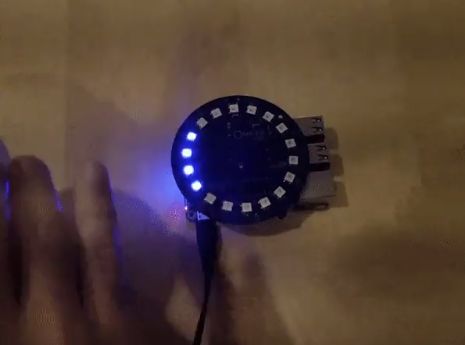
./odaslive -vc ../config/matrix-demo/matrix_creator.cfgMake some noise!… you should see a blue lights indicating where the sound is coming from.
Additional:
You can also run ODAS Studio to see a better visualization of the results from odaslive. Keep in mind that this cannot run with matrix-odas app
To Use ODAS Studio:
Have the ODAS Core app running on your Raspberry Pi and ODAS Studio running on your personal computer. Your Pi will use a TCP socket to connect to your personal computer.
On your personal computer, download the ODAS Studiorepository and follow the installation “From sources”.
The last step is to insert your personal computer's IP address into the ODAS Core configuration file. Insert the following command into your Raspberry Pi and edit the configuration file located at:
for MATRIX Voice
nano ~/odas/config/odaslive/matrix_voice.cfgfor MATRIX Creator
nano ~/odas/config/odaslive/matrix_creator.cfgReplace the <IP> in each ip = “<IP>” lines with the IP address of your personal computer (there are 4 lines in total). Use <Ctrl + x>, press y, and then press enter to save your changes.
Source: Direction of Arrival for MATRIX Voice/Creator Using ODAS