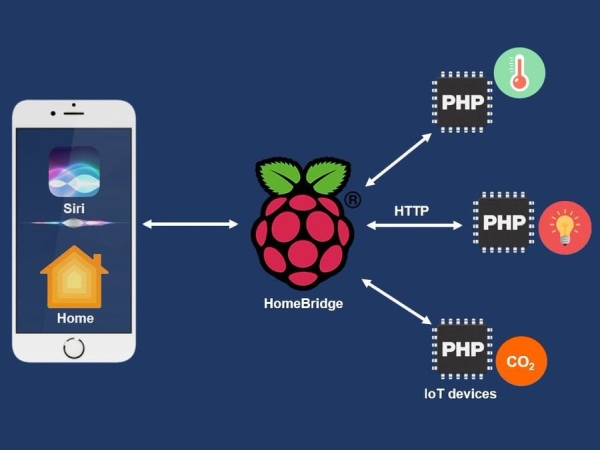
This shows how to make smart home devices, which can be controlled/monitored via Siri or Home app.

Let's make the smart home devices and control/monitor it via Apple Siri or Apple Home App.
After reading this tutorial, you are able to make Siri and Home app:
- monitor any kind of sensors, which is listed by Apple.
- control any kind of devices, which is listed by Apple.
Siri supports multiple languages. It just needs to change language setting on Siri without changing any line of code.
Step 1: Installing homebridge on Raspberry Pi
Follow this instruction
Step 2: Installing PHPoC Plugin on Raspberry Pi
PHPoC plugin does two main tasks:
- Periodically making HTTP request to PHPoC board to get states of sensors/devices and updating these states to Home App.
- On-demand making HTTP request to PHPoC board to control/monitor sensors/devices when there is request from Siri or Home app.
To install PHPoC plugin, type the following command:
sudo npm install -g homebridge-phpocStep 3: Writing Config File on Raspberry Pi
Config file mainly defines which devices and their characteristics is shown on Home app.
Refer to the sample config.json file below
{
“bridge”:{
“name”:”Homebridge”,
“username”:”CC:22:3D:E3:CE:31″,
“port”:51826,
“pin”:”031-45-154″
},
“accessories”:[
{
“accessory”: “PHPoC”,
“name”: “Living Room Lamp”,
“service”: “Lightbulb”,
“characteristics”: [
“On”
],
“url”: “http://192.168.0.189/lightbulb_livingroom.php”,
“http_method”: “GET”,
“update_interval”: 1000
},
{
“accessory”: “PHPoC”,
“name”: “Bedrom Room Lamp”,
“service”: “Lightbulb”,
“characteristics”: [
“On”,
“Brightness”
],
“url”: “http://192.168.0.189/lightbulb_bedroom.php”,
“http_method”: “GET”,
“update_interval”: 1000
},
{
“accessory”: “PHPoC”,
“name”: “Carbon Monoxide”,
“service”: “Carbon Monoxide Sensor”,
“characteristics”: [
“Carbon Monoxide Level”,
“Carbon Monoxide Detected”,
“Carbon Monoxide Peak Level”
],
“url”: “http://192.168.0.189/carbon.php”,
“http_method”: “GET”,
“update_interval”: 1000
},
{
“accessory”: “PHPoC”,
“name”: “temperature”,
“service”: “Temperature Sensor”,
“characteristics”: “Current Temperature”,
“url”: “http://192.168.0.189/temperature.php”,
“http_method”: “GET”,
“update_interval”: 1000
}
]
}
We just need to take a look at accessories part. Here I defines four accessories (also called devices):
- Living Room Lamp: Allow to control and monitor on/off state.
- Bedroom Lamp: Allow to control and monitor on/off state and brightness.
- Carbon Monoxide Sensor: Allow to detect the Carbon Monoxide and monitor Carbon Monoxide level and Carbon Monoxide peek level.
- Temperature Sensor: Allow to monitor temperature value from temperature sensor.
Structure of each accessories is the same. They has the following fields:
- “accessory”: Value is “PHPoC” because it uses homebridge-phpoc plugin installed above.
- “name”: This will be displayed in Home App and is Keyword to ask Siri. No rule for this field but I recommend to use the name of sensors/devices
- “service”: device type. It MUST be the one of Apple-defined services, which specified in HomeKit Accessory Protocol Specification
- “characteristics”: characteristics of sensors/devices. It MUST be some of Apple-defined characteristics, which specified in HomeKit Accessory Protocol Specification
- “url”: the link to PHPoC devices, which reads value from sensors or take control of devices.
- “update_interval”: Interval of updating characteristics of accessories to Home App. The unit is millisecond.
Step 4: Connecting PHPoC Board to Sensors/Devices and Writing PHPoC Code
After connecting PHPoC board to sensors/devices, We need to write code for PHPoC board to handle HTTP request from homebridge-phpoc plugin.
In case of controlling, PHPoC code does:
- Get the controlling information from HTTP request and then control devices
- Read states of sensors/devices and then send back to homebridge-phpoc plugin.
In case of monitoring, PHPoC code does:
- Read states of sensors/devices and then send back to homebridge-phpoc plugin.
Note: when sending back states of sensors/devices, data MUST be in json format. Keys MUST be characteristics name without blank spaces. For example, if characteristic is “Carbon Monoxide Level“, json key MUST be “CarbonMonoxideLevel“.
Example codes (see code sections):
- Carbon Monoxide Sensor: only monitoring
- Temperature Sensor: only monitoring
- Lightbulb: monitoring and controlling
Step 5: Setting Home app your iPhone, iPad
Refer to https://support.apple.com/en-us/HT204893
Step 6: Controlling and Monitoring via Siri or Home app
To buy electronic components, you can order them from utsource.net
Code
{
“bridge”:{
“name”:”Homebridge”,
“username”:”CC:22:3D:E3:CE:31″,
“port”:51826,
“pin”:”031-45-154″
},
“accessories”:[
{
“accessory”: “PHPoC”,
“name”: “Living Room Lamp”,
“service”: “Lightbulb”,
“characteristics”: [
“On”
],
“url”: “http://192.168.0.189/lightbulb_livingroom.php”,
“update_interval”: 1000100
},
{
“accessory”: “PHPoC”,
“name”: “Bedrom Room Lamp”,
“service”: “Lightbulb”,
“characteristics”: [
“On”,
“Brightness”
],
“url”: “http://192.168.0.189/lightbulb_bedroom.php”,
“update_interval”: 1000200
},
{
“accessory”: “PHPoC”,
“name”: “Carbon Monoxide”,
“service”: “Carbon Monoxide Sensor”,
“characteristics”: [
“Carbon Monoxide Level”,
“Carbon Monoxide Detected”,
“Carbon Monoxide Peak Level”
],
“url”: “http://192.168.0.189/carbon.php”,
“update_interval”: 1000
},
{
“accessory”: “PHPoC”,
“name”: “temperature”,
“service”: “Temperature Sensor”,
“characteristics”: “Current Temperature”,
“url”: “http://192.168.0.189/temperature.php”,
“update_interval”: 1050
}
]
}
Source: DIY HomeKit-Enabled Devices

