
The Raspberry Pi Zero W is an incredible bite-sized linux computer that opens the door to so many cool projects and possibilities. I thought it'd be cool to make a Spotify streaming radio, but with a bit of flare. The goal is to make it look like a retro radio with working knobs that displays the album art of the song that's currently playing. 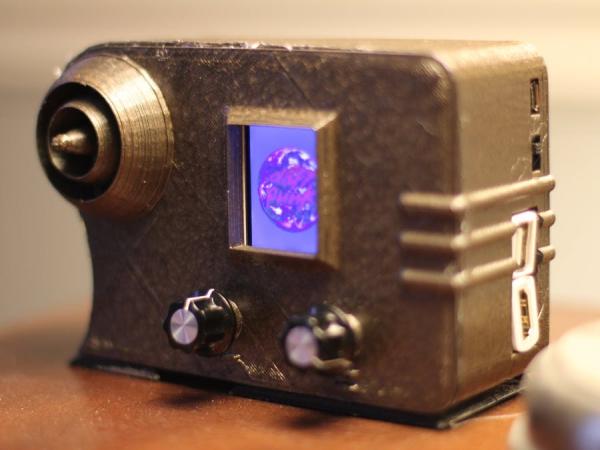
As for the radio design itself, I saw the 1938 Emerson AX212 radio, and thought that it was a very unique design, and the clock face would make a perfect location for an LCD screen. Since I don't have an AX212 on hand, I'll need to design and make one of my own. It's an ambitious goal, but let's see how close I can get.
Setting Up The Raspberry Pi
The Pi Zero Wireless is an incredibly tiny full-functioning linux computer, and it's going to be the core of this project. So the first thing we need to do is set it up.
If you've never used a Raspberry Pi before, it's basically a tiny Linux computer. So, as with all Linux computers, we need to install an Operating System. You can click here to download the Raspbian Operating System for the Raspberry Pi. You will need to burn it to a micro-SD card using the free Etcher program. Once it's on the SD Card, insert it into your Raspberry Pi along with a monitor, keyboard, mouse, and power and let it boot up.
It should boot directly to the desktop. The first thing that you want to do here is connect it to your wireless internet. To do this, click on the wireless icon in the upper right and select your wireless network to connect to. Once connected, right-click on that same wireless icon and choose “Wireless & Wired Network Settings”. From there you can, set a static IP address that we can connect to later.
Finally, click on the Menu icon in the upper left and go to Preferences > Raspberry Pi Configuration. Under the “Interfaces” tab, make sure both SPI and SSH are turned on. Now you can reboot your PI. From now on, we can connect to it remotely using SSH. On Mac and Linux, just open up a terminal and type “ssh pi@your_static_ip” to connect to it. On Windows, you can use the free Putty program.
Making It Speak
The most obvious aspect of a radio is it's ability to play music. And you would think to do this on the Pi Zero would be as simple as plugging in some speakers. But as you go to do that, you realize that the Pi Zero doesn't have an audio output jack (at least at the writing of this tutorial).
There are a few options for remedying this:
- Buy a pre-made amp chip
I decided to go with the pre-made amp chip, but you can go with which-ever option best works for you. The chip I settled on is the Adafruit MAX 98357. It's a mono amp chip, but I'm not intending to have stereo speakers so it'll work fine for my needs.
To keep things organized and easy to connect, I'm using the Adafruit perma-proto “bonnet” for the Pi Zero. You can use any generic proto-board that you want, but I found that this one made connecting things to the Pi very easy. Here's how you wire it up:
- Amp Vin to Raspbery Pi 5V
- Amp GND to Raspbery Pi GND
- Amp DIN to Raspbery Pi #21
- Amp BCLK to Raspbery Pi #18
- Amp LRCLK to Raspbery Pi #19
Download the Fritzing diagram here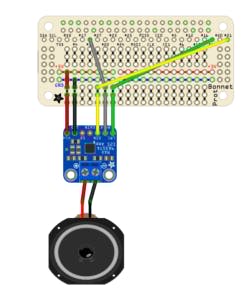
After that, you can connect a speaker to it. The type of speaker you use really depends on the quality you want. I went with a full range speaker and connected it up to the audio output of the MAX98357
Now that it's all wired up, we have to do a simple software tweak to get it running. Connect to your Pi through SSH and run this script:
For more detail: DIY Vintage Spotify Radio Using A Raspberry Pi