
Contents:
Introduction
Ingredients:
- 1 x Raspberry Pi
- 1 x RFID 125 kHz shield for Raspberry Pi
- 1 x RFID Antenna
- 2 x Read only cards (EM4100)
- 2 x Programmable cards (Read-Write Cards, T5557)
NOTE: If you don't have a Raspberry Pi you can get one buying a Raspberry Pi Starter Kit.
 Steps Index
 Steps Index
Steps Index:
- Connecting the RFID module to Raspberry Pi.
- Reading EM4100 cards (read only cards).
- Reading T5557 cards.
- Reading / writing T5557 cards.
- Reading / writing T5557 cards with password.
- Using the sleep mode.
- Video-Tutorial.
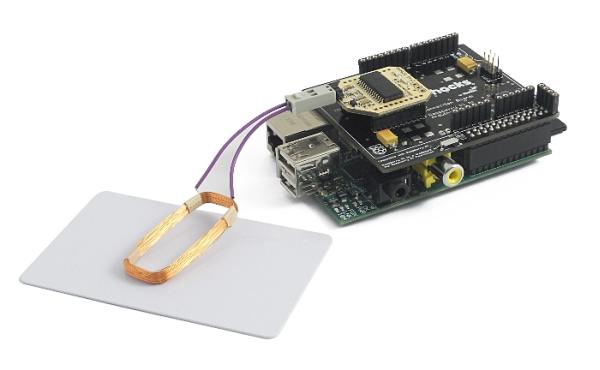
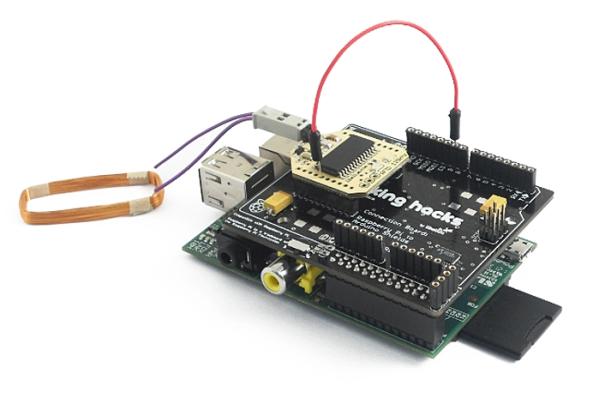
Step 1: Connecting the RFID module to Raspberry Pi:
Setting up the hardware is very easy, just plug the Raspberry Pi to Arduino Shield with the RFID module to the Raspberry Pi. Now you can program the Raspberry Pi and communicate it with the RFID module using the serial port (Serial.read(), Serial.print()…).
Step 2: Reading EM4100 cards (read only cards):
In this part we show an example of the Raspberry Pi reading EM4100 cards. We use the Auto Read mode. Raspberry Pi is waiting all the time, when a card is detected, we read its code, blink the LED and print the code on the standard output.
| Command |
| 0x87 – Set Auto Mode: EM4102 Mode – Parity decoded – Manchester RF/64 |
| FF 01 09 87 01 03 02 00 10 20 30 40 37 |
Code:
/*
   *  RFID module from Libelium for Arduino
   *  Basic program, just Read EM1000 cards
   *
   *  Copyright (C) 2008 Libelium Comunicaciones Distribuidas S.L.
   *  http://www.libelium.com
   *
   *  This program is free software: you can redistribute it and/or modify
   *  it under the terms of the GNU General Public License as published by
   *  the Free Software Foundation, either version 3 of the License, or
   *  (at your option) any later version.
   *
   *  This program is distributed in the hope that it will be useful,
   *  but WITHOUT ANY WARRANTY; without even the implied warranty of
   *  MERCHANTABILITY or FITNESS FOR A PARTICULAR PURPOSE.  See the
   *  GNU General Public License for more details.
   *
   *  You should have received a copy of the GNU General Public License
   *  along with this program.  If not, see .
   *
   *  Version 0.1
   *  Author: Anartz Nuin Jiménez
   */

//Include ArduPi library
#include "arduPi.h"


int led = 13;
byte data_1 = 0x00;
byte data_2 = 0x00;
byte data_3 = 0x00;
byte data_4 = 0x00;
byte data_5 = 0x00;
int val = 0;

void setup(){
	// Start serial port 19200 bps
	Serial.begin(19200);
	pinMode(led, OUTPUT);

	delay(500);

	// Setting Auto Read Mode - EM4102 Decoded Mode - No password
	// command: FF 01 09 87 01 03 02 00 10 20 30 40 37
	Serial.print(0xFF,BYTE);
	Serial.print(0x01,BYTE);
	Serial.print(0x09,BYTE);
	Serial.print(0x87,BYTE);
	Serial.print(0x01,BYTE);
	Serial.print(0x03,BYTE);
	Serial.print(0x02,BYTE);
	Serial.print(0x00,BYTE);
	Serial.print(0x10,BYTE);
	Serial.print(0x20,BYTE);
	Serial.print(0x30,BYTE);
	Serial.print(0x40,BYTE);
	Serial.print(0x37,BYTE);

	delay(500);
	Serial.flush();

	printf("\n");

	printf("RFID module started in Auto Read Mode\n");
}

void loop(){

	val = Serial.read();
	while (val != 0xff){
		printf("Waiting card\n");
		val = Serial.read();
		delay(1000);
	}

	// Serial.read();    // we read ff
	Serial.read();    // we read 01
	Serial.read();    // we read 06
	Serial.read();    // we read 10
	data_1 = Serial.read();    // we read data 1
	data_2 = Serial.read();    // we read data 2
	data_3 = Serial.read();    // we read data 3
	data_4 = Serial.read();    // we read data 4
	data_5 = Serial.read();    // we read data 5
	Serial.read();    // we read checksum

	// Led blink
	for(int i = 0;i < 4;i++){
		digitalWrite(led,HIGH);
		delay(500);
		digitalWrite(led,LOW);
		delay(500);
	}

	// Printing the code of the card
	printf("\n");
	printf("EM4100 card found - Code: ");
	printf("%x",data_1);
	printf("%x",data_2);
	printf("%x",data_3);
	printf("%x",data_4);
	printf("%x",data_5);

	printf("\n\n");
}

int main (){
setup();
while(1){
	loop();
}
return (0);
}
// Led blink
for(int i = 0;i < 4;i++){
digitalWrite(led,HIGH);
delay(500);
digitalWrite(led,LOW);
delay(500);
}
// Printing the code of the card
printf("\n");
printf("EM4100 card found - Code: ");
printf("%x",data_1);
printf("%x",data_2);
printf("%x",data_3);
printf("%x",data_4);
printf("%x",data_5);
printf("\n\n");
}
int main (){
setup();
while(1){
loop();
}
return (0);
}
 // Led blink
for(int i = 0;i < 4;i++){
digitalWrite(led,HIGH);
delay(500);
digitalWrite(led,LOW);
delay(500);
}
// Printing the code of the card
printf("\n");
printf("EM4100 card found - Code: ");
printf("%x",data_1);
printf("%x",data_2);
printf("%x",data_3);
printf("%x",data_4);
printf("%x",data_5);
printf("\n\n");
}
int main (){
setup();
while(1){
loop();
}
return (0);
}
// Led blink
for(int i = 0;i < 4;i++){
digitalWrite(led,HIGH);
delay(500);
digitalWrite(led,LOW);
delay(500);
}
// Printing the code of the card
printf("\n");
printf("EM4100 card found - Code: ");
printf("%x",data_1);
printf("%x",data_2);
printf("%x",data_3);
printf("%x",data_4);
printf("%x",data_5);
printf("\n\n");
}
int main (){
setup();
while(1){
loop();
}
return (0);
}
Here is the output:

For more detail: Documentation: RFID 125 kHz shield for Raspberry Pi tutorial