
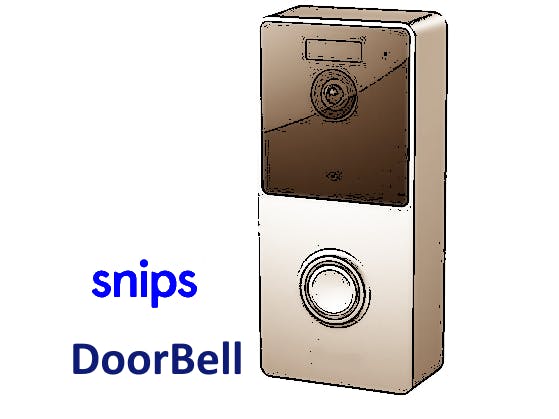
Doorbell that integrate a Snips voice assistant to say welcome and record messages from visitor when you are not at home.
The Idea
Building a Doorbell including a voice assisstant to reply to visitor. The doorbell is able to speak with visitor ( using TTS ) and run voice command.
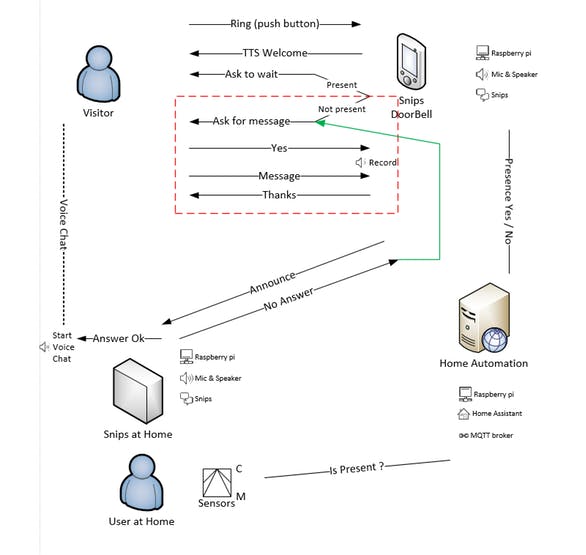
Connected to Home Automation system, the doorbell know if you are at home or not. Base on this information, the doorbell can :
- Say a welcome message with TTS.
- Ring inside the house and wait that somebody reply to visitor thru the Intercom functionality.
- Ask the visitor if he want to record a message for you or try to join you by phone.
- Try to identify the visitor by keywords “postal service”, “UPS”.
Software
The voice assistant use the SNIPS platform. You can design your own voice interactions by creating an assistant on their website, then upload this assisstant to your hardware. SNIPS work offline on your local network. No cloud. connection.
Communication systems use the MQTT protocol. This protocol can be use also to interact with Home Automation software HomeAssistant
To make easy installation and update, I based my installation on Docker.
Hardware
We need 2 Raspberry Pi to build the doorbell and the Home station inside the house.
You can use the Snips Voice Interaction Base Kit or build your own system by assembling together : Raspberry Pi and an Audio subsystem like ReSpeaker 2 Mics Pi Hat. Or other USB solutions.
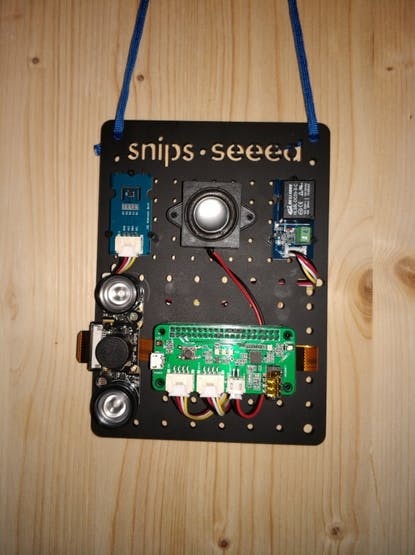
Step 0 – Hardware setup
To run Docker with Swarm and Portainer ( Web UI to manage docker swarm) I use the following images.
raspberry pi 2 & 3
Use the last release of Raspbian Strech Lite (no desktop).
I use 2018-11-13-raspbian-stretch-lite.img for this project.
Available here : https://www.raspberrypi.org/downloads/raspbian/
orangepi zero
Armbian_5.59_Orangepizero_Ubuntu_bionic_next_4.14.65
Available here : https://dl.armbian.com/orangepizero/archive/
orangepi pc+
Armbian_5.69_Orangepipcplus_Ubuntu_bionic_next_4.19.13
Available here : https://www.armbian.com/orange-pi-pc-plus/
Install AudioDrivers
You must install the Audio drivers before anything.
- Respeaker 2 Mic : If you use the ReSpeaker 2 Mics Pi Hat you can find the documentation here
sudo apt-get install git
git clone https://github.com/respeaker/seeed-voicecardcd seeed-voicecard
sudo ./install.sh
sudo reboot
Step 1 – DOCKER
Docker will host all our applications in containers. Easy to update and to upgrade with extra funtionality.
Install Docker:
curl -fsSL https://download.docker.com/linux/raspbian/gpg | sudo apt-key add -

echo "deb [arch=armhf] https://download.docker.com/linux/raspbian stretch stable" | sudo tee /etc/apt/sources.list.d/docker.list

sudo apt-get update
sudo apt-get install docker-ce
sudo usermod -aG docker pi && logout
There's an issue with last buid of docker and older RaspberryPi , use the stable docker version 18.06.2 instead :
sudo apt-get install docker-ce=18.06.2~ce~3-0~raspbian
Step 2 – DOCKER SWARM and PORTAINER (optional)
This step is optional, but very usefull to manage all the docker images in multiple Raspberry / OrangePi with Portainer (Web Interface)
Choose one rpi/opi to be the SWARM Manager and run this command ( replace the <RPI IP> by the public ip adress of your rpi/opi and run this command :
sudo docker swarm init --advertise-addr <RPI IP>
This command return another command to copy that include a token id. Run this command on all the other rpi/opi that you want to join to the swarm.
sudo docker swarm join --token SWMTKN-1-7bq15.....95959 192.168.XXX.XXX:2377
Install now Portainer ( a docker image ) on the Swarm Manager and deploy agent in swarm.
sudo curl -L https://downloads.portainer.io/portainer-agent-stack.yml -o portainer-agent-stack.yml
sudo docker stack deploy --compose-file=portainer-agent-stack.yml portainer
Now you can manage all your docker images and volume from the webpage available on all the member of swarm at http://<RPI IP>:9000/
Step 3 – Home Assistant
Home Assistant will be use to provide informations from your house to the doorbell but also to display status. Communication between the 2 systems is based on MQTT, so any other home automation system that support MQTT can be used instead of Home Assistant.
The official docker image of HA working well on Raspberry & OrangePi. It's better to use a separate Raspberry Pi to install Home Assistant inside your house. To install a standalone HA server, follow again the steps 0 (without audio drivers) 1 and 2.
Create a docker volume named “homeassistant_config” to store the config. Use Portainer to do that or the command :
sudo docker volume create homeassistant_config
then install the docker image with that volume:
sudo docker run -d --name="home-assistant" -v homeassistant_config:/config -v /etc/localtime:/etc/localtime:ro --net=host homeassistant/raspberrypi3-homeassistant
For an easy update and better image management, I always run the image with the version on the name, like this :
sudo docker run -d --name="home-assistant-0.90.2" -v homeassistant_config:/config -v /etc/localtime:/etc/localtime:ro --net=host homeassistant/raspberrypi3-homeassistant:0.90.2
so when I update, I just stop the current image and run the new one. In case of issues you can switch back to the previous version very quickly.
Step 4 – Samba (optional)
To edit the Home Assistant config files from windows, you can run a docker image of samba, sharing the same volume. I use trnape image.
sudo docker run -d --name=samba_ha -v homeassistant_config:/share/data -u admin:putpasswordhere -s ha_config:/share/data:rw:admin trnape/rpi-samba:latest
choose your login / password to protect the share with the parameter -u admin:putpasswordhere
You can now access to Home Assisstant config directory by path \\<HA IP>\ha_config
Step 5 – MQTT (optional)
This step is optional, you can use the MQTT broker embedded with HomeAssistant or the one embedded with SNIPS. I choose to install a standalone MQTT broker ( Mosquitto) on the same RaspberryPi than HA and store persistant configuration in volumes. I use the fstehle image.
sudo docker volume create mqtt_config
sudo docker volume create mqtt_log
sudo docker volume create mqtt_data
sudo docker run -d -p 1883:1883 -p 9001:9001 -v mqtt_config:/mqtt/config:ro -v mqtt_log:/mqtt/log -v mqtt_data:/mqtt/data/ --name mqtt fstehle/rpi-mosquitto
Step 6 – SNIPS Doorbell
To build the Doorbell I create a Docker Image that include all the needed software. You can use the Docker Image directly from docker Hub or you can generate a new one up to date ( build from the last version of SNIPS )
Install the Doorbell image
sudo docker volume create snips_config
sudo docker volume create snips_log

sudo docker run -d --name snips-doorbell \
	-v snips_log:/var/log \
	-v snips_config:/usr/share/snips \
	--privileged \
	--device=/dev/snd:/dev/snd \
	--device=/dev/mem:/dev/mem \
	-e ENABLE_MQTT=no \
	-e ENABLE_HOTWORD_SERVICE=no \
	-p 1883:1883 \
	lijah/snips-doorbell
The first run will probably fail because of the default settings are used.
To manage and edit settings we share the volumes with samba (like in Step 4 for HA)
docker run -d -p <DOORBELL IP>:445:445 \
 -v  snips_config:/share/data \
 -v  snips_log:/share/log \
 --name samba_snips trnape/rpi-samba \
 -u "admin:<YOUR PASSWORD>" \
 -s "snips_config:/share/data:rw:admin" \
 -s "snips_log:/share/log:rw:admin"
You can now access to Doorbell config directory by path \\<DOORBELL IP>\snips_config and show the SNIPS logs here \\<DOORBELL IP>\snips_log
Step 7 – SNIPS Home Station
To build the Home Station, repeat the Step 1 to 2 (Join the swarm if you create one). I create a Docker Image that include all the needed software. You can use the Docker Image directly from docker Hub or you can generate a new one up to date ( build from the last version of SNIPS )
Install the HomeStation image
sudo docker volume create snips_config
sudo docker volume create snips_log

sudo docker run -d --name snips-homestation \
	-v snips_log:/var/log \
	-v snips_config:/usr/share/snips \
	--privileged \
	--device=/dev/snd:/dev/snd \
	--device=/dev/mem:/dev/mem \
	-e ENABLE_MQTT=no \
	-e ENABLE_HOTWORD_SERVICE=yes \
	-p 1883:1883 \
	lijah/snips-homestation
The first run will probably fail because of the default settings are used.
To manage and edit settings we share the volumes with samba (like in Step 4 for HA)
docker run -d -p <HOME STATION IP>:445:445 \
 -v  snips_config:/share/data \
 -v  snips_log:/share/log \
 --name samba_snips trnape/rpi-samba \
 -u "admin:<YOUR PASSWORD>" \
 -s "snips_config:/share/data:rw:admin" \
 -s "snips_log:/share/log:rw:admin"
You can now access to Home Station config directory by path \\<HOME STATION IP>\snips_config and show the SNIPS logs here \\<HOME STATION IP>\snips_log
Step 8 – Setup MQTT
If you plan to use the embedded MQTT broker of SNIPS,
Edit the SNIPS Doorbell configuration file : \\<DOORBELL IP>\snips_config\config\snips.toml and set localhost as ip.
[snips-common]
bus = "mqtt"
mqtt = "localhost:1883"
then you must enable MQTT in the docker run command (step 7):
...
	-e ENABLE_MQTT=yes \
...
If you use the embedded MQTT broker of HomeAssistant or a standalone broker : Set the IP of the mqtt broker in \\192.168.xxx.xxx\snips_config\config\snips.toml configuration file, and optionally user and password if your MQTT is secured :
[snips-common]
bus = "mqtt"
mqtt = "192.168.xxx.xxx:1883"
...
## MQTT authentication
# mqtt_username = ""
# mqtt_password = ""
Follow the installation guide on Home Assistant web site : Setup Home assistant MQTT broker
- If you use the embedded MQTT broker of Home Assistant, enable embedded broker in HA :
# Example configuration.yaml entry
mqtt:
    embedded:
- If you want to use the embedded MQTT broker of SNIPS or the standalone.. Set the IP of the MQTT Broker in configuration.yaml.
# Example configuration.yaml entry

mqtt:
    broker: 192.168.xxx.xxx
Step 9 – Setup Audio
The default settings are design for a simple Raspberry Pi 3 with ReSpeaker 2 Mics Pi Hat.
If you want to use other Audio hardware ( USB or in board input / output ) you must edit the alsa sound configuration file : \\192.168.xxx.xxx\snips_config\config\asound.conf.
and adjust the input (microphone) and output (speaker) device id.
If you use a Raspberry Pi with PSE Eye and Speaker connected to audio Jack, you can use this configuration file.
Step 10 – Setup Doorbell
Edit the configuration file : \\192.168.xxx.xxx\snips_config\config\snips.toml
 [snips-common]
...
locale = "en-US"
Define your locale value to match with the assistant you choose. By default English assistant is installed.
Assistant for French is provided in GitHub and in Snips Store
- set locale value = “fr-FR”
- delete the content of assistant directory :
\\192.168.xxx.xxx\snips_config\assistant\ andreplace by the content of assistant_fr on GitHub
Define the path to store audio records. By default this is stored with Snips config on the docker volume.
[snips-audio-player]
...
record_path = "/usr/share/snips/records"
Setup home automation
 [snips-doorbell]
relay_gpio_bcm = 12
pir_gpio_bcm = 11
temperature_unit = "celsius"
button_gpio_bcm = 17
mqtt_topic_presence = "home/presence"
mqtt_payload_presence = "Yes"
You can redefine gpio used for the push button. By default 17 is the Gpio used by respeaker 2 mic hat.
mqtt_topic_presence and mqtt_payload_presence define the MQTT parameters to get the presence information from home automation system.
Change dialogs
You can redefine all the dialogs generated by TTS
 [snips-doorbell]
..
say_welcome_present = "Hello, i call mister dupon."
say_welcome_nopresent = "Hello, i am out for the moment. Do you want to leave a message ?"
say_no_reply = "No answser. Do you want to leave a message ?"
...
A french version of the dialogs are available on github here.
Step 11 – Try it !
Push the button on respeaker 2 mic hat or send the following mqtt message :
snips/doorbell/snipsdoorbell
{ "command" : "ring" }
"snipsdoorbell" is the name define in Site_ID of configuration file.
If someboy is present at home ( signal sent by the MQTT value "mqtt_topic_presence" ) the doorbell will ask you to wait. If not the doorbel will ask you, if you want to record a message.
Inside House you can reply to visitor (“say respond”) or ask him to left a message..
You can also ask inside house how many messages are available. The message counter is sent my MQTT to the Home Automation system.
The full process is available here.
Upgrade 1 – Change TTS voices.
By default the Doorbel use the picoTTS system. This is a offline TTS provided by Debian image. The voice is automatically selected based on the RPI regional settings, but this tts is not very good for non-English.
The docker image include espeak/mbrolla tts update that provide better quality voices for non-English. Espeak TTS and Mbrolla voices provide an offline good quality of text to speech engine.
To enable espeak TTS, edit the file \\192.168.xxx.xxx\snips_config\config\snips.toml
Disable picoTTS, Enable CustomTTS and setup Espeak as customTTS :
[snips-tts]
## Choose one tts provider (defaults to picotts)
# provider = "picotts"
# provider = "makerstts"
provider = "customtts"
## customtts specific configuration
## available placeholder variables : %%OUTPUT_FILE%%, %%LANG%%, %%TEXT%%
customtts = { command = ["espeak", "-vmb-fr1", "-p30", "-s130", "-w%%OUTPUT_FILE%%", "%%TEXT%%"] }
replace the voice name “mb-fr1” by the one you want to use, the voice are always prefix with “-vmb-” to use mbrola voices. An example of this config is available in config directory under the name snips_customtts.toml
You can adjust the speed and pitch of the voice by playing with the parameters -p and -s see the espeak docs.
To get the list of voices that can be upgraded use theses command:
docker exec -it snips-doorbell bash
ls /usr/lib/arm-linux-gnueabihf/espeak-data/voices/mb
mbrola voices are available for download at mbrola website
To upgrade mbrola voices of the system you must create a directory “mbrola” in the snips_config share and copy voice directory on it.