Story
Hey everyone! This is my first tutorial on Hackster.io You can find my tutorials on ArduinoFanBoy.com , I always tinker with electronics, develop software and also runs a super cool company called TecHacks Inc where we are developing things from space technologies to IoT devices which are all outstanding and I just love my work.
In my first tutorial I'll be showing you the best way to connect your Computer's Screen with Raspberry Pi. I honestly did a lot of google to find the way, when I bought my first Raspberry Pi. I found no detailed tutorials on this and thus decided to right one. Many tutorials shows how to use your Computer's screen with Raspberry Pi using your local network, but if we talk about portability, its obvious that you can't carry your Local Network with you, or might be a superman is reading this. This tutorial is for those who are like me and doesn't have any superpower. I'll explain you the procedure which only requires one LAN cable to connect Computer and Raspberry Pi via Ethernet ports.
This method uses Xrdp and Windows Remote Desktop Connection (which is the simplest way I found 🙂
So lets start the work 😉
If you are looking for how to install Jessie then please have look here. There many tutorials already available on this topic 😉 check them out they are far better then the one I can write up for you.
I assume that you are already having a TV which supports HDMI. If you have one then congo, move to the next part. But, if you don't have one, don't be sad we'll soon have updates on this tutorial for this ASAP ^_^
Getting some updates for your RasPi
Now lets start by downloading some software on your Raspberry Pi, but before we need some updates, open up the terminal and write in the following codes-
sudo apt-get update
This will get updates latest updates available for your system
sudo apt-get upgrade
This will upgrade your system
Note: sudo gives you admin privileges so that you can make changes in the system
Now lets start installing Xrdp on your Raspberry Pi
sudo apt-get install xrdp
This will simply install the xrdp software on your raspberry pi. To know more about what does this software actually does visit its official website. You can also download the terminal commands from attachments.
Setting Up a Static IP address for your RPi
I may have written a step for this too but my work will go wasted as there are many tutorials on this already. But as of now I'm recommending this one for you.
The Final Destination
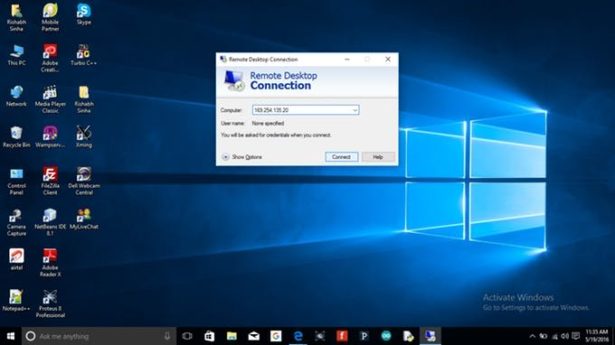
Now if your computer is running Windows OS then you don't need anything to download. Simply type ‘Remote Desktop Connection' and enter the static IP you have set for your raspberry pi.
Enter the static IP of you RPi when the Remote Desktop Connection starts and then hit connect. Make sure your RasPi is on and connected to your laptop through an Ethernet Cable.

You'll see a prompted screen saying you to enter Username and Password, enter then and start playing 🙂
If you find my tutorial helpful for your projects then consider following me on twitter @RiSiOfficial and you can get in touch with me for any help, I'm an expert Web, Software, Hardware developer. So You can also shoot a mail at [email protected] and I'll be back ASAP 🙂
For more detail: Easily use your Computer Screen with Raspberry Pi


