
Hi,
in this instructable, I'll show you how to create a lightweight and incredibly responsive web server with WebSockets.
I'll use it to control a LED using an Arduino but the concept can be applied to many other projects.
Since this project does not use any on-board peripherals, it will work with just about any computer, but running it on a low power machine like the Raspberry PI makes sense for continuous operation.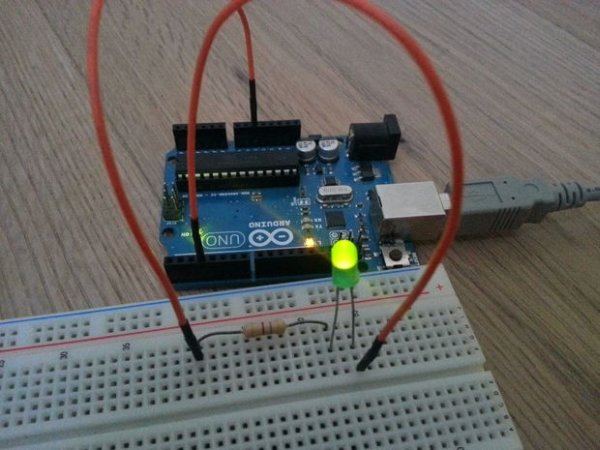
Why use Node.Js or WebSockets?
There are a few tutorials on the web that show how to use a Raspberry Pi for home automation, but many use php and simple http requests to send data back to the server. This is fine for simply switching on and off some lights but quickly reaches it's limitations when you want to run code server-side or if you want bidirectional communication.
Node.Js allows you to write programs in JavaScript and the vast amount of community-made libraries enables you to write very intricate programs in just a few lines of code.
Websockets have a few advantages over simple http requests:
- Speed: A normal http request has to establish a connection before any transactions can happen which takes a lot of time. A websocket is always open and ready to send or receive data.
This means that the lag can be as low as your ping, so just a millisecond or two in most cases - Bidirectional: Websockets allow data to be sent in both directions, this also means that the server can trigger events in the client.
Step 1: Setting up the environment
Installing Node.JS
Node recently released the new version 4.0.0 which comes with a ARM build (http://blog.wia.io/installing-node-js-v4-0-0-on-a-…):
wget https://nodejs.org/dist/v4.0.0/node-v4.0.0-linux-armv7l.tar.gz
tar -xvf node-v4.0.0-linux-armv7l.tar.gz cd node-v4.0.0-linux-armv7l sudo cp -R * /usr/local
Creating your project
mkdir ~/node_led
cd ~/node_led
mkdir public
create your project folder and a folder that contains static webpages
Installing libraries
npm install express
npm install socket.io
npm install serialport
Be sure to do this is the node_led folder or use the ‘-g' flag to install the libraries globally.
express: http server wrapper
socket.io: WebSockets library
serialport: Serial port wrapper
Step 2: Prepare the Arduino
Upload this code to your Arduino:
void setup()
{
  Serial.begin(115200);
}
void loop()
{
  while(!Serial.available());	//wait until a byte was received
  analogWrite(3, Serial.read());//output received byte
}
and connect an LED with a current-limiting resistor to D3 (image shows D10, there is no difference if you use the correct pin in your code).
The code just waits for a byte from the serial stream and sets the PWM level of D3 accordingly.
Now you can connect the Arduino to the Pi via USB and correct the serial port name in main.js.
To find the assigned serial port you can use this command:
ls /dev | grep ttyACM
Instead of a single LED you can connect any peripheral you can imagine to the Arduino. Just to name a few ideas:
-LED stips (maybe RGB, the code can easily be adjusted for 3 sliders)
-Motors / fans
Naturally, both require a transitor to handle the higher current and voltage as shown in the third image. The flyback diode is only necessary for inductive loads such as motors, solenoids or relays.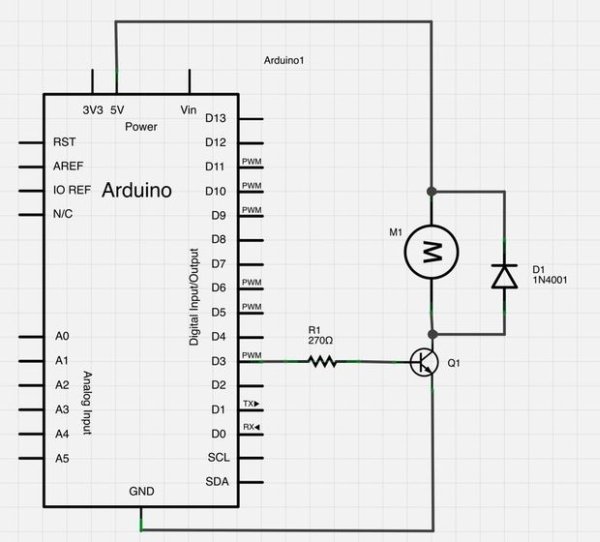
Step 3: Writing the server script
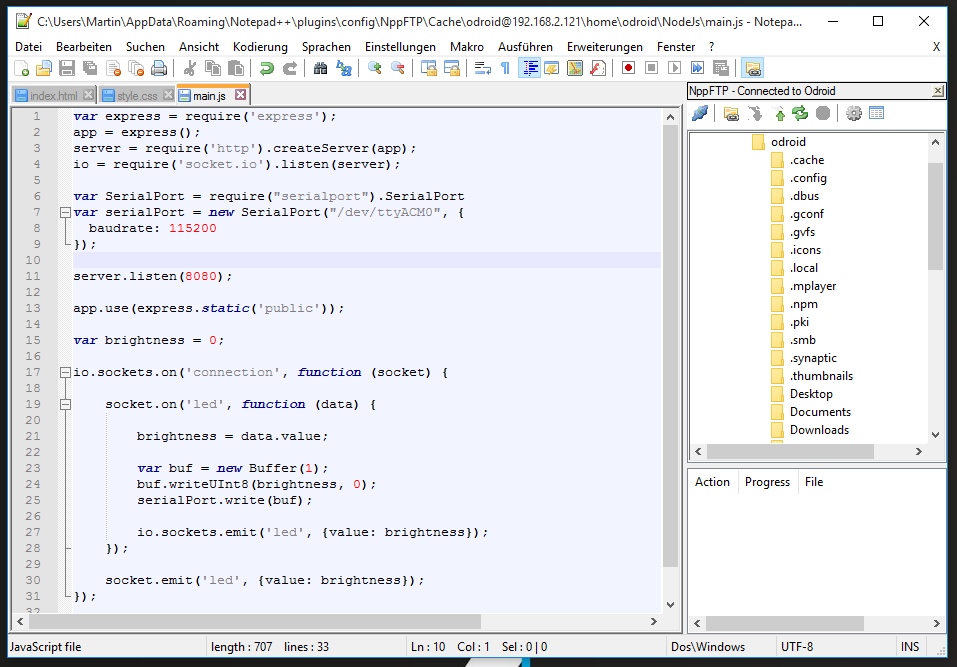
Create a new file called ‘main.js' in the node_led folder, it will contain all the code that is necessary for running the server. Use your favorite text editor (I prefer Notepad++ with the NppFTP plugin).
Set up the webserver and websocket server
express = require('express');  //web server
app = express();
server = require('http').createServer(app);
io = require('socket.io').listen(server);	//web socket server

server.listen(8080); //start the webserver on port 8080
app.use(express.static('public')); //tell the server that ./public/ contains the static webpages
Open the serial port
var SerialPort = require("serialport").SerialPort
var serialPort = new SerialPort("/dev/ttyACM0", { baudrate: 115200 });
Define the WebSocket behavior
var brightness = 0; //static variable to hold the current brightness
io.sockets.on('connection', function (socket) { //gets called whenever a client connects
    socket.emit('led', {value: brightness}); //send the new client the current brightness

    socket.on('led', function (data) { //makes the socket react to 'led' packets by calling this function
        brightness = data.value;  //updates brightness from the data object
        var buf = new Buffer(1); //creates a new 1-byte buffer
        buf.writeUInt8(brightness, 0); //writes the pwm value to the buffer
        serialPort.write(buf); //transmits the buffer to the arduino

        io.sockets.emit('led', {value: brightness}); //sends the updated brightness to all connected clients
    });
});
Step 4: Add the Static Html Content

in the ‘public' folder, add following files:
index.html
when I paste html code into instructables, it automatically renders it as part of the page, so I made the file available on pastebin: http://pastebin.com/jJ9L0RF8
style.css
body {
	text-align: center;
	margin-top: 50px;
	background: #50D0A0;
}

input[type=range]{
	-webkit-appearance: none;
	width: 80%;
}

input[type=range]::-webkit-slider-runnable-track {
	height: 10px;
	background: #ddd;
	border: none;
	border-radius: 3px;
}

input[type=range]::-webkit-slider-thumb {
	-webkit-appearance: none;
	border: none;
	height: 32px;
	width: 32px;
	border-radius: 50%;
	background: goldenrod;
	margin-top: -12px;
}

input[type=range]:focus {
	outline: none;
}

input[type=range]:focus::-webkit-slider-runnable-track {
	background: #ccc;
}
this stylesheet is optimized for webkit browsers such as Google Chrome or the chromium browser.
The website will work just fine without it, but it looks much nicer with.
The website should also render and work fine on most smartphones and tablets (tested with Chrome).
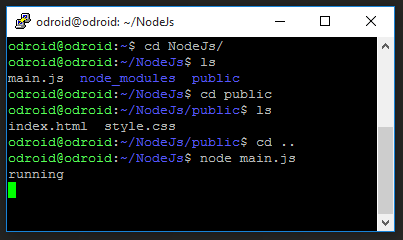
Step 5: Run the Server
go back into ‘node_led' folder and run this command:
nodejs main.js
Now you can visit the website under [raspberry pi IP]:8080
If you visit the site with multiple clients simultaneously, the sliders will move synchronized on all clients.
The LED's brightness should follow the slider with little to no lag at all
Step 6: Conclusion

With Node.Js you can create websites and services with very little code or background knowledge.
Until three days ago, I despised JavaScript as a language and had never used it before. I'm just blown away by the simplicity and the possibilities of Node.Js.
If you want to learn more, here are some websites that might help you:
If you liked this instructable, please consider giving me a vote in one of the contests I participated in, thank you!
Source: Easy Node.JS + WebSockets LED Controller for Raspberry Pi