

Noisebridge is committed to providing a 24/7 accessible space in San Francisco available to all hackers and makers. They are losing their lease as of August 2018 and are currently fundraising to find a new location.
Two things that most any hackerspace can benefit from are better signage explaining the space, and festive LED decorations.
In preparation for Noisebridge’s 10-year anniversary in 2017 we decided to address both in one project; creating suspended LED signs that identify the work areas of our space in San Francisco. This type of signage is not uncommon, but our extensive installation and our means of keeping costs down led to several requests for a tutorial. You can read more about it at the noisebridge blog, but here’s a quick overview of how we made and installed our 14 suspended, edge-lit LED signs.
LINEWORK
The designs of the signs went from sketchbook to AutoCAD to RDworks, which imports .dxf files. I used 3 or 4 line colors: one that was intended to cut through the acrylic, one for cutting halfway through the acrylic, and one that defined the bounds of the sign but was not cut at all.
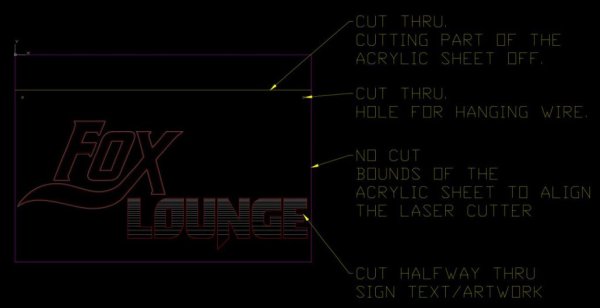
On a few signs I used a fourth color to create a shallower hatch across the letters to help them pick up more light. For suspending the sign, I cut holes to pass wire through in the upper corners of the sign. For text, I tried to keep it all around 4″ inches tall or taller for easy reading across the room.
CUTTING
I used 3/8″-thick acrylic because it was abundant in the TAP Plastics scrap bin. The speed and power (S/P) settings I arrived at for our cutter were 7/55 cut through, 30/50 for a ~3/16″ deep cut.
The half-deep cut forms the graphics of the sign while the cut-through in the upper corners is used for mounting holes. To protect the signs from all the handling, I kept most of the protective film on them until they were mounted and tested.
ELECTRONICS
I determined that ESP8266/Arduino boards with fancy LEDs would be too expensive and ended up using an RGB dimmerto control the whole thing. This also meant using SMD 5050 strip lights, which are cheap. It was also easier for me to set up, as I am still new to electronics.
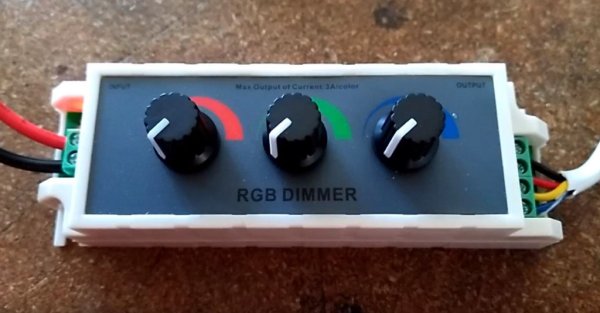
This budgetary decision turned out to be an improvement for the project overall. These dials sit next to the upstairs entrance to Noisebridge and allow anyone to change the color of the signs in the space. Here is the sketch of the layout of the system.
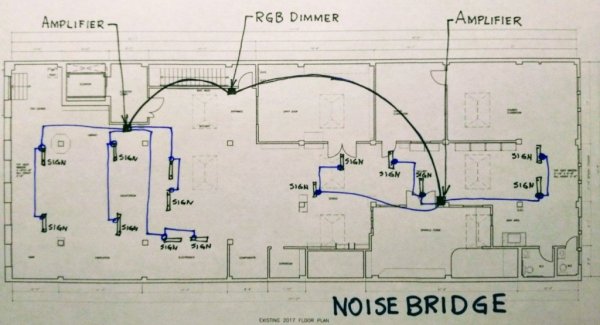
For the RGB dimmer to run all 14 signs, I split the system so that the signs on the west and east sides would run off of separate amplifiers, which I installed on the walls sort of centrally located to the signs they would serve.
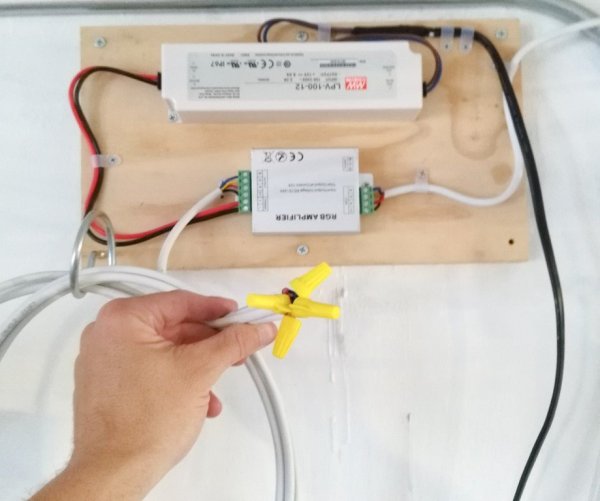
While the dimmer, LEDs, and amplifiers were cheap, I opted to get reliable Mean Well LPV-100-12 8.5A 12V single output switching power supplies. I used 18AWG 4-conductor stranded speaker wire between the dimmer, amplifiers, and signs, run along the ceiling using bridle hooks. I went with cheap, easy to use terminal block connectors on the ceiling above where each sign would be, allowing me to detach and reattach each sign’s LEDs with only a screwdriver.
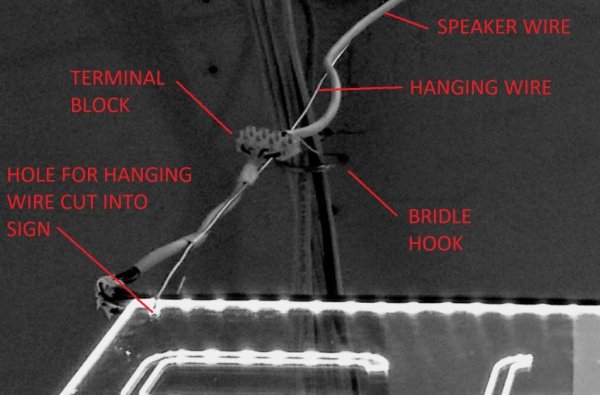
To suspend the signs I used eye lag screws in the ceiling, with a special driver bit made for them, and hooked 3′ lengths of 12 gauge hanging wire onto them — sturdier than I needed, but it allowed me to adjust the signs’ positions by simply bending the wire.
SIGN ASSEMBLY
I cut the LED strips to the length of the signs, then attached enough 22 gauge 4-conductor solid wire to reach the ceiling when the sign was installed. I had to be very careful bending and moving these connections, as they are extremely fragile, even with heat-shrink tubing applied.
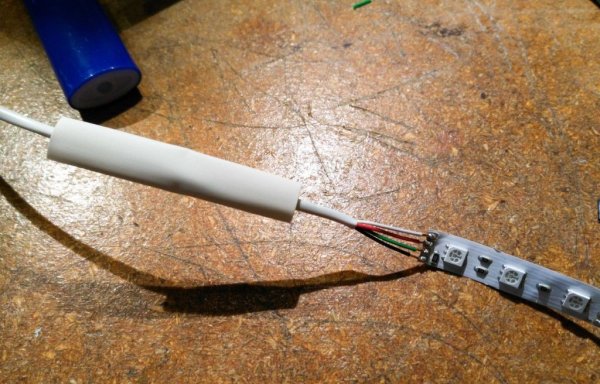
To keep costs down, the LED strips were attached to the tops of the signs with 2″-wide black duct tape. I folded any extra tape over to close off the light at the end and trimmed the excess with scissors.
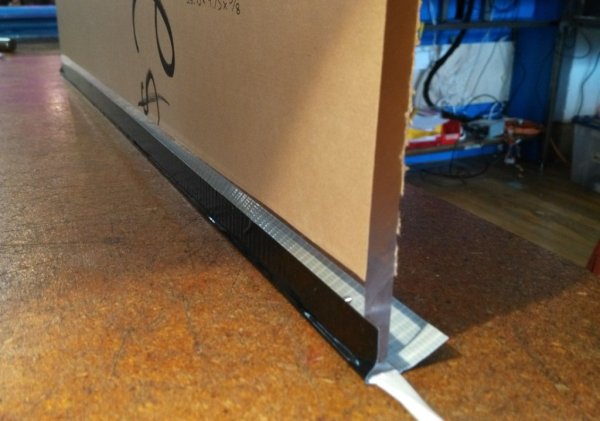
A very small amount of light bleeds through, but not enough to require more tape or another solution. Ideally each LED is centered facing the edge of the sign, but a little offset doesn’t seem to make a big difference.
Source:Edge-Lit LED Signs