
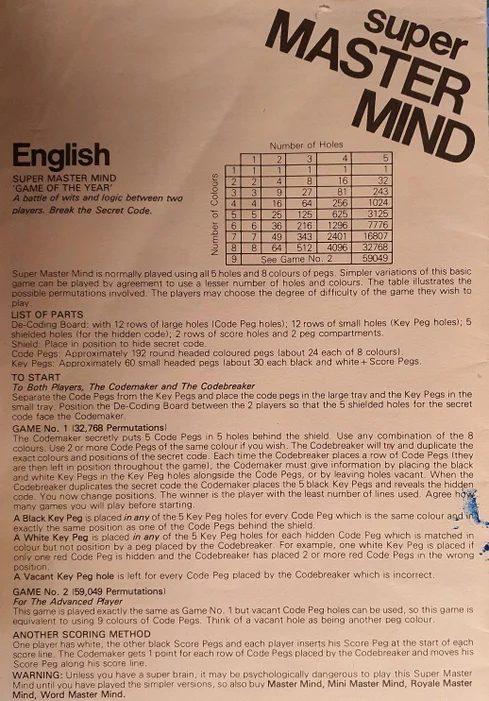
“A battle of wits and logic between two players. Break the secret code.”
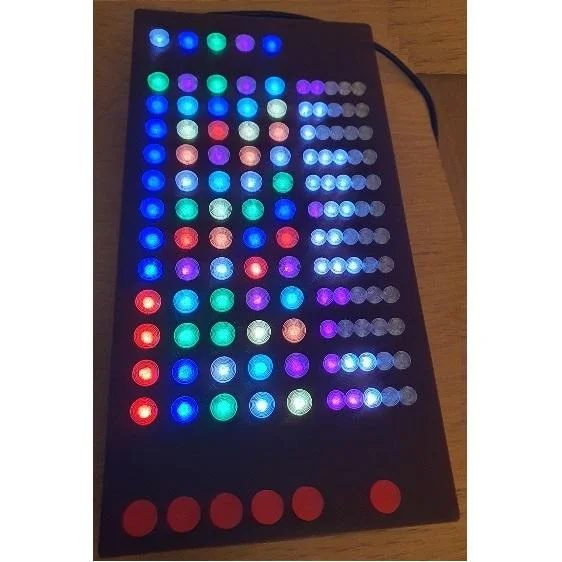
This is an electronic version of the classic 70’s Super Master Mind board game. The object is to guess the code that has been selected by the computer in as few moves as possible using clues given at each turn.
Supplies

Materials
Rasberry Pi Zero WH
SD Card
Adafruit 16×32 LED Matrix Panel (6mm pitch)
Adafruit Matrix Hat (or Bonnet)
7x F-F Dupont Wires
Small length of Stiff wire
6x 10mm Buttons
2.5mm Header block
5v 3A Power Supply
Female Socket barrel jack power connector 5.5×2.1mm
Short wire Jack plug connector male 5.5mm x 2.1mm
Brown, Transparent and Red PLA (or colours of choice)
Tools/Supplies
3D Printer
Soldering Iron
Super Glue
Tweezers/Wire Snips/Helping hands
Laptop/Computer for creating SD card and Pi Setup
Insulating Material (plastic sheet, thin cardboard or similar)
Step 1: Raspberry Pi Setup
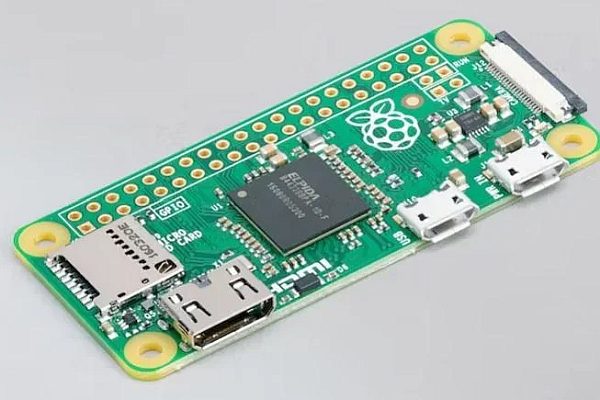
Download and install Rasbian Lite for the Pi Zero, minimal install, no GUI, all that is needed is Python.
https://www.raspberrypi.com/software/operating-systems/
The easiest way to install the OS is using the imager, here:
https://www.raspberrypi.com/software/
Change the default password, setup Wifi (optional) and SSH access – this can be done using the Raspberry Pi Installer options.
Step 2: Matrix Hat
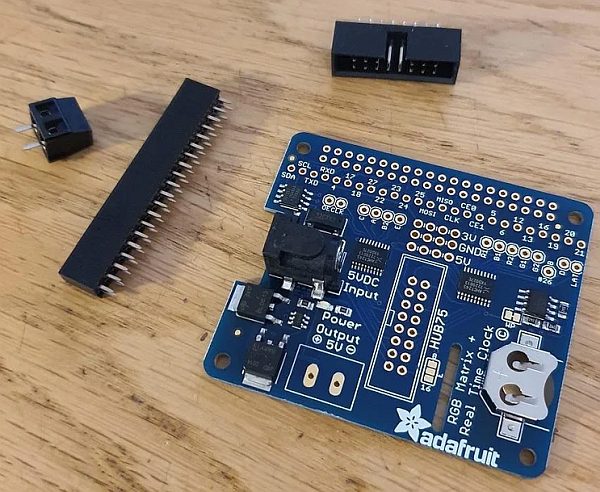
There is also a Matrix bonnet which is a bit cheaper, but was not available while I was making this.
Solder the header and connectors as per the hat assembly instructions:
https://learn.adafruit.com/adafruit-rgb-matrix-plus-real-time-clock-hat-for-raspberry-pi/assembly
I cut a thin plastic sheet to insulate the bottom of the matrix from the other components, with a cutout for the power and data cables but this is optional
Connect the hat, matrix power connectors, and data ribbon cable then power up the Pi for the next section.
Step 3: Matrix Libraries Install
Download and install all of the matrix software for the Pi as per Adafruit’s instructions, at step 6 here:
Step 4: Python Program and Auto Run
Create a folder in the home directory of the Pi called mastermind and save the mm-main-game.py and samplebase.py files there. Make sure the program runs by issuing the following command:
Sudo ./mm-main-game.py -r 16 -b 100
(Or you might need to specify the python3 interpreter)
Sudo /usr/bin/python3 /home/pi/mastermind/mm-main-game.py -r 16 -b 100
SUDO is needed to run the program as the matrix driver needs this to function correctly. You can run without, but you might get flickers or glitches.
The –r specifies the rows and the –b is the brightness (100 is max)
CODE BELOW. I wasnt able to attach this as a file, not sure why.
#!/usr/bin/env python
### Mastermind Game - Nick Stevens 2022 ###
#libraries
from samplebase import SampleBase
import RPi.GPIO as GPIO
import random
class MasterMind(SampleBase):
def __init__(self, *args, **kwargs):
super(MasterMind, self).__init__(*args, **kwargs)
def run(self):
def answerline(pos,colour):
#answerline
answer_x = 2
answer_y = 6+(pos*2)
self.matrix.SetPixel(answer_x,answer_y,colour[0],colour[1],colour[2])
def answerlineall(colour):
#answer line
answer_x = 2
answer_y = 6
while answer_y < 15:
self.matrix.SetPixel(answer_x,answer_y,colour[0],colour[1],colour[2])
answer_y = answer_y + 2
answer_y = 6
def trylinesall(colour):
#try lines
try_x = 28
try_y = 6
while try_x > 5:
while try_y < 15:
self.matrix.SetPixel(try_x,try_y,colour[0],colour[1],colour[2])
try_y = try_y + 2
try_y = 6
try_x = try_x - 2
try_x = 28
def tryline(line,pos,colour):
#try line
try_x = 28-(line*2)
try_y = 6+(pos*2)
self.matrix.SetPixel(try_x,try_y,colour[0],colour[1],colour[2])
def scorelinesall(colour):
#score lines
score_x = 28
score_y = 0
while score_x > 5:
while score_y < 5:
self.matrix.SetPixel(score_x,score_y,colour[0],colour[1],colour[2])
score_y = score_y + 1
score_y = 0
score_x = score_x - 2
score_x = 28
def pulsescoreline(line):
#score lines
score_x = 28-(line*2)
score_y = 0
colour = purple
while score_y < 5:
self.matrix.SetPixel(score_x,score_y,colour[0],colour[1],colour[2])
score_y = score_y + 1
self.usleep(25 * 1000)
score_y = 0
colour = white
while score_y < 5:
self.matrix.SetPixel(score_x,score_y,colour[0],colour[1],colour[2])
score_y = score_y + 1
self.usleep(25 * 1000)
def scoreline(line,pos,colour):
score_x = 28-(line*2)
score_y = pos
self.matrix.SetPixel(score_x,score_y,colour[0],colour[1],colour[2])
#set-up variables
max_brightness = self.matrix.brightness
count = 0
red = [255, 0, 0]
blue = [0, 0, 255]
green = [0,255,0]
white = [255, 255, 255]
orange = [255, 131, 0]
yellow = [255,255,0]
aqua = [0,255,255]
purple = [128,0,128]
off = [0,0,0]
press = False
colours = [red,blue,green,white,orange,yellow,aqua,purple]
answer = [red,red,red,red,red]
#startup-sequence
while press == False:
#wait till a button is pressed
for pin in button:
if GPIO.input(pin) == 0:
press = True
if self.matrix.brightness < 1:
self.matrix.brightness = max_brightness
count += 1
else:
self.matrix.brightness -= 1
if count % 8 == 0:
#RED
colour = red
answerlineall(colour)
trylinesall(colour)
scorelinesall(white)
elif count % 8 == 1:
#GREEN
colour = green
answerlineall(colour)
trylinesall(colour)
scorelinesall(purple)
elif count % 8 == 2:
#BLUE
colour = blue
answerlineall(colour)
trylinesall(colour)
scorelinesall(white)
elif count % 8 == 3:
#WHITE
colour = white
answerlineall(colour)
trylinesall(colour)
scorelinesall(purple)
elif count % 8 == 4:
#ORANGE
colour = orange
answerlineall(colour)
trylinesall(colour)
scorelinesall(white)
elif count % 8 == 5:
#YELLOW
colour = yellow
answerlineall(colour)
trylinesall(colour)
scorelinesall(purple)
elif count % 8 == 6:
#AQUA
colour = aqua
answerlineall(colour)
trylinesall(colour)
scorelinesall(white)
elif count % 8 == 7:
#PURPLE
colour = purple
answerlineall(colour)
trylinesall(colour)
scorelinesall(purple)
self.usleep(10 * 1000)
#whole game loop starts here
while True:
#clear he matrix here
self.matrix.Clear()
self.matrix.brightness = max_brightness
#randomize answer
count = 0
#initial random sequence
turnoff = 5
while count < 10:
anspos = 0
while anspos < turnoff:
colour = colours[random.randint(0,7)]
answerline(anspos,colour)
anspos = anspos + 1
anspos = 0
self.usleep(100 * 1000)
count = count + 1
count = 0
#pick an answer and turn off lamps
while turnoff > 0:
while count < 10:
anspos = 0
while anspos < turnoff:
colour = colours[random.randint(0,7)]
answerline(anspos,colour)
anspos = anspos + 1
anspos = 0
self.usleep(100 * 1000)
count = count + 1
count = 0
turnoff = turnoff - 1
answer[turnoff] = colours[random.randint(0,7)]
answerline(turnoff,off)
#for debug
print(answer[turnoff])
#start of main game loop here
pos1 = 0
pos2 = 0
pos3 = 0
pos4 = 0
pos5 = 0
playertry = 0
while playertry < 12:
#pulse score line
press = False
count = 0
while count < 6:
#wait for button press
for pin in button:
if GPIO.input(pin) == 0:
press = True
count = 6
pulsescoreline(playertry)
self.usleep(60 * 1000)
count = count + 1
#Clear score line
for sl in range(5):
scoreline(playertry,sl,off)
#select your answer
#set the lamps to the prev answer or all red if first try
tryline(playertry,0,colours[pos1])
tryline(playertry,1,colours[pos2])
tryline(playertry,2,colours[pos3])
tryline(playertry,3,colours[pos4])
tryline(playertry,4,colours[pos5])
self.usleep(600 * 1000)
#wait for button push
pressed = 0
while pressed != 7:
#wait for button press
for pin in button:
if GPIO.input(pin) == 0:
pressed = pin
print(pin)
if pressed == 8:
#button 1
pos1 = pos1 + 1
if pos1 > 7:
pos1 = 0
tryline(playertry,0,colours[pos1])
while GPIO.input(8) == 0:
self.usleep(10 * 1000)
pressed = 0
elif pressed == 11:
#button 2
pos2 = pos2 + 1
if pos2 > 7:
pos2 = 0
tryline(playertry,1,colours[pos2])
while GPIO.input(11) == 0:
self.usleep(10 * 1000)
pressed = 0
elif pressed == 25:
#button 3
pos3 = pos3 + 1
if pos3 > 7:
pos3 = 0
tryline(playertry,2,colours[pos3])
while GPIO.input(25) == 0:
self.usleep(10 * 1000)
pressed = 0
elif pressed == 9:
#button 4
pos4 = pos4 + 1
if pos4 > 7:
pos4 = 0
tryline(playertry,3,colours[pos4])
while GPIO.input(9) == 0:
self.usleep(10 * 1000)
pressed = 0
elif pressed == 10:
#button 5
pos5 = pos5 + 1
if pos5 > 7:
pos5 = 0
tryline(playertry,4,colours[pos5])
while GPIO.input(10) == 0:
self.usleep(10 * 1000)
pressed = 0
self.usleep(10 * 1000)
#score the answer that was input
guess = [colours[pos1],colours[pos2],colours[pos3],colours[pos4],colours[pos5]]
score = [off,off,off,off,off]
tmpguess = guess[:]
tmpanswer = answer[:]
scorepos = 4
#score black (purple) pegs
for guesspos, guesscol in enumerate(tmpguess):
if guesscol == tmpanswer[guesspos]:
print("Black Peg")
score[scorepos] = purple
tmpguess[guesspos] = off
tmpanswer[guesspos] = off
scorepos = scorepos - 1
#score white pegs
for guesspos, guesscol in enumerate(tmpguess):
for answerpos, answercol in enumerate(tmpanswer):
if answercol == off or guesscol == off:
continue
if answercol == guesscol:
print("White Peg")
score[scorepos] = white
tmpguess[guesspos] = off
tmpanswer[answerpos] = off
scorepos = scorepos - 1
break
print("Score",score)
#light up the score row
for sl in range(5):
scoreline(playertry,sl,score[sl])
#check if won
if score == [purple, purple, purple, purple, purple]:
playertry = 12
print("WINNER")
playertry = playertry + 1
#all trys used - or guessed correct - end of game
print("END")
count = 0
while count < 6:
for al in range(5):
answerline(al,off)
#answerline(1,off)
#answerline(2,off)
#answerline(3,off)
#answerline(4,off)
self.usleep(100 * 1000)
for al in range(5):
answerline(al,answer[al])
#answerline(1,answer[1])
#answerline(2,answer[2])
#answerline(3,answer[3])
#answerline(4,answer[4])
self.usleep(100 * 1000)
count = count + 1
press = False
while press == False:
#wait till a button is pressed
for pin in button:
if GPIO.input(pin) == 0:
press = True
self.usleep(100 * 1000)
# Main function
if __name__ == "__main__":
#setup GPIO
GPIO.setmode(GPIO.BCM)
button = [10, 9, 25, 11, 8, 7]
for pin in button:
GPIO.setup(pin, GPIO.IN, pull_up_down=GPIO.PUD_UP)
master_mind = MasterMind()
if (not master_mind.process()):
master_mind.print_help()
You will also need the samplebase.py file in the same directory:
import argparse
import time
import sys
import os

sys.path.append(os.path.abspath(os.path.dirname(__file__) + '/..'))
from rgbmatrix import RGBMatrix, RGBMatrixOptions


class SampleBase(object):
    def __init__(self, *args, **kwargs):
        self.parser = argparse.ArgumentParser()

        self.parser.add_argument("-r", "--led-rows", action="store", help="Display rows. 16 for 16x32, 32 for 32x32. Default: 32", default=32, type=int)
        self.parser.add_argument("--led-cols", action="store", help="Panel columns. Typically 32 or 64. (Default: 32)", default=32, type=int)
        self.parser.add_argument("-c", "--led-chain", action="store", help="Daisy-chained boards. Default: 1.", default=1, type=int)
        self.parser.add_argument("-P", "--led-parallel", action="store", help="For Plus-models or RPi2: parallel chains. 1..3. Default: 1", default=1, type=int)
        self.parser.add_argument("-p", "--led-pwm-bits", action="store", help="Bits used for PWM. Something between 1..11. Default: 11", default=11, type=int)
        self.parser.add_argument("-b", "--led-brightness", action="store", help="Sets brightness level. Default: 100. Range: 1..100", default=100, type=int)
        self.parser.add_argument("-m", "--led-gpio-mapping", help="Hardware Mapping: regular, adafruit-hat, adafruit-hat-pwm" , choices=['regular', 'regular-pi1', 'adafruit-hat', 'adafruit-hat-pwm'], type=str)
        self.parser.add_argument("--led-scan-mode", action="store", help="Progressive or interlaced scan. 0 Progressive, 1 Interlaced (default)", default=1, choices=range(2), type=int)
        self.parser.add_argument("--led-pwm-lsb-nanoseconds", action="store", help="Base time-unit for the on-time in the lowest significant bit in nanoseconds. Default: 130", default=130, type=int)
        self.parser.add_argument("--led-show-refresh", action="store_true", help="Shows the current refresh rate of the LED panel")
        self.parser.add_argument("--led-slowdown-gpio", action="store", help="Slow down writing to GPIO. Range: 0..4. Default: 1", default=1, type=int)
        self.parser.add_argument("--led-no-hardware-pulse", action="store", help="Don't use hardware pin-pulse generation")
        self.parser.add_argument("--led-rgb-sequence", action="store", help="Switch if your matrix has led colors swapped. Default: RGB", default="RGB", type=str)
        self.parser.add_argument("--led-pixel-mapper", action="store", help="Apply pixel mappers. e.g \"Rotate:90\"", default="", type=str)
        self.parser.add_argument("--led-row-addr-type", action="store", help="0 = default; 1=AB-addressed panels; 2=row direct; 3=ABC-addressed panels; 4 = ABC Shift + DE direct", default=0, type=int, choices=[0,1,2,3,4])
        self.parser.add_argument("--led-multiplexing", action="store", help="Multiplexing type: 0=direct; 1=strip; 2=checker; 3=spiral; 4=ZStripe; 5=ZnMirrorZStripe; 6=coreman; 7=Kaler2Scan; 8=ZStripeUneven... (Default: 0)", default=0, type=int)
        self.parser.add_argument("--led-panel-type", action="store", help="Needed to initialize special panels. Supported: 'FM6126A'", default="", type=str)
        self.parser.add_argument("--led-no-drop-privs", dest="drop_privileges", help="Don't drop privileges from 'root' after initializing the hardware.", action='store_false')
        self.parser.set_defaults(drop_privileges=True)

    def usleep(self, value):
        time.sleep(value / 1000000.0)

    def run(self):
        print("Running")

    def process(self):
        self.args = self.parser.parse_args()

        options = RGBMatrixOptions()

        if self.args.led_gpio_mapping != None:
          options.hardware_mapping = self.args.led_gpio_mapping
        options.rows = self.args.led_rows
        options.cols = self.args.led_cols
        options.chain_length = self.args.led_chain
        options.parallel = self.args.led_parallel
        options.row_address_type = self.args.led_row_addr_type
        options.multiplexing = self.args.led_multiplexing
        options.pwm_bits = self.args.led_pwm_bits
        options.brightness = self.args.led_brightness
        options.pwm_lsb_nanoseconds = self.args.led_pwm_lsb_nanoseconds
        options.led_rgb_sequence = self.args.led_rgb_sequence
        options.pixel_mapper_config = self.args.led_pixel_mapper
        options.panel_type = self.args.led_panel_type


        if self.args.led_show_refresh:
          options.show_refresh_rate = 1

        if self.args.led_slowdown_gpio != None:
            options.gpio_slowdown = self.args.led_slowdown_gpio
        if self.args.led_no_hardware_pulse:
          options.disable_hardware_pulsing = True
        if not self.args.drop_privileges:
          options.drop_privileges=False

        self.matrix = RGBMatrix(options = options)

        try:
            # Start loop
            print("Press CTRL-C to stop sample")
            self.run()
        except KeyboardInterrupt:
            print("Exiting\n")
            sys.exit(0)

        return True
(CTRL+C to quit the program)
To get the program to autorun when the Pi is powered on edit the rc.local file using sudo nano /etc/rc.local
Tutorial here: https://learn.sparkfun.com/tutorials/how-to-run-a-raspberry-pi-program-on-startup/method-1-rclocal
Insert the command:
sudo bash -c ‘/usr/bin/python3 /home/pi/mastermind/mm-main-game.py -r 16 -b 100 > /home/pi/mastermind/mm-main-game.log 2>&1' &
#!/bin/sh -e
#
# rc.local
#
# This script is executed at the end of each multiuser runlevel.
# Make sure that the script will "exit 0" on success or any other
# value on error.
#
# In order to enable or disable this script just change the execution
# bits.
#
# By default this script does nothing.

# Print the IP address
_IP=$(hostname -I) || true
if [ "$_IP" ]; then
  printf "My IP address is %s\n" "$_IP"
fi

sudo bash -c '/usr/bin/python3 /home/pi/mastermind/mm-main-game.py -r 16 -b 100 > /home/pi/mastermind/mm-main-game.log 2>&1' &

exit 0
Step 5: Button Connections
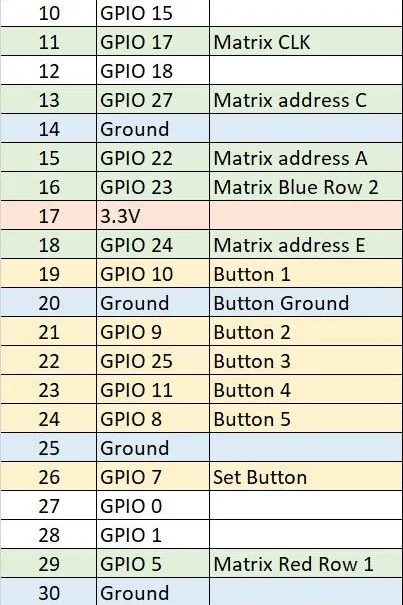
Cut 4 Pin and 3 Pin sections of a header and solder them to the HAT on Pins 20,22,24 and 26 (outer side); and Pins 19,21 and 23 (Inner side) – see photo: (please forgive my horrible soldering skills)
Also see the pinout of all of the connections.
Step 6: 3D Printing
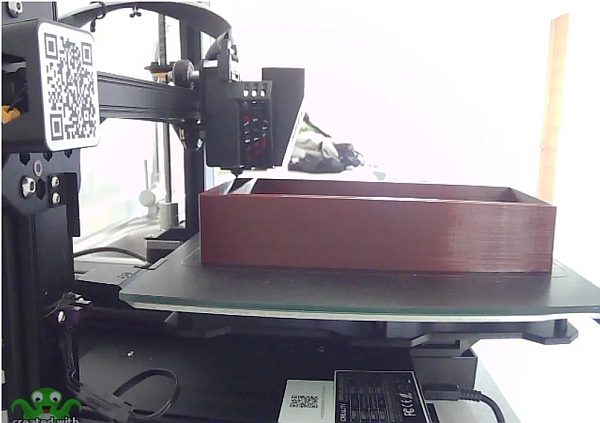
I chose the colours as this kind-of matches the 70’s retro theme 🙂
I would recommend a quality PLA like Prima Select – as it’s strong and makes accurate prints. Last thing you want is the 20 hour print cracking when pressing in the light covers…
Print the Case top and bottom in brown PLA – these are long prints!
Print the button caps and bracket in red PLA
Print the light covers in transparent PLA – you’ll need 65 large and 60 small
Press fit the light covers into the top cover – these just snaped in for me but you might need to either glue them if they are loose or use a round file to make them fit.
Press fit the button caps and test fit to the top cover, might need a bit of filing to make the move smoothly.
Test fit the matrix into the top cover, the switch bracket and switches and make sure everything fits together correctly.
Step 7: Button Wiring

Once you are happy, superglue the buttons onto the bracket – making sure you get the alignment just right through the top cover.
Due to the constraints of the size of the matrix and the print bed size, there is very little room for the buttons and the wiring; so I used stiff wire to connect up all the ground pins of the buttons on one side, and soldered short lengths to the other side so I could connect the dupont wires underneath.
Taking careful note of which wire is which, feed the wires through the holes and carefully seat the buttons down into the case.
Connect the wires to the pins soldered earlier on to the board, making sure you get the correct pin connected to the board.
Pin Pi Pins Notes
19 GPIO 10 Button 1
20 Ground Button Ground
21 GPIO 9 Button 2
22 GPIO 25 Button 3
23 GPIO 11 Button 4
24 GPIO 8 Button 5
26 GPIO 7 Set Button
Step 8: Power Connector
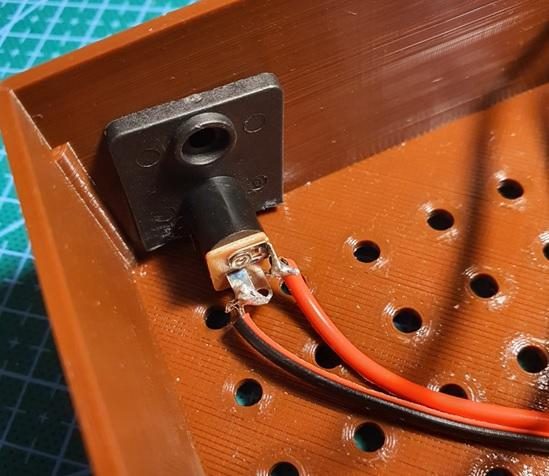
Solder the short male barrel jack connector to the external barrel jack connector. (both of these parts were bought on ebay very cheaply)
Then connect it to the internal power connector on the Matrix hat board. This could also be achieved with a direct soldered connection wire, but I found it easier this way.
Step 9: Final Construction
All that is really left to do now is to fit the top cover and glue the case shut. I probably should have designed the case for screw fittings but I hadn’t thought about that when I designed the case.
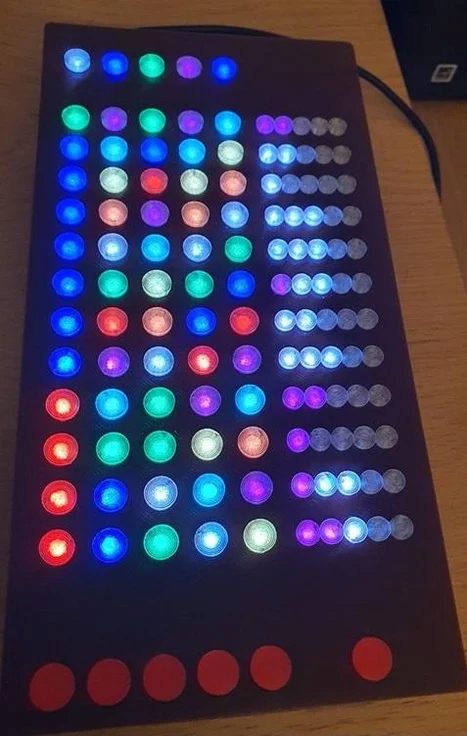
Step 10: Playing the Game!
Power on the game by connecting the 5v power supply.
The system will take about 1 minute to boot, and once ready, the front panel will pulse all the lights to indicate it is ready to go.
A copy of the original games instructions is attached.
Press any button and the game will pick a random code and hide the result.
The game will then indicate the first row and light up the first set of code lights.
Press a corresponding button to change the colour of the code, there are eight colours; Red, Blue, Green, White, Orange, Yellow, Aqua, & Purple. The buttons will cycle through the colours on each press.
Once you are happy press the right button to enter your guess, the game will the score you as follows:
A purple light indicates there is a code of the correct colour and location – the position of the score light does NOT indicate that this is the correct location!
A White light indicates there is a code of the correct colour but in the wrong location – again the position of the score light does NOT indicate which colour is correct!
Once the score is indicated the game will light up the next row to allow you to modify you guess and try again.
If you guess correct or you run out of guesses the secret code will be revealed on the top row.
Good luck Master Mind!
Source: Electronic MasterMind Game