
Day after day, it's getting harder to keep your data private. There's too much demand for it coming from multiple sides. Different sides might have different reasons to obtain your data, but does it matter for you? Does it really matter why your data is being taken from you? Because at the end of the day, the result is the same. Your private data is in someone else's possession! I don't think I need to explain all the consequences that can arise from that.

In my opinion, the only way to keep your data private is to raise the costs of unauthorized access to it as high as possible, ideally higher than any possible reward that a third side can get by obtaining your data. By doing so, you're putting away incentives to access your data without your permission.
I did my best to make the data encrypted with this device indecipherable without the keys, but even that won't help if you encrypt or decrypt your data on an infected computer.
Supplies
- Raspberry Pi Pico x1
- ESP32 x1
- 16×2 LCD display x1
- 100 – 330 Ohm resistor x1
- 4.7k resistor x1
- 4.7k variable resistor x1
Step 1: Install Drivers and Configure Arduino IDE *Optional
If you've never flashed either ESP32 or Raspberry Pi Pico before you need to configure Arduino IDE and install drivers to upload the firmware to the boards, you can download the CP210x driver for ESP32 here: https://www.silabs.com/developers/usb-to-uart-bridge-vcp-drivers
Configuring IDE isn't a part of this tutorial. You can read about it here: https://randomnerdtutorials.com/installing-the-esp32-board-in-arduino-ide-windows-instructions/
and here: https://www.tomshardware.com/how-to/program-raspberry-pi-pico-with-arduino-ide
Step 2: Install LiquidCrystal Library
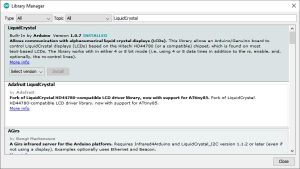
You only need to install one library for this project (if you haven't already installed it before).
To install LiquidCrystal library click Sketch -> Include Library -> Manage Libraries…
Enter LiquidCrystal in the text field, wait till the results of the search appear in the form, and then click Install on the box with the LiquidCrystal name.
Every other required library is already installed in one way or another.
Step 3: Download Firmware

You can download the firmware here: https://github.com/Northstrix/Encrypted_Data_Vault
The firmware for this device is located in the Raspberry_Pi_Pico_plus_ESP32 folder.
I've also included some additional materials that might be useful for you. Check the extra folder.
Step 4: Generate Keys

You can do it by any means possible.
The best way to do it is to throw 20-sided dice.
If you get a number from 1 to 9, write it down. If you get a number from 10 to 15, write down a letter corresponding to that number.
10 = A;
11 = B;
12 = C;
13 = D;
14 = E;
15 = F.
If you get 20, write down 0.
If you get something else, throw the dice again.
Since I'm going to expose the keys to the whole world, I've used an untested RNG to generate the keys, don't ever do that! That will compromise the security of the device.
Step 5: Modify Firmware
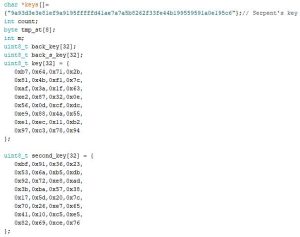
Open the file Raspberry_Pi_Pico_plus_ESP32\Firmware_for_Raspberry_Pi_Pico\Firmware_for_Raspberry_Pi_Pico.ino and replace the existing keys with those you've generated.
Note that all keys are in hexadecimal format!
Step 6: Flash Raspberry Pi Pico
Upload the firmware from the folder Raspberry_Pi_Pico_plus_ESP32\Firmware_for_Raspberry_Pi_Pico into the Raspberry Pi Pico.
*Updated: I figured out that this might be useful for you https://github.com/earlephilhower/arduino-pico/issues/5
Step 7: Flash ESP32

Upload the firmware from the folder Raspberry_Pi_Pico_plus_ESP32\Firmware_for_ESP32 into the ESP32.
Some boards will flash without any problems.
Unfortunately, that's not the case for all boards. If you configured IDE correctly, installed drivers, selected the corresponding port, and still keep getting this error: A fatal error occurred: Failed to connect to ESP32: Timed out waiting for packet header. Connect a 10µF capacitor to the board while flashing.
Connect the positive lead of the capacitor to the EN pin of the ESP32;
Connect the negative lead of the capacitor (usually indicated by the gray stripe) to the GND pin of the ESP32.
Don't forget to disconnect the capacitor after the board flashes.
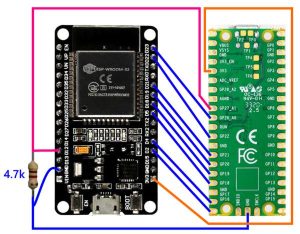
Step 8: Connect ESP32 to Raspberry Pi Pico
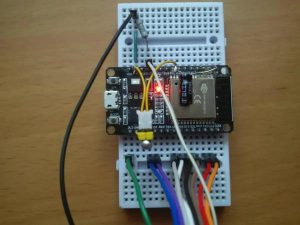
You might be wondering what's the purpose of the ESP32 here. Well, It's simple and kinda questionable at the same time. I wanted to use Raspberry Pi Pico's built-in random number generator. Unfortunately, it turned out to be insecure and not random at all. It seems like there is a predefined sequence that the generator presents as random. To resolve this issue I've used ESP32 as a random number generator. There are no advantages of using an external RNG, besides the fact that it at least seems to produce a random output, unlike the built-in one. The interface that I've implemented to connect ESP32 to Raspberry Pi serves its purpose, although it's slow, primitive, and not exactly what I would call a pinnacle of reliability.
The circuit diagram is in the step N9.
Step 9: Circuit Diagram: ESP32 to Raspberry Pi Pico
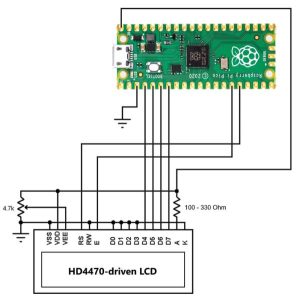
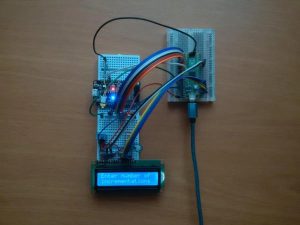
Step 10: Connect 16×2 LCD to Raspberry Pi Pico
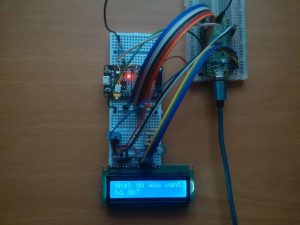
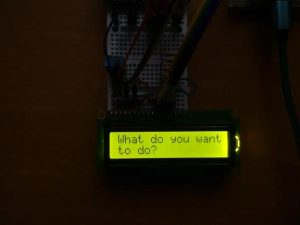
I've added a 16×2 LCD to make this device easier to use. The primary purpose of the display is to inform you of the current operation and the progress of this operation.
The circuit diagram is in the step N11.
Step 11: Circuit Diagram: 16×2 LCD to Raspberry Pi Pico
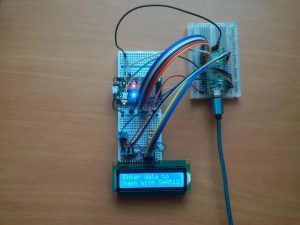
Step 12: User Guide
To see the device's menu connect the device to your computer, select the COM port corresponding to the device, open the Serial Monitor, set the baud rate to 115200, enter “0” into the text field, and press send.
Enter the number corresponding to the option into the text field and press send to select the desired option.
By default, AES is set to 256-bit mode.
1. Encrypt data with AES + Serpent – Encrypt data using AES + Serpent encryption algorithm;
2.Decrypt data with AES + Serpent – Decrypt data using AES + Serpent encryption algorithm;
3.Set AES to 128-bit mode – Set AES to 128-bit mode (128-bit key, 10 rounds);
4.Set AES to 192-bit mode – Set AES to 192-bit mode (192-bit key, 12 rounds);
5.Set AES to 256-bit mode – Set AES to 256-bit mode (256-bit key, 14 rounds);
6.Hash data with SHA-512 – Compute the hash for the given string using SHA-512 hash function;
7.Encrypt data in counter mode with AES + Serpent – Encrypt data using AES + Serpent encryption algorithm but increment key after encrypting each block;
8.Decrypt data in counter mode with AES + Serpent – Decrypt data using AES + Serpent encryption algorithm but increment key after decrypting each block;
9.Increment key (IV) n times – Increment both AES keys required number of times, only first 64-bits can be affected by this option;
10.Encrypt data in counter mode with AES + Serpent + AES – Encrypt data using AES + Serpent + AES encryption algorithm but increment key after encrypting each block;
11.Decrypt data in counter mode with AES + Serpent + AES – Decrypt data using AES + Serpent + AES encryption algorithm but increment key after decrypting each block;
12.Test RNG – Test random number generator by generating 16 random hexadecimal strings;
13.Derive part of the key from the string – Literally, derive a part of the key from the input string. In other words – set a master password;
14.Generate random ASCII strings – Generate the requested number of random ASCII strings;
The most secure way to encrypt notes (at least I consider it to be the most secure):
1) Power up the device;
2) Make sure that the RNG works the way it's supposed to by testing it (option N12);
3) Set master password N1 (option N13);
4) Set IV (option N9);
5) Calculate the hash of the note that you want to encrypt (option N6);
6) Encrypt note using AES-256 + Serpent + AES-256 encryption algorithm in counter mode (option N10);
7) Reboot the device (disconnect the power cable and connect it again);
8) Set master password N2 (option N13);
8) Encrypt the IV that you've used in step 4 by using AES-256 + Serpent + AES-256 encryption algorithm in counter mode (option N13);
9) Increment key (IV) 100 times or any other number that is easy for you to remember (option N9);
10) Encrypt hash that you've used in step 5 by using AES-256 + Serpent + AES-256 encryption algorithm in counter mode (option N13);
You can store the hint for the master password N1 alongside the hint for the master password N2, ciphertext from step N6, Encrypted IV from step N8, and encrypted hash from step N10 in the database that I made specifically for this project.
To decrypt the note encrypted that way and to check its integrity:
1) Power up the device;
2) Set master password N2 (option N13);
3) Decrypt the IV (option 11);
4) Increment the key (IV) by 100 or a number that you've used in the step N9 of the encryption process;
5) Decrypt hash (option N11);
6) Reboot the device (disconnect the power cable and connect it again);
7) Set master password N1 (option N13);
8) Increment IV by the number you've obtained from the step N3;
9) Decrypt ciphertext by using AES-256 + Serpent + AES-256 encryption algorithm in counter mode (option N13);
10) Calculate the hash of the decrypted note (option N6);
11) Compare the calculated hash with the hash from step N5. If both hashes match, that means that your note wasn't altered while being stored. If hashes don't match, that means that someone had tampered with your note!
Step 13: Test RNG

To test the random number generator:
1) Open the Serial Monitor;
2) Enter 12 into the text field;
3) Press Send button.
If the output looks random, that means that RNG works the way it's supposed to.
If there's a repeating sequence or too many zeroes, check the connection between the boards.
The first output is an example of the working RNG and working interface.
The second and third outputs are examples of the bad connection between the boards. If you're getting something like that, my advice to you would be to disassemble the whole circuit, flash ESP32 again, check every wire, and then assemble the entire thing again.
Step 14: Set Master Password
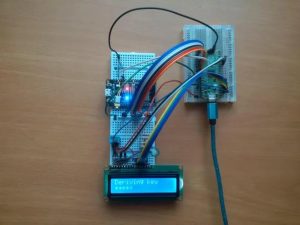
The purpose of the master password is to prevent the third side from deciphering your notes by simply getting physical access to the device. The master password is used to derive a part of the key. The master password isn't stored in the permanent memory. You need to enter it every time you're powering up the device. After you disconnect power from the device, every modified part of the key will be lost because it's stored in the volatile memory.
After the master password is entered, it's hashed with SHA-512, then this hash goes through Serpent 576 times, and after that, the obtained result is used to modify the parts of two AES's keys.
One of the numbers derived from the master password is used as a verification number. The verification number must always be the same for the same password.
You might be wondering why the number of iterations is 576. The answer is not as straightforward as it can be. At first, it was 50, then I increased it to 100, after increasing it to 100 I realized that it's still not enough, and increased it to 1000, after that I realized that 1000 is too much and decreased it to 500, then 500 appeared “not enough” for me. I increased it to 550, and again it appeared “not enough” to me, I increased it to 575, then I realized that I will never find a “perfect number”. So, I increased the number of iterations by one and finally stopped wasting my time on “looking for a perfect number of iterations”.
To set a master password:
1) Enter 13 into the text field;
2) Press Send button;
3) Enter your master password;
4) Press Send.
I've used this master password:
It c@n b3 as lon6 and as we1rd as y0u wan7 it to be. You can set different master passwords for different sets of notes.
And obtained the verification number 200
Step 15: Set IV
The purpose of the initialization vector is the same as the purpose of the master password. It just works differently – instead of deriving a part of the key from the input string, the initialization vector (in that case) sets the number of iterations of the first eight sections of the key. It works as a counter. Each section of the AES's key can have a value between 0 and 255. IV only affects the first eight sections of the key. It works as follows: iterate the current section until it reaches 255, on the next iteration set the current section equal to zero and increment the next section by one. The same principle applies to every section.
Now let me explain why I wrote (in that case) – IV is supposed to be a number that is used as a starting point for the counter. In that case, it is a starting point for the counter (in the counter mode), but instead of being a starting point itself, it increments the key by itself! That's the key difference between that case and what IV is supposed to be. And by the way, you can only call the number of the key incrementations an IV only in cases where cipher uses counter mode. In the case of AES + Serpent without counter mode, the number of the key incrementations is exactly what I called it.
I hope I wrote an explanation that's clear enough. Anyway, if you don't get something, you can always ask a question in the comment section.
I've used 123456 as an IV.
Step 16: Hash Data
To prevent unauthorized modification of the note or forgery of a fake note using already obtained ciphertexts you should hash the note and then store the hash in an encrypted form!
To hash a string enter 6 into the text filed, press Send, paste the string that you want to hash, and then press Send.
I came up with these results:
Input:
Day after day, it's getting harder to keep your data private. There's too much demand for it coming from multiple sides. Different sides might have different reasons to obtain your data, but does it matter for you? Does it really matter why your data is being taken from you? Because at the end of the day, the result is the same. Your private data is in someone else's possession! I don't think I need to explain all the consequences that can arise from that. In my opinion, the only way to keep your data private is to raise the costs of unauthorized access to it as high as possible, ideally higher than any possible reward that a third side can get by obtaining your data. By doing so, you're putting away incentives to access your data without your permission. I did my best to make the data encrypted with this device indecipherable without the keys, but even that won't help if you encrypt or decrypt your data on an infected computer. With all the flaws and inconveniences that come with this device, it does its job and doesn't cost like it's covered in gold. Even the weakest encryption algorithm utilized by this device is capable of making your data indecipherable without the keys, not to mention that the combination of the strongest encryption algorithm, master password, and the initialization vector can make your notes indecipherable even if the attacker gets the physical access to the device. While the primary purpose of this device is to protect your private data from unauthorized access, it can do more than that. This device can also give you the ability to detect if your data had been tampered with and the ability to generate random strings in both ASCII and hexadecimal formats.
Hash:
8624b52c3334d65571654b98e7d7be617be3e29e98cc92cc5099377fd60ccbe3a957acc12aaa43ab0417dfc4109d46922ff23bf359599c1c132a9bb54b121047
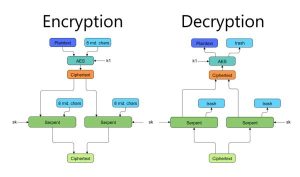
Step 17: AES + Serpent Encryption Algorithm

The first encryption algorithm requires two keys; AES's key, and Serpent's key. It takes eight characters (64 bits) as an input (if the input length isn't multiple of eight ASCII characters, padding is applied), generates 64 random bits (eight characters), and passes 128 bits to the AES (Advanced Encryption Standard) cipher. After that, the AES's ciphertext split into two half, 64 bits each. Each half of the AES's ciphertext then passed to the Serpent cipher alongside 64 random bits. Finally, the resulting ciphertext is the concatenation of the two ciphertexts from the Serpent cipher. Random bits generated during the encryption process are disregarded during the decryption process. And by the way, if you give the algorithm the same input more than once, the output will be different every time.
You can find more diagrams in the same repository in GitHub.
Step 18: AES + Serpent Encryption Algorithm in Counter Mode
Step 19: AES + Serpent + AES Encryption Algorithm in Counter Mode
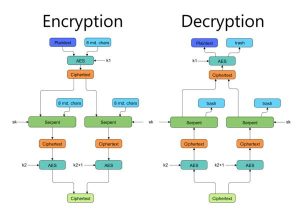
Finally, Let's get to the strongest encryption algorithm utilized by this device. It requires three keys to function: Two AES' keys and one Serpent's key. This algorithm takes eight characters (64 bits) and three keys as an input, generates 192 random bits in the encryption process, and produces a sixty-four-character string in the hexadecimal format as an output. If the length of the input block isn't equal to eight, then the padding is applied. The number of rounds performed by the AES and the key length of the AES's keys depend on the chosen mode.
The encryption process goes as follows:
1) The algorithm takes an input block;
2) If the length of an input block isn't equal to eight, then the padding is applied;
3) Input block is passed to the AES alongside 64 random bits;
4) AES encrypts obtained 128-bit block using the first key;
5) The result of the previous step is split into two equal 64-bit halves;
6) 64 random bits are concatenated to each half;
7) Each of the 128-bit halves is encrypted using Serpent;
8) Each ciphertext from the Serpent is encrypted using AES with the second key;
9) Concatenation of two ciphertexts produced by the AES using the second key is the resulting ciphertext.
AES's key is incremented each time after the algorithm uses that key.
Step 20: Encrypt Your Data Using AES + Serpent + AES in Counter Mode
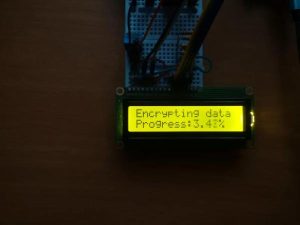
At this point, I've changed the display to compensate for the worsening room illumination.
This device encrypts passwords, notes, phone numbers, and whatever you feed to it.
To encrypt a record:
1) Enter 10 into the text field;
2) Press Send button;
3) Enter the stuff that you want to encrypt;
4) Press Send.
I was able to encrypt and decrypt a 14 500-character long record without any problems!
Eventually, I came up with these results:
Plaintext:
Day after day, it's getting harder to keep your data private. There's too much demand for it coming from multiple sides. Different sides might have different reasons to obtain your data, but does it matter for you? Does it really matter why your data is being taken from you? Because at the end of the day, the result is the same. Your private data is in someone else's possession! I don't think I need to explain all the consequences that can arise from that. In my opinion, the only way to keep your data private is to raise the costs of unauthorized access to it as high as possible, ideally higher than any possible reward that a third side can get by obtaining your data. By doing so, you're putting away incentives to access your data without your permission. I did my best to make the data encrypted with this device indecipherable without the keys, but even that won't help if you encrypt or decrypt your data on an infected computer. With all the flaws and inconveniences that come with this device, it does its job and doesn't cost like it's covered in gold. Even the weakest encryption algorithm utilized by this device is capable of making your data indecipherable without the keys, not to mention that the combination of the strongest encryption algorithm, master password, and the initialization vector can make your notes indecipherable even if the attacker gets the physical access to the device. While the primary purpose of this device is to protect your private data from unauthorized access, it can do more than that. This device can also give you the ability to detect if your data had been tampered with and the ability to generate random strings in both ASCII and hexadecimal formats.
Ciphertext:
abeaded1bd167e8542c3535d323b819dff200f5e7ea5ba62c931c01495c709742fa8afc67156abf6641421842234a02d71db03557be406eeb0d62ed20517eda499c2aace8d385e11c54721cbb7012ee7a85c291f77ec8f2f779ca914889a2fefe104d217fb6a455cfcc4e64a9c5f020c50f3038bb4dde06d776f6fe60fe89326d08eae5c2af0ccada63e7e52fb7127c555c182c094e7614a3c7b4d2f6ec066484c2b993c598c9198ee6c303c80103ee2129f5f9d7c1e2e0bcb5be35aba2f555445559e80759b8d580e7ffb58b77cc9717480d8eb2541aa920bfe26a9156b7fef4149a3da428ea01424b2c800f7dcaff4bdd1c25e42ea959e718747f8f9a97c1711d30832d5f96542a5d7954f4f465627a0b6e1179c079f1e242894363681abcd33481bab29d750a0b29210808f900cee849659692ae0cf84c7f85dd7a58c52d8933a93dc8866b4661da0639b79411e6a8905fb2d4c3d4b8cd9c1e66f114e40f02c2d543842c0f1a787e96fc2acc4da775be206c09a19ed7d1b8befd9cfb9cecf3f8d69910b658aa99f6e80a93571643603527a430c16fec33988bbb03b0f34e3fc06bd3c1ec0d7e14a8c3fbee33ea18c1754ef9f03cb545ce5936fa48eb99e525ae9c79aab5308de0a5feaa9cd82a413c0fb83e27a19ab939896a5f431c39f2bd85a9aa44d3c07efb5e72715fa720448fa3a901d8d23bd80596490b42acb9bc481808e3f3634e3724239440774c51545be468f963d0d950a8a003543bb5f38abb8c9868f05f2bf7f77f4f8b8404d335cbed1eee1b60c6909455adcc072eef6ee2304f1ef51c896c75ac8461e3f8a458f57916340e361153431cdcf87ba5350c677283a209545d06760ca82b2a8cd2f601ad0a3927a502547863a25ccf6e45e5b81e6f51f6675f9e402e2a4397b836e6ac8a9d81bfbe1bd260062cd5eb9a086eeeb861eccc26e148d9d6c00656ca614471dd8d7a93c78a1b3bbd4428fc8276d9448679e262b4ed02046c58b9eaef8c596c6a41216caf867a62d06ff2a0aefdee637355dc5baeff656a784b99767090e53299e1adfd8882333db4a89007f307a0eee6910a6d9b74ce7b5c7410cc4f34218f07c97663d7413df5537c8bcc54c3185600b0ad13fa19cd4566d0ee2380e59802b6f088fc520ec2b77cb27554d2d3d733d801469c6172fb4b074f555096609b9f7929bf45387a58f748e71037f449405d995df7772e9a371199df032ee517e6f11f930b05d62287ef3b50d8b9122f83e30149edd7f84cb128bc73fb04185941cb84b91ddeb35ea35c7c695d23164a027718a21670ecece62eb908e81978a5107367149876a027cd11b6ffa44fa5562b55413b93f939df29b6718c99c16c99e0aaa6e13997112e41e586704464b1b0e8f6110a0b70b7e47d2030332869838515b783a141d0672a4054150e4514413f2f6628f3e5d0d7a54144276afc8d0a6eaec7ef83cd6bb4453ee22bf8be2055d18ae30696f92635cfdc3bee999b45a5272cca38ed995af7c9181367cfdc1550df93f18abcfa0292830a1efe3038ced6ae70dba7fc5a30464614b6696b195fbafaf35b3b9661f8929130619ff2e075b671b16a3a55597ce0bbc54d0da43713a21326058079764a2dd471ea07a7192101c49250b7bd294676c4cae622ed19a5a93df937fa8e033df888d182e7e98d97a815b0627e84f4b2185335fc6dfdfddd5ff0dfcaa6bf7c7e3c6273c9381a00ee6a250abd36f0bc6c22037189989a1f0d9723d3afcc49d55358dce633b64041b95e50c2f200019b1107024748f6caa4e62923e2ba76e7ce185a5f302775a060256f8023339fbf7b32aa1ed1fe6819d54d7711263e29e1e5aa7c427b5caf3a217cb114d320335b140072be4297fdf800893ab835d7ca64e05cd627157d5d863b226b58aa288801a9521b1b91e385a1ac5fae5cb553b3c8799255055893e75ab2e32053b7028e1321aab6afbcd002e1f855688b22dfb6cca7840902868401d10e500f05cc2641532898a665e87dd4792002e9434a0a85ad7e40761b21386f88b1efb3c5aa6b176879c68757b7e8ad7d374d13c9cc48833ba130f272a36899287bc5665a16580520e7c5e8584afe465750989ea1075e8ca165b958ba48e867fd907ecd239c13d55100f415c1d066cd53612ff63f63f6575f1e0de223826c80554e5a151f5a9241917c6aff2c81627087c2e04dc3d69c2533a222b4b3e65a0a7dfbb69cd8bd41af2906a27830d1a7411bf3653ea489bb817aba2e02be458dcc5a975225b1fe7c7e151416fde3de21eea5f46577dc9c7908e5637c0181ee392d6b09a75e3ed3ece41fc254fbcb1b5ad5807c90f3f5ed173095eed1f6237a61c6dc99c4bb1b792055706e3a8705e1d3ba6574f2d814c000e42714487186ce38657e35fc2ac7be8c0272e2676c1c755140de17fed3116c2a8f65cab5a480f99a9f68217ff67b45fc88c5767bafeeba12b6661a41095ffda8c04c0c9f2e84b6c1d36824115efb333b22a4cb62868c3a36b00b4891a2c19f9ba27f8c40eb66b6808043beca0267d5e0cbf7f40b9777545afa66df19527c95034f179e8d5d566edd31047c79f5781c4bc3b700c9cc7511de6328a939d0b9ece33a3366d266c41ec3ce9f37229995b7b4f28b2fe9c55be1fd4caa57e60a4c00af33f8b6a164beed87f8b71982290c4a4ba4abe2ab19d103ac5112af8d396f357414dadb629bcd089eb63011e0f96f4921a92119588891975539f2add753db75e0eff0baeff2c930e24ecdd8fb660409281a37ff8c4c12c3cb41f7c451c20cd4cbc84a06868aeda54ccda865083808c41a74913758234992a70e7790136c8e8dcdf53b7d42acb6ff33e96f56740213bb472ba79fe6001c48687cc7ee563fb7709738ffe2f3fb85dec624f347ee21548bf22cf6865ab6d39a79dd586d9becd1f11e7d2156ba80d525ce0db4489d949b708a18967d042c4aef2073786e9414cce4d597fd5c139e63bdd71a6ac7f2e25c1e8461fec6db552863154c3618cdadcf08d89874c0ee9604fcde8d5e9b79fd4fef6daa2b06297cfe61b2a8d6096554f9edeeb7bf0ddc2473f7695b535c673fc2a046242b00ed7fdff9297ba1eb44619fd6a391fef6d9b547f84eb1bee5502c8aea4a697861fb28c819d337a41dd038d8433a7d6054fa270ce7eec4d72ea8e36a48e2694ebb17d8321f039a2e414eb956005fef73e12e0cd0df769da70e2f4fbd69cec737ab7b05440bb270a8ec15a6e262c5f3b4cbdace8c5c9bbdc37db8d604dae78112edfa9182a20b39165490e7ba6975a8118e22738d3008cc5c46b874d507e8ed1cc6c189e94f9b7cf4fbc8fd273d64303f3a101bbeee03920358567889fa2ee3e815ddee052bdbeafc6201271f00dc39f7ae8848a77122f0f861b335b7d1aa53763456311ac8bd111f9c903648efe1deb408da2f7b68ed80a67c166faedd34b4eae768879cee91e959d4ef76e17e04575b1f5eb3faae62366e24b3e2d4e30224c2902770ef8a61ccb0d2dacd3b4f551463a2686b82b86489380ee3a16e41c3b57019bc8b27e064f8583ee33a2fe95d8c46a440ed71f516164dcd18964660d945dd49f3c74413f741a2e5db223245b82f671b03fbc9de680e80ed687dd51d1fcc66452ba2a32b58267eaa642e98ee0a0937046d20fa6408e75d1ffc360b3f5222ba7bd2ea0a12a3000c9f05911d3e5a160773bc4ecbff56f0926aa10ec2bbbbc6a809319f819cdaec7c9c0fd9e4fb73bb426ea3ef448d063196ee4b68168d185034b70af05816d32e5b173a1ea2d39d915637435a0d9b09ce4a878cd5eb1af4388340eacd22a5bc177c8ea9e8754719017f20312dd30c3f99e8f5b6d70ff54cf494afd963c86a2af2b37b8e236b8a8b5f1025c4bf9da6bba07afe3a2d01a13be2ceed3b8f59bf761dd0a71d8207c174cdc9109d50ee3656ca12aa6072308bdfb2717e65296bdd0b09bd4547e7209d4df57a3cb57dc96ea285d853f1ab3cde596a9ec4975970e3698163f49e9aca2e16a2cc7bd05c1cd8a4b667f93555d1ddcaa846af670b77e95dc924128d73e55fcb2d712c2b5b8931b2d29ae065e7d728239ffc788d6eaa1efedae9fad19882918d1dc5f5acaf72cdf4fe3d916573453281b016f1f7d8f2541846419b10117d79ceb3be852bd02ddf0420ab6eb5f49db6419a5767982a668c46e9c3c6e53495631cfd3776618c47031e9c5a93ba1bf249b9c378603225a22bf9b7755ac3a12868265d162ffdae39725ec119921fdca763f8f4c235761fa5d74fa70c994f8caf06e6c6cfa353bf7de0bc442b0e22affba2b1bbed1879f9bac4082adb4b7b24484dfa327361985fa6c90ef9ebf11de12cde53997c98c7750721b88b693a776f42ccd46b7b37a1b44b2e8dc6e621ec7918f3a6e5defd6a8abcce1c259622418689f2185968095c9881a1763a6ff40c5fba4a1df1e36cce4ed01ab76919fbb3be395e43947f14f86dd6b4577f8ba06d421897e86f7e5dea577d44a7435773b8eb9536bbb0c69e555defcd05e31190691dba4654623475d90601c65b6d3d641a19613ef678fad5bb6de1d1cf5f49346533681244542023aebf2880621b9b08fdb8b63e7fdcf900754e543cbe0ec3fa8b5d6f6e58a05b74030876bca60e2dc15859aac9566957edbf85b3b2416db7c7682916844ef1b493a26f0b8ea01cb73c16fccb1f839ca431973d0d5a7d410ca3ce5f0fe7b5576829485a15b30031df6d958e0bbf6dfaf6148a5f2f3610f204845f3c075b7e84e585a224f42f5d4a5fdf24567ee595ff4115da311c8fb16d4b97a68c9d20a5abd5000f38c0eca72d9de94960b430958b57feb2d710d9825dde5b1cbbc7540ad979cff692a97f96c71d2b5ad32531146ee69b0e3a757b97bc8258cd6a487429d6e2817422cb1d2e0272cb18b105871f95c5bbf7eb455d4f4759c8a0ae96c4f48ca00d3cb0dad27fb65dfd39a03e8ebfe37a249c08d5511a3e62dcfd45f369f5a7691edd70e5a8c001cffe2c31240a3a21201d55301a1fd22ee3728029a0785bdded04e306e11c69445e3f4afb84e9c6561f130754799bb4e4453849b3021fe2b19ec2ee8d3d37ec14c4071b6d31d41620d2cb703ae0d4409b438fb301ca40b1ce33acf215f1d6716d4515a3167799930b6159677be700562dd35c45ad454cf11d368dd67ffdac22e23eb567587010dcd4bffcad7feca4badaa98bfecf08d9cee4275b4ab227b75dcd8ea3ee7e440fb4279018b4fb3dde99a4a4c26ea70dec445109768e93f43e7cf5404445cdab502c90e6bf30832c8324d1b9cb662c96c426a5b13214cbe9a479fb2dc488ac13c41d281ca81c7068a6baa5b99ef0d9cfa8ffeae7ffdc1ce16c0181ec1aee46d20676a59da30ae356218919007a6eab6059e4ab1e1060bf3aa79f8317c973c50c5eed5b90c753f98dc3a25ec9177bcd7e1437557b8aa5b42229b1d744420bf3f4132c8c1582a18ca0625b61b4b98a054ae87bfd224d781a5eda8e4455f2cb4f70a8dee3e0271a2b0374f549d6099dade221e90519e28932b489f78a7c481d43651cc74cbaf762de987cad0e27903e97bb9e5cff5680b92137b1db34391054c5676cf469957276b27f66169527f1d51eebc9a20aa032dd1a91afb13c794e9f65b2c816d681549a3871cf5bef150b2fc5e30eec77ba84c725a32a6657fab7c6188a614d6b1916ef7f6a5019776746fd7eea4931d66461bdbc98688dc67173d1f2f0c01181da7cb6528f25e8a17111245d715e79c04c2225123cd01dd64d8474941a41944092892bee6964aaafecbc52432412d137aaebf025fe7d1d850fa29ea09abd37479c1f2ac8e6573fa344cae107d9909b1313a73fa1c127a9b2ededfe4813e7e9cb390143521b6fafd95ff54d83c8531fa6e5b2ebe6c8850d2b0483cb107d83d70fdc42059eca8cdb10de054f1c18d0dae43c569de48f625ad22b258565084e0313d69064598938e00318a5292865369fa959e326d346bac72ac0405792beb9bb78515ed241631726d305ecac3b565c4d322221edd841b203b7e789592a355479caf373ba168e4f1d3ef1f89b49c1b4312682b2b4347369ac484c92559f3f9961d86390e726604fa2a99c49dc6f4ad8de0d86369bbb4d6b472f7aa57d59a7dc93ff10fef5c29a2b1e024cf9e28e26e257012a76d8eedcf56f44f9564036c267253249846e488dbe0f02c04c397f51e985cd8ab0668b32f2d2ebefb72f3ee4183dac8c4b0e6ba547998227334b921166498d4f02389517a3558a5511bbbc5ed9a9c7dbe729377f56f4084dca9cf4a972034813ae3cbc727ac03d07e64e70b924e00071a46ea4fa1b41604370096973437e8d9371a293bee4ae9b213e8cd40e33d866a4e8e8913a133297fc7560764dfa6c7f6c63ab06b737eac6c6a3e7df6fd0e99b5c9bf2b0686e0d89f5ea65b5dc8b14016972b2d38ed1e81d6c55b38b9d037dc04234080c092d75b519407211df679211ba3f0d1afbe58c915ad996b6be7b0ab0c2ac823c1866840c65cbb67c908f13fa28bae0e0c73356351dab5723035c836d93cb53e8b7e57fa93e4e7f78eba4ad39684bcd5085af518595bda3401310157c111ecaf679e12dd352ddbe771bb2aa797d188620d58285688be5fbea3447edddebc40f8753c65499723ff074b813bb13f176ca8fc5af97e1f02939a9b996ece1b55d5da83736182033b0c4f89f5a2608331c89aa71dd024e61cbb101ba53f63ff674f076deae6f886d680c8d5ad2bd6047a4e73f65162a1428d7bc2065358f0d608bd8a2ecc5fb1e0931d5ab60ec85e62e9d67391af1d907e5dce1cc6389eb852f4171694904a9b158c71ca78688aa6c7fc83393a3938120d4f52bbec561494ff7ab5a468182ee29ad61cbe55ab553e20cdcd3f8b1e376f44f9e3391c0a3248e36feb9843d930476bcf7cffab860ee245b8681f7631e1988d519f84f2a36abce6c6e09b1f9f25e06f1cee77d425b790ebf7864a78c52b6d24a1faeb2a3db4d8daa6a2ef162141406227adbdc82f37c186de8ef06d7a85b05a35fbf6976274df1a1ab27f0b4bee1d7687e500c64cf4dfaf07efdcc03fc9349c83d83a1bde7f1b5585e78952adb36b59817769eebc58119d3fd2112481508fcaba83cc865e2ded40183110053ca3daa2ac042438504b5454b0806f16934aa15d977ed31bba6dfdb88e9af2de335647f987326a66aa76cf0dff3dca5ca248fa91bf3db29167f8ff4ceeb0b7220a927a7296a371a192d357d825777570a27399503ab7783c2517c09ec7f5af0f3fd56049fe6ea74ec9c618632b7cab7f2fa3cfd539d389c497489c31285e6a505f625f19f6294259a9cc76f18a8661dc9c91bf09581275799ff58ab63ec723dd0886f50100df126216fd064ebe7aa6a4b83fd7270c18299cee22050dd021f02d206cfca0cde3e07630b1310dcd83305a1d90c19fd7a05b54300036e6287929029a6392875c4115faebd6d1cae56389c349f688cca3f16cb0003366302387f4ac4fcf135dd2afe34de549b10d8ead07ce021f1dafbba7af53da7e8c492466534d86d4171a9f2894d6ba19f1ce9a5431e0f6074d54baff26e7bab4ca52e78803fed02d4942e5c28bbc4d5dd5fc6a2cd5b6dd7b5b823debcad48a28fab663f98ce1e8c8a84204e73b8ae288b7536d8af55b124890ad58a0fc0c198236f29ae99258454ecbc166c1920b5c0e0044ec51da5e5b12a69383e712c35196388f9881cef249126bd64a3ff4a05a33a277cbea671c1a1a680506889064e8956104d18b99aac3dcacb832301b81030b3b36d105245af02e36ee3c320939c7d576a0856391f1c78eea543037be34ed0e56d91edd1b530bfaf92ae260046990de6e0c8b31eae43228cdec18875fff36e176a5dcba013c2523420f5fec82bc5086bce1a8b6510ea027c673452c75602e0518f295398ca5975f7f979da4686f3043d0d62e5e52a4911d11694f61192ce9583b73c90f107215daae964ba1f7b1b45427c249daa7e90c212e4d073f1b9ae88e2bc28570f3e07adc6facba61796293d3c298ac5b013654533f6bd3064b99814fd0705c25ff56ff4c922cc20a03e2681f18320c32a8a9bbca42fcc71e0885c82e77f6502a04724cd80f7dacc4238cf3304575124d955eb70264f976c0c179c31a43e5771f60bbd540524c89b74f62f97efeee765099d98af99229f2903aab5bc81233484ec972ee97fa9bdc2de713233987a7262d3fe4817e3a9720035ea141d609595b07097ab68b19ca403ed10acbb26f781a52bf0f2cde47ee95b881402cdecd946e6bcc10c844f5aeb3feccd7db434a30eab01b3ae95ccf97b2c898c41e51f1b9f7c1b7d344bce3970df3d7069d17cacd05fbde84b88c3599c9ea7b979876dfdb3d078c5db223359cf94642496fae8255bfe4e32e447bdcc80a50271560384c596b5bc75c67127f4c9478df5ba8324c6232bed92ce85eec4a3c399ae0e7381a5cd9fd982fee8f4ff033a49ffd4ed87f3eef2a3c72a12d7e34e76ff186185ec226954e38b8b40e46e41c9c1f5d646d4d1144c035c9eeeb309677c2d0e9eaf967e1b0a5012170d72d4cbdd2a7eb65918a34043d281080783741ee5fc36fb13b25f5f4c6e1cd90a78cd260a7fe99c8e277a4f19c6279f389c25650d7c89f37c0dc93de9f9a3a560345020a6cc35e245fd56bad5b621dd9538ac5ede45f5d9c449446a1edfc90bb02c98c569971b1158053db081379bce04331601e69b1685bbd434b99b18a5ba7ce2bb7cdfe175db6b8705345904ab1ca3b27d18ec62e8d3b864c67615d93a2cc8ca2b49d82d3a3942e7e70706dcaaf6f9c1a2602145a14786bfeddd38b30cff99b2fb2132de076dfbbc87c129172dfd036ce754eb1c0a0365394962b5d45c99c7755735785be8bcca33031b8b7680cffe151671b93cff2a3d0cec037ca09e6c9d9f8e3e927e2a41cd7ee00fefee85252b673803a2e3160739ef31cea3208008fa1e5efdeaf1b56994d81df96fef5d57ec25e6bd87be4bcc3fe274f2b40f140ff84cc6c8fcf2fdadcb396d24816ded7ecb931dfd83db9618a1456279f28448abbd9e1034ac40f0da6e63c08de7e79b89e0d959dfe48a632102a53a377c6651cf0c696115309a50b7bd696f26ca3aabd23d5af4e0c090178868eab56a46137188e185400eebd88d341d2457af23dd5dc008bf4b307961363fe66d69268644e9f2b7e8b8a17a67e85e35f1fd2d7349c6e4adef58506cc09eee52a3b00b24b6ac1c173d408c8b68525157cc264980934edbefd4739441810946249ba4733b6f73ca47a1454454035bfc1b0d9f492feebaf25271154ffd4092b7a4dba750a512a0abbcbe94ba95002d57df0949f924ca2d63a742da724275f2493361d3d2df8e0574d8f2f903d4d4ebfcb190d7f210b00dea3587a4623cff556b21965f529f44c8b0f4f266148337ec2c620d8b3a06afed1c4093f591d3582ffebe98e3370e7579b62c2d8ccb01f6043f3c7e5f0d9e7af8e8cbfc6de780d3705148d85ff238868e9df40edce3ab74aed8db7ee6618482401358762e00cc39e6b8e734661dd93f88f22509a2c9c57763348c95647b280cc9dc6dd1bd955f3c393d6099263ef9e9f393f15a4f0392be407c7ff816c44f22908e9ab31ab70db7c214a89ece917a6073e963b2654cebd29308c7a
Step 21: Add Record to the Database
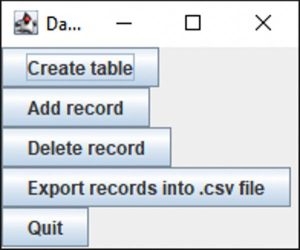
To make it easier for you to store and organize your notes. I made a database specifically for this project.
The database is located in the same repository in the folder Raspberry_Pi_Pico_plus_ESP32\DB for the Vault
The installation process is very similar to this https://www.instructables.com/Twinkle-Installation-and-User-Guide/
To use a database, you need to create a table for the data by pressing Create table button. You only need to press this button in two cases:
1) You've never pressed it before;
2) You've deleted the file called records.db
In case of the successful creation of the table, you will see the corresponding message.
After the table is created you can start adding records to the database. Press Add record button and then enter the desired name of the record and hint for the master password, but not the master password itself! After that, paste the encrypted IV, ciphertext, and encrypted hash.
Make sure there are no commas “,” in the record name.
If you're not going to use some fields, insert – there.
Step 22: Delete Record From the Database
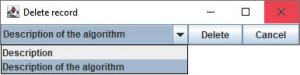
To delete the record:
1) Press the Delete record button;
2) Select the record that you want to delete;
3) Press Delete.
You can only delete one record at a time.
Step 23: Extract Records From the Database

To access your stored records, you need to export them first. To do so, press the Export records into .csv file button. Then navigate to the folder with the database and open the records.csv file.
I've only had one stored record, and apparently, I was too lazy to add the encrypted IV and encrypted hash.
Step 24: Decrypt Your Data Using AES + Serpent + AES in Counter Mode

To decrypt a record:
1) Enter 11 into the text field;
2) Press Send button;
3) Enter the ciphertext that you want to decrypt;
4) Press Send.
I came up with these results:
Ciphertext:
abeaded1bd167e8542c3535d323b819dff200f5e7ea5ba62c931c01495c709742fa8afc67156abf6641421842234a02d71db03557be406eeb0d62ed20517eda499c2aace8d385e11c54721cbb7012ee7a85c291f77ec8f2f779ca914889a2fefe104d217fb6a455cfcc4e64a9c5f020c50f3038bb4dde06d776f6fe60fe89326d08eae5c2af0ccada63e7e52fb7127c555c182c094e7614a3c7b4d2f6ec066484c2b993c598c9198ee6c303c80103ee2129f5f9d7c1e2e0bcb5be35aba2f555445559e80759b8d580e7ffb58b77cc9717480d8eb2541aa920bfe26a9156b7fef4149a3da428ea01424b2c800f7dcaff4bdd1c25e42ea959e718747f8f9a97c1711d30832d5f96542a5d7954f4f465627a0b6e1179c079f1e242894363681abcd33481bab29d750a0b29210808f900cee849659692ae0cf84c7f85dd7a58c52d8933a93dc8866b4661da0639b79411e6a8905fb2d4c3d4b8cd9c1e66f114e40f02c2d543842c0f1a787e96fc2acc4da775be206c09a19ed7d1b8befd9cfb9cecf3f8d69910b658aa99f6e80a93571643603527a430c16fec33988bbb03b0f34e3fc06bd3c1ec0d7e14a8c3fbee33ea18c1754ef9f03cb545ce5936fa48eb99e525ae9c79aab5308de0a5feaa9cd82a413c0fb83e27a19ab939896a5f431c39f2bd85a9aa44d3c07efb5e72715fa720448fa3a901d8d23bd80596490b42acb9bc481808e3f3634e3724239440774c51545be468f963d0d950a8a003543bb5f38abb8c9868f05f2bf7f77f4f8b8404d335cbed1eee1b60c6909455adcc072eef6ee2304f1ef51c896c75ac8461e3f8a458f57916340e361153431cdcf87ba5350c677283a209545d06760ca82b2a8cd2f601ad0a3927a502547863a25ccf6e45e5b81e6f51f6675f9e402e2a4397b836e6ac8a9d81bfbe1bd260062cd5eb9a086eeeb861eccc26e148d9d6c00656ca614471dd8d7a93c78a1b3bbd4428fc8276d9448679e262b4ed02046c58b9eaef8c596c6a41216caf867a62d06ff2a0aefdee637355dc5baeff656a784b99767090e53299e1adfd8882333db4a89007f307a0eee6910a6d9b74ce7b5c7410cc4f34218f07c97663d7413df5537c8bcc54c3185600b0ad13fa19cd4566d0ee2380e59802b6f088fc520ec2b77cb27554d2d3d733d801469c6172fb4b074f555096609b9f7929bf45387a58f748e71037f449405d995df7772e9a371199df032ee517e6f11f930b05d62287ef3b50d8b9122f83e30149edd7f84cb128bc73fb04185941cb84b91ddeb35ea35c7c695d23164a027718a21670ecece62eb908e81978a5107367149876a027cd11b6ffa44fa5562b55413b93f939df29b6718c99c16c99e0aaa6e13997112e41e586704464b1b0e8f6110a0b70b7e47d2030332869838515b783a141d0672a4054150e4514413f2f6628f3e5d0d7a54144276afc8d0a6eaec7ef83cd6bb4453ee22bf8be2055d18ae30696f92635cfdc3bee999b45a5272cca38ed995af7c9181367cfdc1550df93f18abcfa0292830a1efe3038ced6ae70dba7fc5a30464614b6696b195fbafaf35b3b9661f8929130619ff2e075b671b16a3a55597ce0bbc54d0da43713a21326058079764a2dd471ea07a7192101c49250b7bd294676c4cae622ed19a5a93df937fa8e033df888d182e7e98d97a815b0627e84f4b2185335fc6dfdfddd5ff0dfcaa6bf7c7e3c6273c9381a00ee6a250abd36f0bc6c22037189989a1f0d9723d3afcc49d55358dce633b64041b95e50c2f200019b1107024748f6caa4e62923e2ba76e7ce185a5f302775a060256f8023339fbf7b32aa1ed1fe6819d54d7711263e29e1e5aa7c427b5caf3a217cb114d320335b140072be4297fdf800893ab835d7ca64e05cd627157d5d863b226b58aa288801a9521b1b91e385a1ac5fae5cb553b3c8799255055893e75ab2e32053b7028e1321aab6afbcd002e1f855688b22dfb6cca7840902868401d10e500f05cc2641532898a665e87dd4792002e9434a0a85ad7e40761b21386f88b1efb3c5aa6b176879c68757b7e8ad7d374d13c9cc48833ba130f272a36899287bc5665a16580520e7c5e8584afe465750989ea1075e8ca165b958ba48e867fd907ecd239c13d55100f415c1d066cd53612ff63f63f6575f1e0de223826c80554e5a151f5a9241917c6aff2c81627087c2e04dc3d69c2533a222b4b3e65a0a7dfbb69cd8bd41af2906a27830d1a7411bf3653ea489bb817aba2e02be458dcc5a975225b1fe7c7e151416fde3de21eea5f46577dc9c7908e5637c0181ee392d6b09a75e3ed3ece41fc254fbcb1b5ad5807c90f3f5ed173095eed1f6237a61c6dc99c4bb1b792055706e3a8705e1d3ba6574f2d814c000e42714487186ce38657e35fc2ac7be8c0272e2676c1c755140de17fed3116c2a8f65cab5a480f99a9f68217ff67b45fc88c5767bafeeba12b6661a41095ffda8c04c0c9f2e84b6c1d36824115efb333b22a4cb62868c3a36b00b4891a2c19f9ba27f8c40eb66b6808043beca0267d5e0cbf7f40b9777545afa66df19527c95034f179e8d5d566edd31047c79f5781c4bc3b700c9cc7511de6328a939d0b9ece33a3366d266c41ec3ce9f37229995b7b4f28b2fe9c55be1fd4caa57e60a4c00af33f8b6a164beed87f8b71982290c4a4ba4abe2ab19d103ac5112af8d396f357414dadb629bcd089eb63011e0f96f4921a92119588891975539f2add753db75e0eff0baeff2c930e24ecdd8fb660409281a37ff8c4c12c3cb41f7c451c20cd4cbc84a06868aeda54ccda865083808c41a74913758234992a70e7790136c8e8dcdf53b7d42acb6ff33e96f56740213bb472ba79fe6001c48687cc7ee563fb7709738ffe2f3fb85dec624f347ee21548bf22cf6865ab6d39a79dd586d9becd1f11e7d2156ba80d525ce0db4489d949b708a18967d042c4aef2073786e9414cce4d597fd5c139e63bdd71a6ac7f2e25c1e8461fec6db552863154c3618cdadcf08d89874c0ee9604fcde8d5e9b79fd4fef6daa2b06297cfe61b2a8d6096554f9edeeb7bf0ddc2473f7695b535c673fc2a046242b00ed7fdff9297ba1eb44619fd6a391fef6d9b547f84eb1bee5502c8aea4a697861fb28c819d337a41dd038d8433a7d6054fa270ce7eec4d72ea8e36a48e2694ebb17d8321f039a2e414eb956005fef73e12e0cd0df769da70e2f4fbd69cec737ab7b05440bb270a8ec15a6e262c5f3b4cbdace8c5c9bbdc37db8d604dae78112edfa9182a20b39165490e7ba6975a8118e22738d3008cc5c46b874d507e8ed1cc6c189e94f9b7cf4fbc8fd273d64303f3a101bbeee03920358567889fa2ee3e815ddee052bdbeafc6201271f00dc39f7ae8848a77122f0f861b335b7d1aa53763456311ac8bd111f9c903648efe1deb408da2f7b68ed80a67c166faedd34b4eae768879cee91e959d4ef76e17e04575b1f5eb3faae62366e24b3e2d4e30224c2902770ef8a61ccb0d2dacd3b4f551463a2686b82b86489380ee3a16e41c3b57019bc8b27e064f8583ee33a2fe95d8c46a440ed71f516164dcd18964660d945dd49f3c74413f741a2e5db223245b82f671b03fbc9de680e80ed687dd51d1fcc66452ba2a32b58267eaa642e98ee0a0937046d20fa6408e75d1ffc360b3f5222ba7bd2ea0a12a3000c9f05911d3e5a160773bc4ecbff56f0926aa10ec2bbbbc6a809319f819cdaec7c9c0fd9e4fb73bb426ea3ef448d063196ee4b68168d185034b70af05816d32e5b173a1ea2d39d915637435a0d9b09ce4a878cd5eb1af4388340eacd22a5bc177c8ea9e8754719017f20312dd30c3f99e8f5b6d70ff54cf494afd963c86a2af2b37b8e236b8a8b5f1025c4bf9da6bba07afe3a2d01a13be2ceed3b8f59bf761dd0a71d8207c174cdc9109d50ee3656ca12aa6072308bdfb2717e65296bdd0b09bd4547e7209d4df57a3cb57dc96ea285d853f1ab3cde596a9ec4975970e3698163f49e9aca2e16a2cc7bd05c1cd8a4b667f93555d1ddcaa846af670b77e95dc924128d73e55fcb2d712c2b5b8931b2d29ae065e7d728239ffc788d6eaa1efedae9fad19882918d1dc5f5acaf72cdf4fe3d916573453281b016f1f7d8f2541846419b10117d79ceb3be852bd02ddf0420ab6eb5f49db6419a5767982a668c46e9c3c6e53495631cfd3776618c47031e9c5a93ba1bf249b9c378603225a22bf9b7755ac3a12868265d162ffdae39725ec119921fdca763f8f4c235761fa5d74fa70c994f8caf06e6c6cfa353bf7de0bc442b0e22affba2b1bbed1879f9bac4082adb4b7b24484dfa327361985fa6c90ef9ebf11de12cde53997c98c7750721b88b693a776f42ccd46b7b37a1b44b2e8dc6e621ec7918f3a6e5defd6a8abcce1c259622418689f2185968095c9881a1763a6ff40c5fba4a1df1e36cce4ed01ab76919fbb3be395e43947f14f86dd6b4577f8ba06d421897e86f7e5dea577d44a7435773b8eb9536bbb0c69e555defcd05e31190691dba4654623475d90601c65b6d3d641a19613ef678fad5bb6de1d1cf5f49346533681244542023aebf2880621b9b08fdb8b63e7fdcf900754e543cbe0ec3fa8b5d6f6e58a05b74030876bca60e2dc15859aac9566957edbf85b3b2416db7c7682916844ef1b493a26f0b8ea01cb73c16fccb1f839ca431973d0d5a7d410ca3ce5f0fe7b5576829485a15b30031df6d958e0bbf6dfaf6148a5f2f3610f204845f3c075b7e84e585a224f42f5d4a5fdf24567ee595ff4115da311c8fb16d4b97a68c9d20a5abd5000f38c0eca72d9de94960b430958b57feb2d710d9825dde5b1cbbc7540ad979cff692a97f96c71d2b5ad32531146ee69b0e3a757b97bc8258cd6a487429d6e2817422cb1d2e0272cb18b105871f95c5bbf7eb455d4f4759c8a0ae96c4f48ca00d3cb0dad27fb65dfd39a03e8ebfe37a249c08d5511a3e62dcfd45f369f5a7691edd70e5a8c001cffe2c31240a3a21201d55301a1fd22ee3728029a0785bdded04e306e11c69445e3f4afb84e9c6561f130754799bb4e4453849b3021fe2b19ec2ee8d3d37ec14c4071b6d31d41620d2cb703ae0d4409b438fb301ca40b1ce33acf215f1d6716d4515a3167799930b6159677be700562dd35c45ad454cf11d368dd67ffdac22e23eb567587010dcd4bffcad7feca4badaa98bfecf08d9cee4275b4ab227b75dcd8ea3ee7e440fb4279018b4fb3dde99a4a4c26ea70dec445109768e93f43e7cf5404445cdab502c90e6bf30832c8324d1b9cb662c96c426a5b13214cbe9a479fb2dc488ac13c41d281ca81c7068a6baa5b99ef0d9cfa8ffeae7ffdc1ce16c0181ec1aee46d20676a59da30ae356218919007a6eab6059e4ab1e1060bf3aa79f8317c973c50c5eed5b90c753f98dc3a25ec9177bcd7e1437557b8aa5b42229b1d744420bf3f4132c8c1582a18ca0625b61b4b98a054ae87bfd224d781a5eda8e4455f2cb4f70a8dee3e0271a2b0374f549d6099dade221e90519e28932b489f78a7c481d43651cc74cbaf762de987cad0e27903e97bb9e5cff5680b92137b1db34391054c5676cf469957276b27f66169527f1d51eebc9a20aa032dd1a91afb13c794e9f65b2c816d681549a3871cf5bef150b2fc5e30eec77ba84c725a32a6657fab7c6188a614d6b1916ef7f6a5019776746fd7eea4931d66461bdbc98688dc67173d1f2f0c01181da7cb6528f25e8a17111245d715e79c04c2225123cd01dd64d8474941a41944092892bee6964aaafecbc52432412d137aaebf025fe7d1d850fa29ea09abd37479c1f2ac8e6573fa344cae107d9909b1313a73fa1c127a9b2ededfe4813e7e9cb390143521b6fafd95ff54d83c8531fa6e5b2ebe6c8850d2b0483cb107d83d70fdc42059eca8cdb10de054f1c18d0dae43c569de48f625ad22b258565084e0313d69064598938e00318a5292865369fa959e326d346bac72ac0405792beb9bb78515ed241631726d305ecac3b565c4d322221edd841b203b7e789592a355479caf373ba168e4f1d3ef1f89b49c1b4312682b2b4347369ac484c92559f3f9961d86390e726604fa2a99c49dc6f4ad8de0d86369bbb4d6b472f7aa57d59a7dc93ff10fef5c29a2b1e024cf9e28e26e257012a76d8eedcf56f44f9564036c267253249846e488dbe0f02c04c397f51e985cd8ab0668b32f2d2ebefb72f3ee4183dac8c4b0e6ba547998227334b921166498d4f02389517a3558a5511bbbc5ed9a9c7dbe729377f56f4084dca9cf4a972034813ae3cbc727ac03d07e64e70b924e00071a46ea4fa1b41604370096973437e8d9371a293bee4ae9b213e8cd40e33d866a4e8e8913a133297fc7560764dfa6c7f6c63ab06b737eac6c6a3e7df6fd0e99b5c9bf2b0686e0d89f5ea65b5dc8b14016972b2d38ed1e81d6c55b38b9d037dc04234080c092d75b519407211df679211ba3f0d1afbe58c915ad996b6be7b0ab0c2ac823c1866840c65cbb67c908f13fa28bae0e0c73356351dab5723035c836d93cb53e8b7e57fa93e4e7f78eba4ad39684bcd5085af518595bda3401310157c111ecaf679e12dd352ddbe771bb2aa797d188620d58285688be5fbea3447edddebc40f8753c65499723ff074b813bb13f176ca8fc5af97e1f02939a9b996ece1b55d5da83736182033b0c4f89f5a2608331c89aa71dd024e61cbb101ba53f63ff674f076deae6f886d680c8d5ad2bd6047a4e73f65162a1428d7bc2065358f0d608bd8a2ecc5fb1e0931d5ab60ec85e62e9d67391af1d907e5dce1cc6389eb852f4171694904a9b158c71ca78688aa6c7fc83393a3938120d4f52bbec561494ff7ab5a468182ee29ad61cbe55ab553e20cdcd3f8b1e376f44f9e3391c0a3248e36feb9843d930476bcf7cffab860ee245b8681f7631e1988d519f84f2a36abce6c6e09b1f9f25e06f1cee77d425b790ebf7864a78c52b6d24a1faeb2a3db4d8daa6a2ef162141406227adbdc82f37c186de8ef06d7a85b05a35fbf6976274df1a1ab27f0b4bee1d7687e500c64cf4dfaf07efdcc03fc9349c83d83a1bde7f1b5585e78952adb36b59817769eebc58119d3fd2112481508fcaba83cc865e2ded40183110053ca3daa2ac042438504b5454b0806f16934aa15d977ed31bba6dfdb88e9af2de335647f987326a66aa76cf0dff3dca5ca248fa91bf3db29167f8ff4ceeb0b7220a927a7296a371a192d357d825777570a27399503ab7783c2517c09ec7f5af0f3fd56049fe6ea74ec9c618632b7cab7f2fa3cfd539d389c497489c31285e6a505f625f19f6294259a9cc76f18a8661dc9c91bf09581275799ff58ab63ec723dd0886f50100df126216fd064ebe7aa6a4b83fd7270c18299cee22050dd021f02d206cfca0cde3e07630b1310dcd83305a1d90c19fd7a05b54300036e6287929029a6392875c4115faebd6d1cae56389c349f688cca3f16cb0003366302387f4ac4fcf135dd2afe34de549b10d8ead07ce021f1dafbba7af53da7e8c492466534d86d4171a9f2894d6ba19f1ce9a5431e0f6074d54baff26e7bab4ca52e78803fed02d4942e5c28bbc4d5dd5fc6a2cd5b6dd7b5b823debcad48a28fab663f98ce1e8c8a84204e73b8ae288b7536d8af55b124890ad58a0fc0c198236f29ae99258454ecbc166c1920b5c0e0044ec51da5e5b12a69383e712c35196388f9881cef249126bd64a3ff4a05a33a277cbea671c1a1a680506889064e8956104d18b99aac3dcacb832301b81030b3b36d105245af02e36ee3c320939c7d576a0856391f1c78eea543037be34ed0e56d91edd1b530bfaf92ae260046990de6e0c8b31eae43228cdec18875fff36e176a5dcba013c2523420f5fec82bc5086bce1a8b6510ea027c673452c75602e0518f295398ca5975f7f979da4686f3043d0d62e5e52a4911d11694f61192ce9583b73c90f107215daae964ba1f7b1b45427c249daa7e90c212e4d073f1b9ae88e2bc28570f3e07adc6facba61796293d3c298ac5b013654533f6bd3064b99814fd0705c25ff56ff4c922cc20a03e2681f18320c32a8a9bbca42fcc71e0885c82e77f6502a04724cd80f7dacc4238cf3304575124d955eb70264f976c0c179c31a43e5771f60bbd540524c89b74f62f97efeee765099d98af99229f2903aab5bc81233484ec972ee97fa9bdc2de713233987a7262d3fe4817e3a9720035ea141d609595b07097ab68b19ca403ed10acbb26f781a52bf0f2cde47ee95b881402cdecd946e6bcc10c844f5aeb3feccd7db434a30eab01b3ae95ccf97b2c898c41e51f1b9f7c1b7d344bce3970df3d7069d17cacd05fbde84b88c3599c9ea7b979876dfdb3d078c5db223359cf94642496fae8255bfe4e32e447bdcc80a50271560384c596b5bc75c67127f4c9478df5ba8324c6232bed92ce85eec4a3c399ae0e7381a5cd9fd982fee8f4ff033a49ffd4ed87f3eef2a3c72a12d7e34e76ff186185ec226954e38b8b40e46e41c9c1f5d646d4d1144c035c9eeeb309677c2d0e9eaf967e1b0a5012170d72d4cbdd2a7eb65918a34043d281080783741ee5fc36fb13b25f5f4c6e1cd90a78cd260a7fe99c8e277a4f19c6279f389c25650d7c89f37c0dc93de9f9a3a560345020a6cc35e245fd56bad5b621dd9538ac5ede45f5d9c449446a1edfc90bb02c98c569971b1158053db081379bce04331601e69b1685bbd434b99b18a5ba7ce2bb7cdfe175db6b8705345904ab1ca3b27d18ec62e8d3b864c67615d93a2cc8ca2b49d82d3a3942e7e70706dcaaf6f9c1a2602145a14786bfeddd38b30cff99b2fb2132de076dfbbc87c129172dfd036ce754eb1c0a0365394962b5d45c99c7755735785be8bcca33031b8b7680cffe151671b93cff2a3d0cec037ca09e6c9d9f8e3e927e2a41cd7ee00fefee85252b673803a2e3160739ef31cea3208008fa1e5efdeaf1b56994d81df96fef5d57ec25e6bd87be4bcc3fe274f2b40f140ff84cc6c8fcf2fdadcb396d24816ded7ecb931dfd83db9618a1456279f28448abbd9e1034ac40f0da6e63c08de7e79b89e0d959dfe48a632102a53a377c6651cf0c696115309a50b7bd696f26ca3aabd23d5af4e0c090178868eab56a46137188e185400eebd88d341d2457af23dd5dc008bf4b307961363fe66d69268644e9f2b7e8b8a17a67e85e35f1fd2d7349c6e4adef58506cc09eee52a3b00b24b6ac1c173d408c8b68525157cc264980934edbefd4739441810946249ba4733b6f73ca47a1454454035bfc1b0d9f492feebaf25271154ffd4092b7a4dba750a512a0abbcbe94ba95002d57df0949f924ca2d63a742da724275f2493361d3d2df8e0574d8f2f903d4d4ebfcb190d7f210b00dea3587a4623cff556b21965f529f44c8b0f4f266148337ec2c620d8b3a06afed1c4093f591d3582ffebe98e3370e7579b62c2d8ccb01f6043f3c7e5f0d9e7af8e8cbfc6de780d3705148d85ff238868e9df40edce3ab74aed8db7ee6618482401358762e00cc39e6b8e734661dd93f88f22509a2c9c57763348c95647b280cc9dc6dd1bd955f3c393d6099263ef9e9f393f15a4f0392be407c7ff816c44f22908e9ab31ab70db7c214a89ece917a6073e963b2654cebd29308c7a
Plaintext:
Day after day, it's getting harder to keep your data private. There's too much demand for it coming from multiple sides. Different sides might have different reasons to obtain your data, but does it matter for you? Does it really matter why your data is being taken from you? Because at the end of the day, the result is the same. Your private data is in someone else's possession! I don't think I need to explain all the consequences that can arise from that. In my opinion, the only way to keep your data private is to raise the costs of unauthorized access to it as high as possible, ideally higher than any possible reward that a third side can get by obtaining your data. By doing so, you're putting away incentives to access your data without your permission. I did my best to make the data encrypted with this device indecipherable without the keys, but even that won't help if you encrypt or decrypt your data on an infected computer. With all the flaws and inconveniences that come with this device, it does its job and doesn't cost like it's covered in gold. Even the weakest encryption algorithm utilized by this device is capable of making your data indecipherable without the keys, not to mention that the combination of the strongest encryption algorithm, master password, and the initialization vector can make your notes indecipherable even if the attacker gets the physical access to the device. While the primary purpose of this device is to protect your private data from unauthorized access, it can do more than that. This device can also give you the ability to detect if your data had been tampered with and the ability to generate random strings in both ASCII and hexadecimal formats.
Step 25: Generate Random Strings
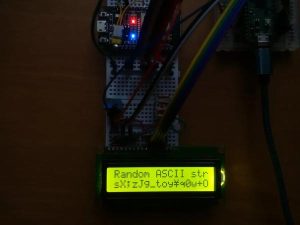
To generate random strings in the hexadecimal format, you need to simply test RNG (option N12).
To generate a random string in the ASCII format:
1) Enter 14 into the text field;
2) Press Send button;
3) Enter the number of strings to generate;
4) Press Send.
Step 26: Final Thoughts
With all the flaws and inconveniences that come with this device, it does its job and doesn't cost like it's covered in gold. Even the weakest encryption algorithm utilized by this device is capable of making your data indecipherable without the keys, not to mention that the combination of the strongest encryption algorithm, master password, and the initialization vector can make your notes indecipherable even if the attacker gets the physical access to the device. While the primary purpose of this device is to protect your private data from unauthorized access, it can do more than that. This device can also give you the ability to detect if your data had been tampered with (by calculating hashes) and the ability to generate random strings in both ASCII and hexadecimal formats.
I hope you will find a good use for this device.
If you like this tutorial, please share it.
Thank you for reading this tutorial.
Source: Encrypted Data Vault: Raspberry Pi Pico + ESP32 Version