In this application we will setup a CE current monitor with a Raspberry Pi and display current readings for circuits through a web interface
Story
Introduction
In this Article we are going to monitor the energy consumption (current) of some circuits in a home or business through Raspberry Pi. The Raspberry Pi will connect to a 12 channel current monitoring board from www.controleverything.com and display those current readings on a web page. This will allow us to see how much a particular circuit is drawing in real time from any device on the network with a web browser.
The web interface we will put together here is a no frills interface. It will just show you current readings in black and white for each circuit. Feel free to edit the web interface and pretty it up in any way you see fit. Maybe even label each circuit on the interface like Living Room lights, Refrigerator, etc.
Without further adieu lets get started!
Step 1.1 Pi Setup
First we need to get our Raspberry Pi all setup and ready to go. For this project I am running the current latest version of Raspbian on my Pi (2016-03-18 Jessie). All provided instructions are based on that fact. If you have another version of Raspbian or another Linux OS all together keep in mind some alterations to proceeding instructions may differ for you. Raspberry Pi provides some great instructions on getting Raspbian installed on your Pi here.
Once your Pi is booted up and running we will start by connecting to it via SSH. Instructions for connecting to your Pi over SSH provided here. Default username is generally pi and password is raspberry.
SSH Connected to Pi? Good, lets move on.
Step 1.2 Apache Install/Setup
The first thing we are going to do is install Apache which is a web server that will serve our web interface to the user. To do this enter the following in the SSH terminal:
sudo apt-get install apache2 -y
This should install Apache on your Raspberry Pi. The cool thing is after this installation runs it works! Open a web browser on your computer and enter the IP address of the Pi. You should be greeted by the default web page.
Next there are a few settings in Apache we need to modify so lets pop the hood.
Back in your SSH terminal to the Pi enter the following:
sudo nano /etc/apache2/apache2.conf
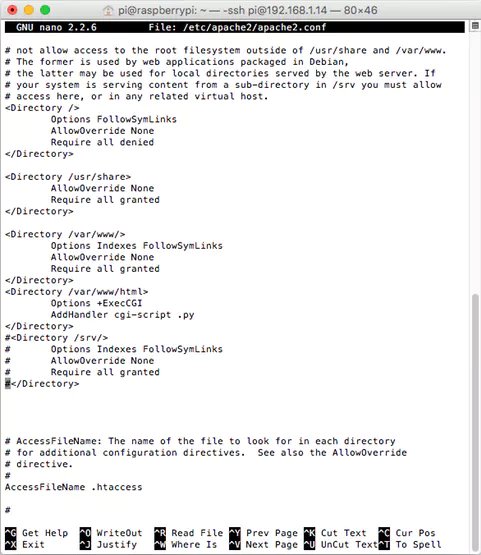
This will open up a file that we need to add some info to. Scroll down until you see some directory tags. We need to add an additional one there that says this:
<Directory /var/www/html>
    Options +ExecCGI
    AddHandler cgi-script .py
</Directory>
Screen shot of how I added this:
Hit ctrl+x to exit. When prompted to save say yes. When prompted to enter file name leave it as is.
Back in the terminal enter:
sudo a2enmod cgi
Step 1.3 I2C Tools setup
Now we need to install a package called I2C tools and another package called Python-SMBus These two packages together will allow our Python script to communicate with the ControlEverything.com current monitoring board.
In the SSH terminal enter:
sudo apt-get update
This will update the apt-get package installer so we can be sure we get the latest packages.
Next in the SSH terminal enter:
sudo apt-get install 12c-tools
After that package is installed enter:
sudo apt-get install python-smbus
After that package is installed it is a good idea to reboot the pi so in the SSH terminal enter:
sudo reboot
Wait a few seconds for the Pi to reboot and re-associate with the network, then re connect to the Pi via SSH.
Lets test i2c-tools to make sure everything is working. Make sure the current monitoring board is connected to the Pi using the included I2C cable and is powered up with a 12VDC power supply source. Then in the SSH terminal enter:
i2cdetect -y 1
Hopefully the Pi will recognize our Current monitoring board which will be registered at address 0x2a This is what you should see in the terminal:
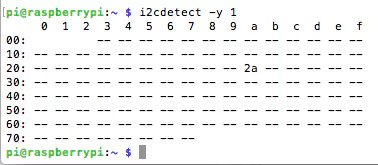
If you see the controller listed there then we are good to move on.
Step 1.4 Upload Web interface/Python files to Pi
We will use sftp to upload our files to the Pi. You will need an ftp client to do this. I highly recommend filezilla if you do not already have an ftp client. It can be obtained here(Be sure to get the client and not the server). They provide documentation on FTP but it is pretty easy. Once you have that downloaded and installed we are ready to proceed.
We need to alter some permissions on the Apache file directories in order upload our files to the Pi so back in the SSH Terminal enter:
sudo chown -R pi:www-data /var/www/html
Now open Filezilla and connect to the Pi. Enter the Pi's IP address as the host, pi as the username, raspberry as the password, and 22 as the port. Connected? Great! Lets shove some files in there!
The files can be obtained from our github repo here:
https://github.com/ControlEverythingCom/Pi-Current-Monitor-Web-1
In Filezilla navigate to the local directory where you downloaded/cloned those files. In the Remote Side pane of Filezilla for the Pi navigate to /var/www/html directory and upload the files there.
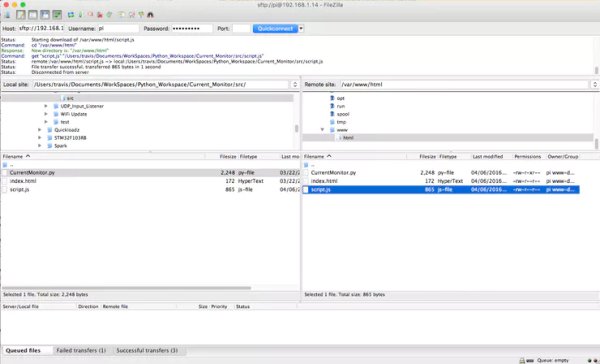
Back in the terminal move over to the /var/www/html directory by entering:
cd /var/www/html
Now enter:
python CurrentMonitor.py
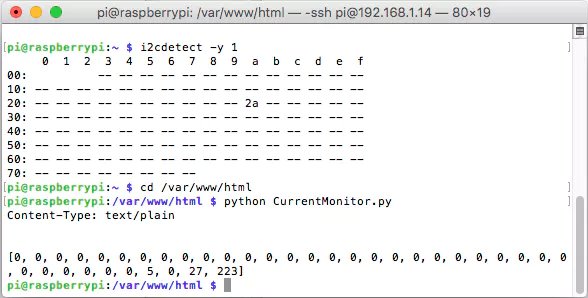
The Python application should print the current readings to the console like this:
Step 1.5 Final configuration settings
We need to change the owner of all files in the html directory now. In the SSH terminal enter:
sudo chown -R pi:www-data /var/www/html
Now we need to correct permissions on the CurrentMonitor.py to do that enter:
sudo chmod g+x /var/www/html/CurrentMonitor.py
Now since Apache is going to run the Python script to interface with the i2c port on the Pi we have to make sure Apache(www-data) is allowed to do that. So we will add www-data to the i2c group like this:
sudo usermod -a -G i2c www-data
And finally…(drum roll please):
sudo reboot
Close that SSH terminal. I'm sure you're as tired of it as I am!
Step 2 Wire up and install the board.
We must note here that you will be messing with 120 VAC wiring here and electrical shock is no laughing matter. If you do not feel comfortable with this please PLEASE hire a registered electrician to do this step for you. They know what they are doing.
Before proceeding you MUST shut down all power to the circuit breaker panel using the main off switch. If possible we highly recommend also shutting the breaker off at the pole/box that supplies power to the panel. This will ensure you do not get shocked. Be sure to test all points in the Circuit breaker panel for voltage before proceeding.
I also recommend turning off all breakers in the panel just to be on the safe side.
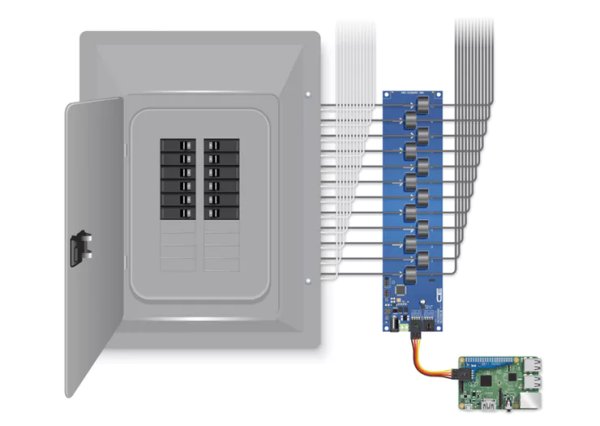
The current monitoring board monitors the hot leg of an AC circuit. This wire is generally the black leg in a 3 conductor cable. White is generally Neutral and bare or green is generally ground. So run the Black leg of each circuit you want to monitor through each of the on board current monitoring sensors as shown here:
After all wires are run through the on board sensors and connected back to the circuit breakers in the panel connect a USB power supply to the Raspberry Pi and a regulated 12VDC power supply source to the Current monitoring board. Do not worry if these power supply sources are off due to all the circuits being off. It will not hurt anything if the Pi and Current Monitoring board power up later.
Now it's time to power everything back up. Be Careful!!!! Do one more sanity check over absolutely everything and make sure everyone is clear of the area and everything is connected properly. Also make sure you have the cover back on the Circuit Panel if you removed it during installation. Turn power back on at the pole/box. Then go back to the Circuit panel and turn on the main power switch there. Now turn on each circuit breaker in the panel one at a time. If all the breakers turn on without tripping and everything is powered up in the house/business then congratulations on a job well done! Feel free to celebrate in any way you see fit.
Step 3 Lets have some fun!
Make sure your Pi is back on the network. Note that it's IP address may have changed if the router rebooted so be sure to check that. Once you know the Pi's IP make sure your computer, phone, or tablet is on the same network as the Pi, then enter the Pi's IP address in your web browser. You should now see real time current levels for each circuit you wired up.
Now run around and turn things on and off like a mad man/woman. I know I thoroughly irritated my wife by flipping the lights in the living room on and off erratically for several minutes laughing and jumping up and down like a complete idiot. Do not feel bad if this happens to you.
Ending Notes
While this was fun and all you may find yourself a bit bored with it after a few days. At that point I highly recommend having some fun with customizing the web interface for the Pi. You can do some really cool stuff there.
Some other things you can do are register a static IP address for the Pi on your network so it does not change (DHCP). I generally reserve the IP on my router as I feel this is the safest thing and if your router supports it, it is super easy.
Also you can open a port on your router firewall to allow external access so you can monitor everything while you are away from home. You can really go all out here and setup DNS. Make sure to take security into consideration if you decide to do this and do it right.
Another really cool thing is to monitor the current of each circuit and calculate kilowatt hour usage for the circuits. This is absolutely possible to do, but a bit more complex. We may do another post on that later. This would allow you to see how many pennies each of the circuit in your house is costing you!
The possibilities here really are abundant so be creative and let us know what you come up with!


