
Use the ESP32 and the Adafruit Electret Microphone Amplifier Board to stream your voice over WiFi to your Raspberry Pi.
Story
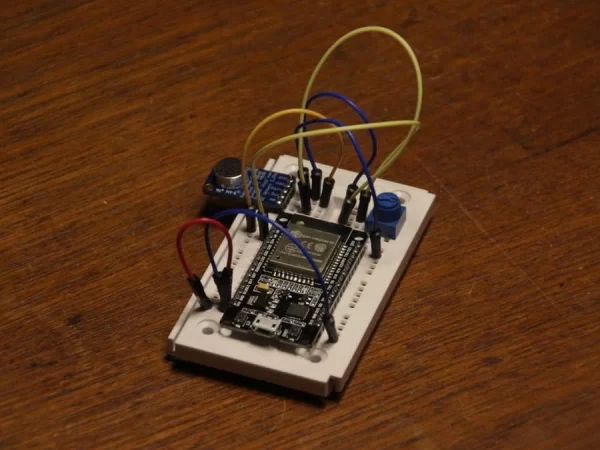
There are so many things that do audio streaming out there. Smart helpers like Alexa and Google Home. And so I came to the idea to do something with tone too. I took an electret microphone build an amplifier with an operational amplifier and connected it to an esp8266 developer board. The program actually worked but sometimes there were some pauses while playing it live. I tried using interrupts but they didn't work. Also, the signal was very noisy. So I upgraded to an ESP32 board and Adafruit's Electret Microphone Amplifier Board. Changed the code a little and it worked!
Step 1: Building the Circuit
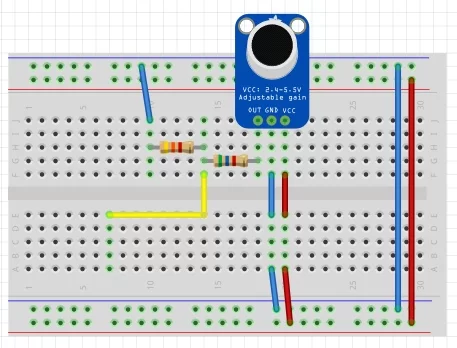
Unfortunately, the voltage range of the analogue input is only from 0 to 1 volt. Because our microphone returns a voltage between 0 and 2.25V you have to use a voltage divider, shown in the picture below. The yellow cable can be connected directly to the ADC of your ESP32 board. Don't forget to also connect ground and 5 volts (Vin) to your ESP32. Be careful when working with 5V levels and a 3.3V logic!
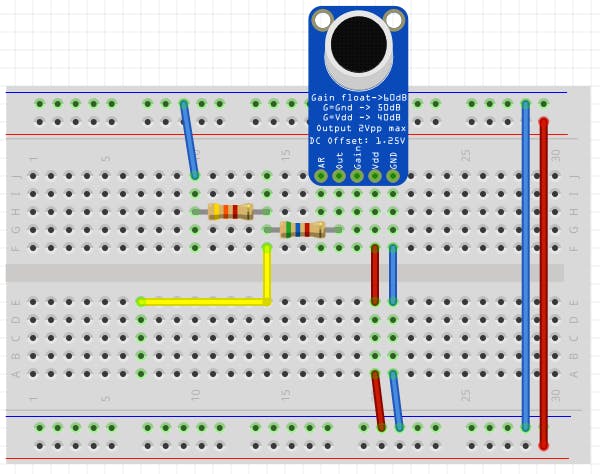
When you don't have the resistors you can also use a 10kΩ potentiometer and set it to 5.6k and 4.4k.
Step 2: Set up the code
Open the Arduino software on your computer. Paste the Arduino code from the CODE section below in the editor. (Don't forget to remove the standard code before!) Now change your WiFi credentials in the following path of the code:
const char* ssid     = "YOUR SSID";
const char* password = "YOUR PASSWORD";
Furthermore, you have to set the IP Address of your Raspberry Pi.
const char* host = "YOUR SERVER IP ADDRESS"; Now you can upload the code to your ESP32 board. To Tools-> Board and select your ESP32 board. Now select the Port at Tools-> Port. Now you click “upload” to upload your Sectch.
Step 3: Get streaming
Connect to your Raspberry Pi. Make sure you have selected the correct audio output in your settings. Type in “sudo raspi-config”. A graphical interface will show up. Go to “Advanced Options” and hit enter. Select “Audio” in the shown submenu and hit enter once more. To be ensure working, select “Force 3.5mm (‘headphone') jack” and confirm. Now you should be on the main menu. Now go to “Finish”. And you're done.
Now just type in the following command and hit enter:
nc -l 4444 | aplay -r 8000 -f U8Now plug in your ESP32 module. (Don't forget to connect a speaker or headphones to your Raspberry.) And listen to your stream.
IMPORTANT: first run the command and then connect the ESP32 to power.
Schematics
Code
/* Audio streamer with ESP32 and Adafruit elected microphone board.
 * Created by Julian Schroeter.
*/
#include <Arduino.h>
#include <WiFi.h>
#include <driver/adc.h>

#define AUDIO_BUFFER_MAX 800

uint8_t audioBuffer[AUDIO_BUFFER_MAX];
uint8_t transmitBuffer[AUDIO_BUFFER_MAX];
uint32_t bufferPointer = 0;

const char* ssid     = "YOUR SSID";
const char* password = "YOUR PASSWORD";
const char* host     = "YOUR SERVER IP ADDRESS";

bool transmitNow = false;

WiFiClient client;

hw_timer_t * timer = NULL; // our timer
portMUX_TYPE timerMux = portMUX_INITIALIZER_UNLOCKED;

void IRAM_ATTR onTimer() {
  portENTER_CRITICAL_ISR(&timerMux); // says that we want to run critical code and don't want to be interrupted
  int adcVal = adc1_get_voltage(ADC1_CHANNEL_0); // reads the ADC
  uint8_t value = map(adcVal, 0 , 4096, 0, 255);  // converts the value to 0..255 (8bit)
  audioBuffer[bufferPointer] = value; // stores the value
  bufferPointer++;

  if (bufferPointer == AUDIO_BUFFER_MAX) { // when the buffer is full
    bufferPointer = 0;
    memcpy(transmitBuffer, audioBuffer, AUDIO_BUFFER_MAX); // copy buffer into a second buffer
    transmitNow = true; // sets the value true so we know that we can transmit now
  }
  portEXIT_CRITICAL_ISR(&timerMux); // says that we have run our critical code
}


void setup() {
  Serial.begin(115200);

  WiFi.mode(WIFI_STA);
  WiFi.begin(ssid, password);

  while (WiFi.status() != WL_CONNECTED) {
    delay(500);
    Serial.print(".");
  }

  Serial.println("");
  Serial.println("WiFi connected");
  Serial.println("MY IP address: ");
  Serial.println(WiFi.localIP());

  adc1_config_width(ADC_WIDTH_12Bit); // configure the analogue to digital converter
  adc1_config_channel_atten(ADC1_CHANNEL_0, ADC_ATTEN_0db); // connects the ADC 1 with channel 0 (GPIO 36)

  const int port = 4444;
  while (!client.connect(host, port)) {
    Serial.println("connection failed");
    delay(1000);
  }

  Serial.println("connected to server");

  timer = timerBegin(0, 80, true); // 80 Prescaler
  timerAttachInterrupt(timer, &onTimer, true); // binds the handling function to our timer
  timerAlarmWrite(timer, 125, true);
  timerAlarmEnable(timer);

}

void loop() {
  if (transmitNow) { // checks if the buffer is full
    transmitNow = false;
    client.write((const uint8_t *)audioBuffer, sizeof(audioBuffer)); // sending the buffer to our server
  }
}
Source: ESP32 Voice Streamer