
In this project, you’re going to build an Android app using the MIT App Inventor software that allows you to control the ESP8266 GPIOs.
First, watch the video demonstration
To learn more about the ESP8266 use the following tutorials as a reference:
- Getting started with the ESP8266
- ESP8266 web server with NodeMCU
- Flashing NodeMCU firmware
- ESP8266 troubleshooting guide
If you like the ESP and you want to do more projects you can download my eBook Home Automation using ESP8266 here.
Let’s get started!
Parts List
Here’s the hardware that you need to complete this project:
- 1x ESP8266 (eBay)
- 1x FTDI programmer (eBay)
- 2x LEDs
- 2x 220Ω Resistors
- 1x Breadboard
- 1x Android Phone
Click the image above, to see on eBay.
Flashing Your ESP with NodeMCU
In this tutorial we are going to use the NodeMCU firmware. You have to flash your ESP with NodeMCU firmare.
Downloading ESPlorer IDE
I recommend using the ESPlorer IDE which is a program created by 4refr0nt to send commands to your ESP8266.
Follow these instructions to download and install ESPlorer IDE:
- Click here to download ESPlorer
- Unzip that folder
- Go to the main folder
- Run “ESPlorer.jar” file
- Open the ESPlorer IDE
Schematics (3.3V FTDI Programmer)
The schematics for this project are very straight forward. You only need to establish a serial communication between your FTDI programmer and your ESP8266. You can buy one FTDI programmer on eBay.
Wiring:
- RX -> TX
- TX -> RX
- CH_PD -> 3.3V
- VCC -> 3.3V
- GND -> GND
Uploading Code
You should see a window similar to the preceding Figure, follow these instructions to upload a Lua file:
- Connect your FTDI programmer to your computer
- Select your FTDI programmer port
- Press Open/Close
- Select NodeMCU+MicroPtyhon tab
- Create a new file called init.lua
- Press Save to ESP
Everything that you need to worry about or change is highlighted in red box.
Code
Upload the following code into your ESP8266 using the preceding software. Your file should be named “init.lua“.
Don’t forget to add your network name (SSID) and password to the script below.
-- Rui Santos
-- Complete project details at http://randomnerdtutorials.com

wifi.setmode(wifi.STATION)
wifi.sta.config("YOUR_NETWORK_NAME","YOUR_NETWORK_PASSWORD")
print(wifi.sta.getip())
led1 = 3
led2 = 4
gpio.mode(led1, gpio.OUTPUT)
gpio.mode(led2, gpio.OUTPUT)
srv=net.createServer(net.TCP)
srv:listen(80,function(conn)
    conn:on("receive", function(client,request)
        local buf = "";
        buf = buf.."HTTP/1.1 200 OK\n\n"
        local _, _, method, path, vars = string.find(request, "([A-Z]+) (.+)?(.+) HTTP");
        if(method == nil)then
            _, _, method, path = string.find(request, "([A-Z]+) (.+) HTTP");
        end
        local _GET = {}
        if (vars ~= nil)then
            for k, v in string.gmatch(vars, "(%w+)=(%w+)&*") do
                _GET[k] = v
            end
        end

        if(_GET.pin == "ON1")then
              gpio.write(led1, gpio.HIGH);
        elseif(_GET.pin == "OFF1")then
              gpio.write(led1, gpio.LOW);
        elseif(_GET.pin == "ON2")then
              gpio.write(led2, gpio.HIGH);
        elseif(_GET.pin == "OFF2")then
              gpio.write(led2, gpio.LOW);
        end
        client:send(buf);
        client:close();
        collectgarbage();
    end)
end)
Schematics
Now follow these schematics to create the circuit that controls two LEDs.
Your ESP IP Address
When your ESP8266 restarts, it prints in your serial monitor the ESP IP address. Save that IP address, because you’ll need it later.
In my case, the ESP IP address is 192.168.1.95. If you experience problems seeing your IP read this troubleshooting guide.
Creating the Android App with MIT App Inventor
MIT App Inventor is a drag-and-drop software that allows you to create a basic, but fully functional Android app within an hour or less.
Here’s how to edit the ESP8266 Controller app:
- Click here to download .zip folder that contains .aia file
- Unzip the folder
- Go to MIT App Inventor
- Click the “Create Apps” button on the top right corner
- Go to the “Projects” tab and select “Import project (.aia)”
After importing the .aia file, you’ll be able to edit the app and see how the app was built.
Designer
The designer tab is where you can edit how the app looks. Feel free to change the text, change the colors, add buttons or add more features.
Blocks
The blocks section is where you can add what each button does and add logic to your app.
Click the image above to enlarge the figure
After finishing editing the app you can click the “Build” app tab and install the .apk file in your Android. I personally recommend that you first upload the app provided below to ensure that everything works as expected (later you can edit the app).
Installing the Android App
Follow these instructions to install the default app that I’ve created:
- Click here to download .zip folder that contains the .apk file
- Unzip the folder
- Move the .apk file to your Android phone
- Run the .apk file to install the app
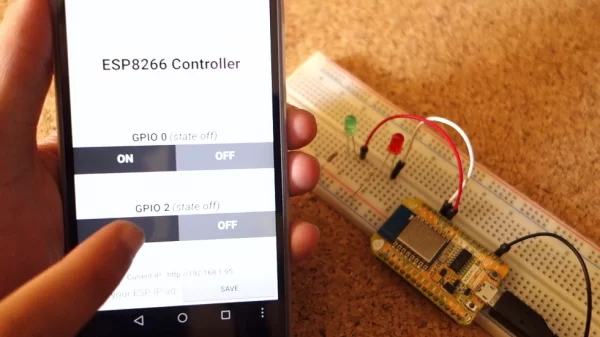
Here’s how the ESP8266 Controller app looks when you to open it.
ESP8266 Controller
It’s very easy to configure. Click the button “Set IP Address” on the bottom of the screen and type your IP address (in my case 192.168.1.95).
You’re all set!
Now you can turn the GPIOs high and low with your smartphone. Go to the top of this page to see a video demonstration of this project.
Taking It Further
This is a basic example that shows you how easy it is to integrate an Android app with the ESP8266. You can take this example and modify it.
You could add multiple screens to the app, so you can other ESPs or add buttons to control more GPIOs.
For More Details: ESP8266 controlled with Android app (MIT App Inventor)