
The Raspberry pi board is a mini-computer which runs on ARM11 processor but is available at extremely cheap price. The device uses the Broadcom controller chip which is a SoC (System on Chip). The Raspberrypi is called a mini-computer because the SoC has the powerful ARM11 processor which runs on 700 MHz at its core and having the peripherals like timers, interrupt controller, GPIO, PCM / I2S, DMA controller, I2C, SPI slave, PWM, UART, USB, graphical processing unit (GPU) which includes VideoCore, MPEG-2 and MPEG-4 and a 512 MB SDRAM.
There is an Ethernet port which can be used to connect the board to a computer network. Those who don’t want to use a HDTV and separate keyboard and mouse for the Raspberrypi board can plug the board using a LAN cable to the Ethernet port of the PC and do remote access in TUI or GUI mode.
 In an operating system, the user can write so many codes and made them executable and then run each of them as background processes to achieve multi-tasking. The another easy method to achieve the multitasking is using a Shell script in which all the commands to execute the codes as background process are scripted into, but it is not a proper method since the user can have little control over the processes which are initiated by the Shell script. The same thing can be done by executing a single C code in which the system () function opens up a new Shell and pass the commands to them. Since it may open up a new Shell for executing each and every process the better method is to use execve () function in the code which itself can execute a new process.
In this project the Raspberrypi board is loaded with Ubuntu and is remotely accessed using VNC. The Raspberrypi board is also connected to the internet. There are 26 connectors which can be taken out from the connector port of the Raspberrypi board. All the connector pins are taken out using 13*2 pin female connectors and at the other end of their wire 26 pin Burg stick male connectors are attached. The Burg stick male connectors allow each pin out from the Raspberrypi board to be plugged into the holes of a breadboard. To access the pins that coming out of the Broadcom controller of the Raspberrypi board using C language, a C library is available called “bcm2835” which has been downloaded and installed.
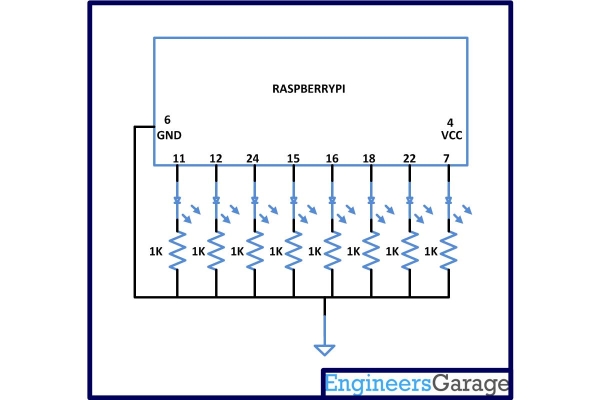
There are eight general purpose IO pins on the 13*2 pin connectors of the Raspberrypi board and to each one of them a LED is connected through 1K resistor. Separate code has been written to blink the LEDs individually and made them into executable files named blink2, blink3, blink4, blink5, blink6, blink7 and blink8. It is suggested to keep all the .c files and the executable files in a single folder for this particular project.Executing a File using Execv
For more detail: Executing a File using Execve On Raspberry Pi