
Introduction
Using the Raspberry Pi and some additional peripherals, we have designed and built a face recognition system. In this system there is a camera which will detect the faces presented before it and if shown one face at a time, it will track that face such that that face is centered in front of the camera. This project was made possible through the extensive use of online resources and online libraries.
Through the use of these libraries we suceeded in successfully building this system and produced working final project. This report details our journey as we figureed what libraries we should use, how to use OpenCV, and how to control the servos through the use of some third party libraries. The path to the final project was not a straight path as we explored many different combinations of different ideas each with its own benefits and flaws.
As part of our final presentation, we had six different demonstrations, each one demonstrating a different idea and a different way of doing things. Each demonstration builds on ideas produced from the one before until finally our last demonstration shows how the final systems works.
Objective
The objective of this project was to design and create an encapsulated system that would use a camera to view the outside world and detect and recognize individual faces. This system would be contained in a single unit and could be carried around with any person.
Design and Testing
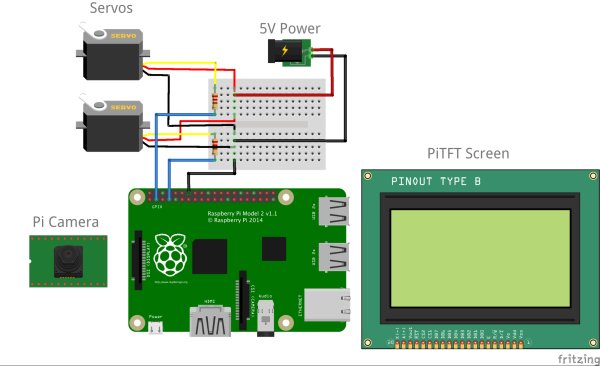
As shown in Figures 1 and 2, the face recognition system is made up by three main parts: the face recognition module, pan-and-tilt module, and the piTFT touch screen. The face recognition module detects and recognizes your face. The pan-and-tilt part is in charge of tracking facial movement. Finally using the piTFT screen, we can control the whole system and display the face recognition results.
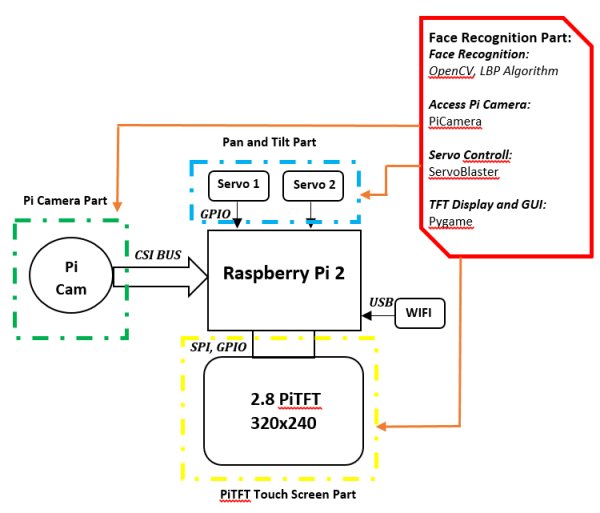
We use the OpenCV library for face recognition and the ServoBlaster library for the pan-and-tilt control. As with the display and touch button on piTFT, the pygame could help us implement these functions. More detailed descriptions of system design are presented in the following sections.
System Design
OpenCV and the Face Recognition Algorithm
For the facial recognition, we chose to use OpenCV library to realize the image processing and face recognition tasks. It is a very powerful library of computer vision programming functions. The first thing we need to consider in this part is choosing a proper face recognition algorithm. There are two popular face recognition algorithms included in OpenCV, the Haar Cascade and Local Binary Patterns (LBP). We are using the LBP method in this project because its features are simpler in contrast to Haar's features and both the training and detection with LBP are several times faster than Haar (source). More detailed descriptions of these two algorithms can be found here. These two algorithms both use an XML file to record the features of the object we want to detect. The OpenCV library has already included some well-trained XML files for face and body part detection. Also, with the help of OpenCV, we could train our own LBP or Haar classifiers and generate the XML cascade files. In other words, it is possible to train a classifier to detect any object we want. The Naotoshi Seo’s blog on OpenCV Haar Training is a very good tutorial of generating your own Haar classifiers (source). However, Naotoshi Seo also warned that the training time may be horribly long and it took him one week to generate his own XML file. So, if you want to generate your own classifier, be sure to plan ahead and use enough training sets.
Pi Camera Module
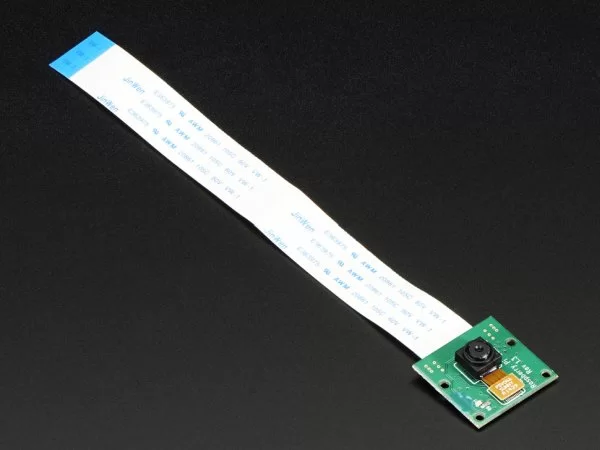
After choosing the proper face recognition algorithm, another problem we had to solve was how to access the Pi Camera. The Pi Camera is connected to processor via the CSI bus. It's quite different from the USB camera and the OpenCV library couldn’t access to it directly. So, we need to use the Pi Camera package to help us access the camera module. The Pi Camera library provides many useful functions such as capturing an image and converting it into an OpenCV object. With the help of PiCamera, we can capture images or videos, convert them into OpenCV object, and then conduct the image processing and face recognition function. You can install the PiCamera by running:
$ sudo apt-get install python-pip

$ sudo apt-get install python-dev

$ sudo pip install picamera
If you don’t like the Pi Camera, installing the UV4L driver is an alternative way to access the Pi Camera. This driver could create a new device as /dev/video0 and the system will regard the Pi Camera as a USB camera. Thus the OpenCV could access the Pi Camera module directly from /dev/video0. This website describes in detail how to install and use the UV4L driver.
In the end we chose to go with the Pi Camera library since we found it easier to use and it had simple instructions to convert the images captured by the Pi Camera to an OpenCV object.
Pan-and-Tilt Module
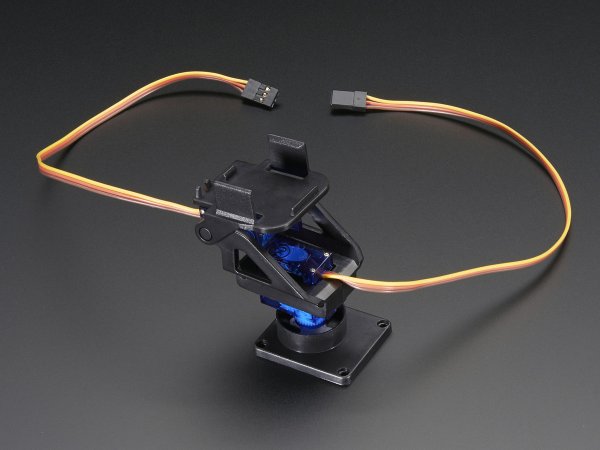
To track the movement of detected face, we need a pan-and-tilt module. This module has two SG-90 servo motors and the rotate range is about 180 degrees for each servo. Figure 5 shows the datasheet of SG-90.
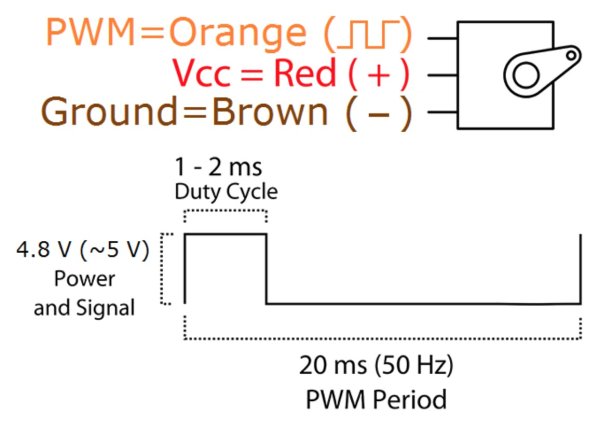
“0°” (1.5 ms pulse) is the middle position, “90°” (~2 ms pulse) is all the way to the right, and “-90°” (~1 ms pulse) is all the way to the left.
To prevent the servos from constantly moving around, we defined a “safe area” for the detected face. The “safe area” is an n*n bounding box which will decide whether the servos need to move or not. When the center coordinates of the detected face is out of the bounding box, the servos will move to make it in the bounding box again. Once the face inside of the bounding box, the servos remain idle.
To drive these two servos, we used the ServoBlaster library. We chose to go with this library because it's performance is far better than the PWM control of RPi.GPIO. When we use the RPi.GPIO library to drive two servo motors, we found that the motors were always jittering and the movement was not stable at all. The ServoBlaster provides an interface to drive multiple servos via the GPIO pins and the motor movements are more stable. It will create a device as /dev/servoblaster. To drive the motor, you send a command directly to the created device. For example, the command echo 0=150 > /dev/servoblaster will generate a 1.5ms pulse and the servo motor will rotate to position “0”. In this project, the ServoBlaster use GPIO 4 and 17 for servos 0 and 1.
PiTFT Screen and Touch Button
The last module of this project is the PiTFT screen. We want to make the face recognition result displayed on the PiTFT screen and create some touch buttons on it to control the system. The pygame library provides interfaces to display images and videos on PiTFT and it also allows your to create some control buttons on your screen. To export the program interface on the PiTFT, we need to set os.putenv('SDL_FBDEV', '/dev/fb1'). Also, os.putenv('SDL_MOUSEDRV', 'TSLIB') and os.putenv('SDL_MOUSEDEV', '/dev/input/touchscreen') will enable the touchscreen for pygame.
Compiling OpenCV
Since the current binary version of OpenCV available to install on the Raspbian OS through apt-get (version 2.3.x) is too old to contain the face recognition algorithms used by this project, we are going to compile and install the OpenCV library on our own.
Before compiling, make sure that you have installed the necessary dependencies:
$ sudo apt-get update

$ sudo apt-get upgrade

$ sudo pip install build-essential cmake pkg-config python-dev

libgtk2.0-dev libgtk2.0 zlib1g-dev libpng-dev libjpeg-dev libtiff-dev

libjasper-dev libavcodec-dev swig unzip
These packages will allow you to load various image file formats such as JPEG, PNG which are necessary for image I/O. It also installs the GTK development library for Graphical User Interfaces (GUIs). The libavcodec-dev is used to enable video I/O OpenCV. Once we have done this, we are ready to download and compile OpenCV.
First, download and unzip OpenCV 2.4.9 from the web:
$ wget

http://downloads.sourceforge.net/project/opencvlibrary/opencv-unix/2.4.9/opencv-2.4.9.zip
$ unzip opencv-2.4.9.zip
Change your directory to opencv-2.4.9 and using the cmake command to generate the makefile for the project. If you want to enable the OpenMP support of OpenCV (maybe you want to add parallel programming features in your program), you could add -WITH_OPENMP=ON in cmake.
$ cd opencv-2.4.9

$ cmake -DCMAKE_BUILD_TYPE=RELEASE -DCMAKE_INSTALL_PREFIX=/usr/local

-DBUILD_PERF_TESTS=OFF -DBUILD_opencv_gpu=OFF -DBUILD_opencv_ocl=OFF
Make sure there are no errors or warnings after you execute this command. Then start the compilation by sending:
$ make
The compiling process takes about 3 hours using RPi2 (about 10 hours on RPi model A) so in the meantime you can grab a book and have a nice break during the compilation.
Finally after the long compiling process, we are ready to install the OpenCV library:
$ sudo make install
And finally to check that it was installed properly, you can check in python by entering python and sending the following:
$ python

>>> import cv2

>>> cv2.__version__

'2.4.9'
Demos
This section gives a brief description on each of the demos that we presented, and each subsection corresponds to one of the files in the Code Appendix.
Face Recognition Using a Single Core
1_single_core.py
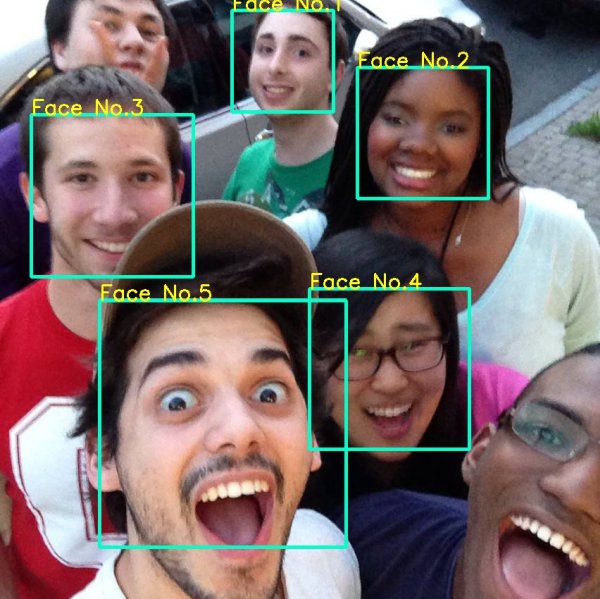
In our first demo, we implemented the face recognition system. The face recognition program could label different faces using a rectangular and adds a face counter above it. Figure 6 shows a sample result. Since only one core is used, the FPS of recognition is pretty slow, showing about 4 to 5 frames per second. When there are only one face, the servo motor could track the face movement. The rotation of the servo motors are pretty stable and precise using the ServoBlaster.
Detect and Recognize Different Objects
2_phone.py
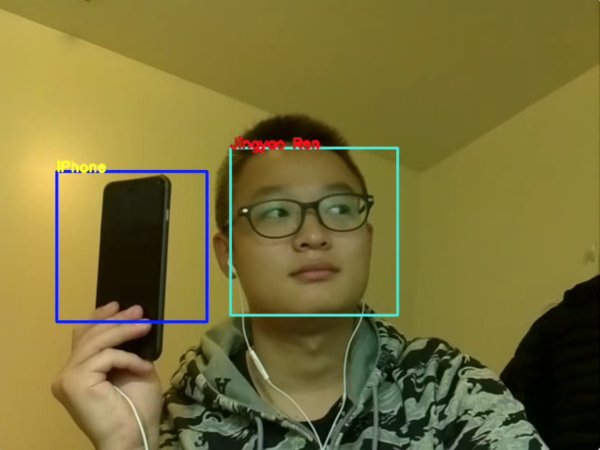
In our second demo, we show that we can recognize faces and cellphones simultaneously. Moreover, the program could label different objects with different labels. It worth pointing out that the XML file we use to detect the cellphones were generated by Radamés Ajna and Thiago Hersan (source). To identify two objects, we to use two different object classifiers in this demo. Thus, the searching time is doubled and the FPS dropped to 2-3 frames per second.
Frame Jump Using One Core
3_frame_jump.py
When the the live video is played at under 5 FPS, the video is choppy to the point point where it is unacceptable. To solve the chopiness problem, only using one core, we came up with a trick we call the “Frame Jump”. After carefully analyzing our one core version, we found that the process of searching faces in an image is the most time-consuming part. If we could speed up this process, we might be able to improve the FPS. In OpenCV, we use the face_cascade.detectMultiScale( image ) function to search for faces in an image. We call this function every time when the program reads a new frame. But what if we don’t search for faces on every frame? If we only search faces every 3 or 4 frames, and display the results repeatedly until a new search is finished, then we can improve the FPS. Because we jumped some frames and didn’t search for faces, we called this method “Frame Jumping”. After implementing this method, the program could achieve 10 FPS by jumping every 4 frames. The FPS will become a little bit lower when the detectMultiScale function is called and will become normal after this frae.
Face Recognition Using Multi Core
4_multi_core.py
Rather than just running the facial recognition program every four frames, maybe instead we can run the facial recognition program on every frame but parallelize the facial recognition algorithm to speed up the program. Since the bottleneck of this program is the part where we actually search the image for faces, if we can parallelize that part, we can see speedups to create a more fluid image. To do this we import a new library for python, the multiprocessing library. In this library we can assign functions to be processed by other cores. Here we utilize the library's Pool functions to create a pool of processors that can run the facial recognition algorithm. We then create a pipeline of images to be processed. Here we fetch images in sequence, assign at most four frames (one for each core) to be processed using the facial recognition algorithm, and finally serialize the results to display the images in sequence once again. Using this parallelization of the facial recognition algorithm, we got the program to run at about 15 FPS, which about a 3X speed up from the single core program. It's also important to note that since we are pipelining the frames, that each frame is delayed by three frames, and there is a noticeable latency when looking at the video being played back.
Frame Jump Using Multi Cores
5_multi_core_fj.py
To even further improve our system, we decided to combine both techniques previously described. Here we take the frame jumping method and combin it with the multiprocessing described in the previous subsection. Now we're going to extend our pipeline even further and expand it to sixteen frames and process only four out of every sixteen frames. To see the results we actually doubled the size of the image being processed and we were still able to maintain a fluid image being produced. However since we extended our pipeline to be four times as large, our latency has also drastically increased. Because of this we can no longer use the tracking portion of the program since the images that it is getting is sixteen frames late and it is no longer able to properly track faces.
Face Recognition Using Multi Cores and PiTFT
6_multi_core_tft.py
Finally we put everything together and finally get the video to be displayed on the PiTFT itself. However this process was not as simple as just drawing the image on the PiTFT. The problem that we encountered was that there were two programs trying to access the SPI interface at the same time. We realized that the ServoBlaster library that we had been using uses the SPI interface while the PiTFT also uses the SPI interface. These two items were trying to use SPI at the same time and causing a conflict. We decided that instead of getting these two items both use SPI at the same time we would change to a different servo driver, pigpio. Here the pigpio library doesn't use the SPI interface but still provides the stability that the RPi.GPIO library could not provide. With this conflict resolved we were able to get the image out on the TFT screen and finally we added a function to the TFT screen just to quit the program when the screen is tapped. We moved back to the the code we used in the multiprocessing code without frame jumping so that we can use the face tracking portion as well.
Results and Conclusion
Using our last demo as the final result, we can see that we were able to meet many of the specifications outlined by our Objectives section. Although we were not to create a fully encapsulated system, our final design could easily be encapsulated by adding some additional hardware such as a battery pack and some sort of casing. Our final demo was able to detect faces in front of it, track that face so that it was centered on screen, and it did all this in a timely manner.
We were also unable to meet our goal of having our system recognize individual faces. The main reason behind this was because we did not have enough time to train the system to recognize individual faces. This process takes a long time, on the order of weeks, which is longer than this project had upon its completion. However we strongly believe that by training the system, over time our design should be able to meet this goal as well.
Ultimately we are very pleased with the results. We were able to design and build this system from scratch. We were able to meet most of our objectives and in the end we produced a system that works.
Parts List
Here is the parts that we bought as part of this project. This list does not include the Raspberry Pi, PiTFT, etc. that was already provided for us.
| Name | Purchase Link | Cost | Quantity |
|---|---|---|---|
| Raspberry Pi Camera | amazon | $26.55 | 1 |
| Wi-Fi USB Adapter | amazon | $9.99 | 1 |
| Mini Pan-Tilt Kit | amazon | $22.99 | 1 |
| Adafruit Flex Cable | amazon | $11.14 | 1 |
| LEGO Camera Case | amazon | $7.99 | 1 |
Code Appendix
The following are each of the source files we used to produce each demo. Each of these demos are described in the Demos portion of the Design and Testing section. Brief implementation notes are listed as comments throughout each of the files. These files can be executed under the correct environment by simply using the following command:
$ sudo python <file_name>
Each of these files are numbered one through six as each file builds off of ideas produced in the previous demo.
1_single_core.py
###############################################################################
#                                                                             #
# file:    1_single_core.py                                                   #
#                                                                             #
# authors: Andre Heil  - avh34                                                #
#          Jingyao Ren - jr386                                                #
#                                                                             #
# date:    December 1st 2015                                                  #
#                                                                             #
# brief:   This is the simple face-tracking program. It uses a single core to #
#          process the images taken by the Pi Camera and processes them using #
#          OpenCV. It then uses ServoBlaster to move the servos so that your  #
#          face is centered.                                                  #
#                                                                             #
###############################################################################


### Imports ###################################################################

from picamera.array import PiRGBArray
from picamera import PiCamera
import time
import cv2
import os


### Setup #####################################################################

# Center coordinates
cx = 160
cy = 120

os.system( "echo 0=150 > /dev/servoblaster" )
os.system( "echo 1=150 > /dev/servoblaster" )

xdeg = 150
ydeg = 150

# Setup the camera
camera = PiCamera()
camera.resolution = ( 320, 240 )
camera.framerate = 60
rawCapture = PiRGBArray( camera, size=( 320, 240 ) )

# Load a cascade file for detecting faces
face_cascade = cv2.CascadeClassifier( '/home/pi/opencv-2.4.9/data/lbpcascades/lbpcascade_frontalface.xml' )

t_start = time.time()
fps = 0


### Main ######################################################################

# Capture frames from the camera
for frame in camera.capture_continuous( rawCapture, format="bgr", use_video_port=True ):

    image = frame.array

    # Use the cascade file we loaded to detect faces
    gray = cv2.cvtColor( image, cv2.COLOR_BGR2GRAY )
    faces = face_cascade.detectMultiScale( gray )

    print "Found " + str( len( faces ) ) + " face(s)"

    # Draw a rectangle around every face and move the motor towards the face
    for ( x, y, w, h ) in faces:

        cv2.rectangle( image, ( x, y ), ( x + w, y + h ), ( 100, 255, 100 ), 2 )
        cv2.putText( image, "Face No." + str( len( faces ) ), ( x, y ), cv2.FONT_HERSHEY_SIMPLEX, 0.5, ( 0, 0, 255 ), 2 )

        tx = x + w/2
        ty = y + h/2

        if   ( cx - tx >  10 and xdeg <= 190 ):
            xdeg += 3
            os.system( "echo 0=" + str( xdeg ) + " > /dev/servoblaster" )
        elif ( cx - tx < -10 and xdeg >= 110 ):
            xdeg -= 3
            os.system( "echo 0=" + str( xdeg ) + " > /dev/servoblaster" )

        if   ( cy - ty >  10 and ydeg >= 110 ):
            ydeg -= 3
            os.system( "echo 1=" + str( ydeg ) + " > /dev/servoblaster" )
        elif ( cy - ty < -10 and ydeg <= 190 ):
            ydeg += 3
            os.system( "echo 1=" + str( ydeg ) + " > /dev/servoblaster" )

    # Calculate and show the FPS
    fps = fps + 1
    sfps = fps / ( time.time() - t_start )
    cv2.putText( image, "FPS : " + str( int( sfps ) ), ( 10, 10 ), cv2.FONT_HERSHEY_SIMPLEX, 0.5, ( 0, 0, 255 ), 2 )

    # Show the frame
    cv2.imshow( "Frame", image )
    cv2.waitKey( 1 )

    # Clear the stream in preparation for the next frame
    rawCapture.truncate( 0 )
2_phone.py
###############################################################################
#                                                                             #
# file:    2_phone.py                                                         #
#                                                                             #
# authors: Andre Heil  - avh34                                                #
#          Jingyao Ren - jr386                                                #
#                                                                             #
# date:    December 1st 2015                                                  #
#                                                                             #
# brief:   This demonstrates OpenCV's capabilities to detect not just faces   #
#          but other objects as well. In this case a standard black phone can #
#          be detected. With the proper cascade file this program can be used #
#          to detect whichever object.                                        #
#                                                                             #
###############################################################################


### Imports ###################################################################

from picamera.array import PiRGBArray
from picamera import PiCamera

import time
import cv2
import os
import pygame


### Setup #####################################################################

os.putenv('SDL_FBDEV', '/dev/fb1')

# Setup the camera
camera = PiCamera()
camera.resolution = ( 320, 240 )
camera.framerate = 40
rawCapture = PiRGBArray( camera, size=( 320, 240 ) )

# Load the cascade files for detecting faces and phones
face_cascade = cv2.CascadeClassifier( '/home/pi/opencv-2.4.9/data/lbpcascades/lbpcascade_frontalface.xml' )
phone_cascade = cv2.CascadeClassifier( 'cascade.xml' )

t_start = time.time()
fps = 0


### Main ######################################################################

# Capture frames from the camera
for frame in camera.capture_continuous( rawCapture, format="bgr", use_video_port=True ):

    image = frame.array

    # Look for faces and phones in the image using the loaded cascade file
    gray = cv2.cvtColor(image,cv2.COLOR_BGR2GRAY)
    faces  = face_cascade.detectMultiScale(gray)
    phones = phone_cascade.detectMultiScale(gray)

    # Draw a rectangle around every face
    for (x,y,w,h) in faces:
        cv2.rectangle( image, ( x, y ), ( x + w, y + h ), ( 255, 255, 0 ), 2 )
        cv2.putText( image, "Face No." + str( len( faces ) ), ( x, y ), cv2.FONT_HERSHEY_SIMPLEX, 0.5, ( 0, 0, 255 ), 2 )

    # Draw a rectangle around every phone
    for (x,y,w,h) in phones:
        cv2.rectangle( image, ( x, y ), ( x + w, y + h ), ( 255, 0, 0 ), 2 )
        cv2.putText( image, "iPhone", ( x, y ), cv2.FONT_HERSHEY_SIMPLEX, 0.5, ( 0, 255, 255 ), 2 )

    # Calculate and show the FPS
    fps = fps + 1
    sfps = fps / ( time.time() - t_start )
    cv2.putText( image, "FPS : " + str( int( sfps ) ), ( 10, 10 ), cv2.FONT_HERSHEY_SIMPLEX, 0.5, ( 0, 0, 255 ), 2 )

    cv2.imshow( "Frame", image )
    cv2.waitKey( 1 )

    # Clear the stream in preparation for the next frame
    rawCapture.truncate( 0 )
Acknowledgements
We would like to thank first and foremost, Prof. Joseph Skovira and Gautham Ponnu for helping us throughout this project and providing the resources to make this project possible.
We'd also like thank the Raspberry Community for the extensive amount of information available on the web. We did a lot of research and are particularly appreciative of the following resources:
Official OpenCV Documentation
Naotoshi Seo’s Blog on OpenCV Haar Training
Train Your Own OpenCV Haar Classifier
Face Recognition using Python and OpenCV
Official Pi Camera Documentation
How to Install or Upgrade UV4L on Raspbian Wheezy and Raspbian Jessie
Servo Control with Raspberry Pi in 5 minutes or less
Controlling the Raspberry Pi Camera with Python
Raspberry Pi Pygame UI basics
How to Build and Install OpenCV 2.4.9 on the Raspberry Pi
Raspberry Pi Face Recognition Treasure Box
Install OpenCV and Python on your Raspberry Pi 2 and B+
Without the work done by these people and by the community, this project would not have been able to progress as much as it did, nor even be completed on time.
Source: Face Recognition System