Introduction:
Today we have amazing access to great streaming content: music, news, weather, stories, etc. Yet, this access is limited to those who can navigate today's electronic devices. This project is based on a belief that the elderly want and need this access – they simply require an accessible interface and navigation.
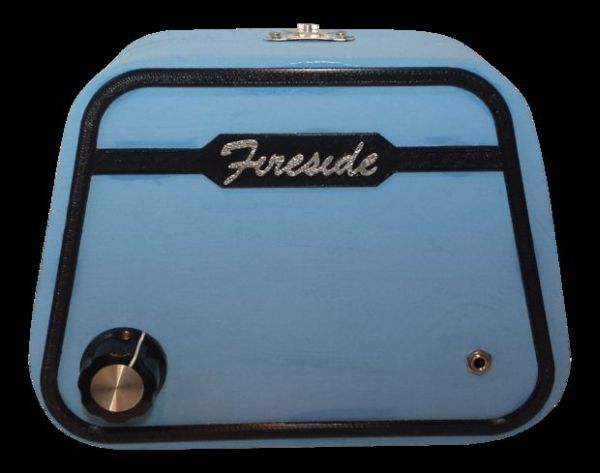
Fireside Internet Radio is an internet connected, open source hardware/software project designed to make personalized streaming content available to those who need it the most. Visit www.firesideinternetradio.com for more information.
What does it do?
Fireside Internet Radio provides 3 main functions:
1) Provides a personalized list of streaming content feeds. Elderly users switch between these ‘radio stations' by simply pressing a button. The same button is held down to turn the radio on and off. Caregivers can change the list of streaming sites remotely by updating a Google spreadsheet.
2) The software uses Google speech and other APIs to provide weather, time, news updates and also to read personalized information. For example, an Alzheimer patient may need to be reminded of their name or the names of their loved ones each time the player is turned on.
3
)
T
witter
API c
an be u
sed with Google speech to keep elderly loved ones socially connected. By setting up a Twitter account for the user (my grandmother has one but doesn't know what Twitter is!), family and friends can post quick updates. The software will check for Tweets and use the Google speech API to read the post.
I hope to develop othe
r useful functions – please post if you have suggestions! (Also, this is first instructable – please rate openly and pass along any improvements! Thanks!)
Basic instructions:
1) Assemble radio hardware (based on Raspberry Pi (A or B)). Overall cost is approx. $70-$80 (not including headphone)
2) Download, customize (feel free to branch) software (python) from Github
3) Install Raspbian OS on SD Card, several software downloads, and Fireside scripts
4) Setup a Google Drive spreadsheet and list streaming urls
5) Build a speaker or headphone with pushbutton to operate the Fireside player
The next pages provide specifics for each of these steps.
Step 1: Organize the hardware
Check out the Fireside player BOM (bill of materials) image above. A few notes on these items:
- Raspberry Pi: Models A, B, A+, B+ will work. I prefer the A as it is most economical. If you plan to develop on the Pi, you may want to consider a B as it has 2 USB ports.
- Amplifier: A lot of 5V amps will work. I've been happy with the 5V amp with integrated volume control from DROK. Check out: http://www.amazon.com/gp/product/B00C4N410G/ref=oh…
- SD Card: Some SD cards seem to work better for Raspberry Pi. Check out http://elinux.org/RPi_SD_cards for and up to date list of compatible cards.
- Charger: 5V Wall charger with micro usb end is required. A 1500 mA charger (or larger) will provide enough current for both the Pi and the amp. Chargers can be purchased all day long on Amazon.
- WiFi adapter: I've tried a lot of Wifi dongles, all purchased on Amazon -most work well with no issues. The Panda Ultra Wireless N adapter is one that consistently performs well.
- Inserts: Threaded inserts and screws can be found on McMaster Carr: http://www.mcmaster.com/#standard-threaded-inserts…
- Case: I use wooden boxes from craft stores. They usually cost just a few dollars and look very nice when sanded and painted. Cigar boxes and hollowed books also work well.
- Base: the base for the Raspberry Pi can be printed on any plastic rapid prototype machine.
- Not included: speaker with button – see last step
Next step: Assemble player hardware
Step 2: Assemble the hardware
- Drill 3 1/4″ holes into the case: a) amp/volume knob b) headphone jack and c) for power cable.
- Using hot glue, fasten the base for the Raspberry Pi in place. Make sure you allow room to access the SD card, USB -for wifi dongle, and the power connection.
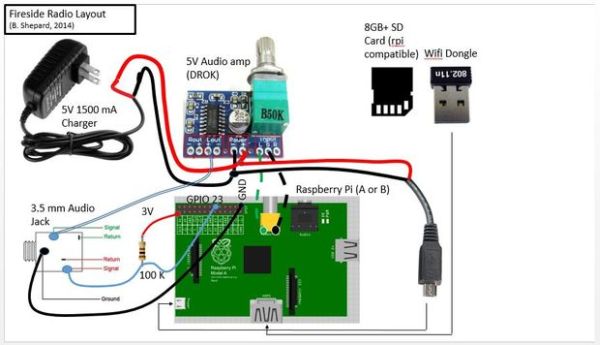
- On the bottom of the Raspberry Pi, locate the weld points shown in the photo. These points are the ground and signal connection for the Pi's audio out. Solder a black ground wire and red signal wire at the points shown.
- Cut the 5V power cable about 2 inches from the micro USB connection. You will solder the cable directly into the 5V amplifier board's power pins. The 2 inch USB end will also be soldered onto the amp board to extend power to the Pi. See photo.
- Keeping wire lengths that work for your layout in mind, solder the power, amp, Pi, resistor and headphone jack as shown in the layout. Be sure to pass the power cable through the hole in the case before soldering to the amp board.
- Mount the amp and headphone jack in place using the threaded nut. Mount the Pi with (2) 4-40 machine screws. Use electrical tape to protect any exposed wiring.
- (or maybe step 1) Finish the case however you choose. I usually sand and paint the cases (before hardware assembly) and use rapid prototyped plastic trim pieces to design the front.
Next step: Load software onto SD card.
Step 3: Load software onto SD card
Before loading the Fireside python code and other necessary software, install Raspbian Wheezy operating system on the SD card. (Again, check that the SD card is compatible with Pi: http://elinux.org/RPi_SD_cards )
Several great Instructables have been written for configuring a SD card with Raspbian. Check out this one, for example: http://www.instructables.com/id/Introduction-64/
(If you are using a SD with OS already installed, it is a good idea to update/upgrade before continuing.)
After Raspbian is installed on the SD card and Pi has been configured, boot up a Raspberry Pi with keyboard, HDMI monitor, mouse, and network connection. (If you plan to use your media player PI to configure the SD card, you may need to loosen its mounting inside the case in order to attach HDMI and a USB hub.) Confirm that network connection is working. Also confirm that the time setting is correct.
For more detail: Fireside Internet Radio Player for Elderly Users – built with Raspberry Pi


