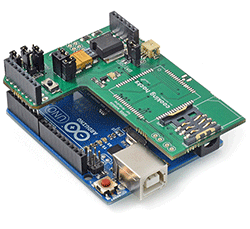
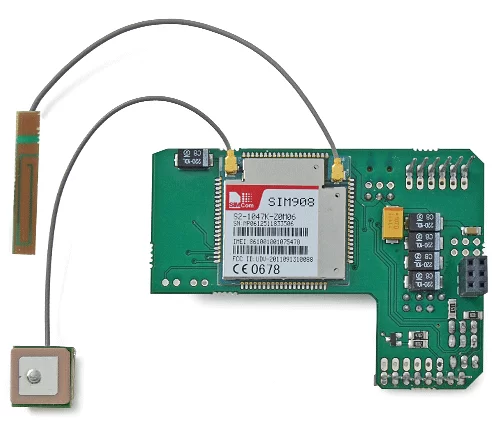
The new shield designed for Arduino and Raspberry Pi integrates the SIM908 module which counts with both GPRS and GPS technologies what allows to easily perform realtime tracking applications. The idea is simple: read the GPS coordinates (longitude and latitude) and send them by using a HTTP request to a web server. Then use a browser to load the PHP webpage which uses Googlemaps to show the location in realtime.
All the code including the PHP scripts and the Arduino program can be downloaded and it has been released with an open source license.
Tutorial Index
- Ingredients
- Step 1: The shield (hardware)
- Step 1b – Using the GPRS+GPS module with Raspberry Pi
- Step 2: Using GPRS+GPS module with AT commands
- Step 3: Powering the board
- Step 4: Using the shield in standalone mode – Calls
- Step 5: Using the shield in standalone mode – Sending and receiving SMS
- Step 6: Using the shield in standalone mode – FTP
- Step 7: Using the shield in standalone mode – TCP and UDP
- Step 8: Using the shield in standalone mode – HTTP
- Step 9: Using the shield in standalone mode – GPS
- Realtime geolocation tracking
- Documentation
- Get the Shields
Ingredients Go to index
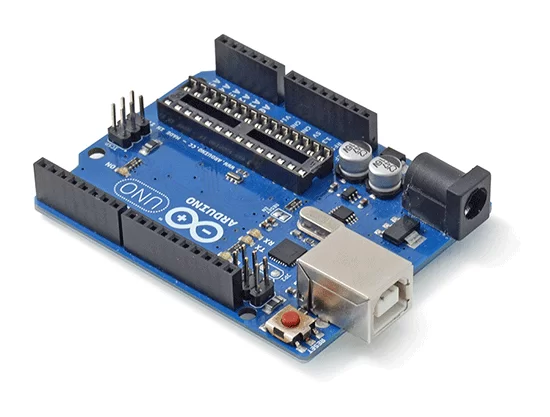
- 1 x Arduino or 1 x Starter Kit for Raspberry Pi + Raspberry Pi
- 1 x GPRS+GPS Quadband Module for Arduino (SIM908)
- 1 x GPRS antenna
- 1 x GPS antenna
- 1 x SIM card
- 1 x PC
NOTE: If you are looking for a complete solution to use 3G, GPRS and A-GPS, you can use our 3G/GPRS shield for Arduino (3G + GPRS) or our Kit with Audio/Video
NOTE: The codes of the tutorial have developed to work on Arduino IDE v1.0.1
Step 1: The shield (hardware) Go to index
The board (shield) we are going to use in this tutorial is the GPRS+GPS Quadband Module for Arduino (SIM908) from Cooking hacks.
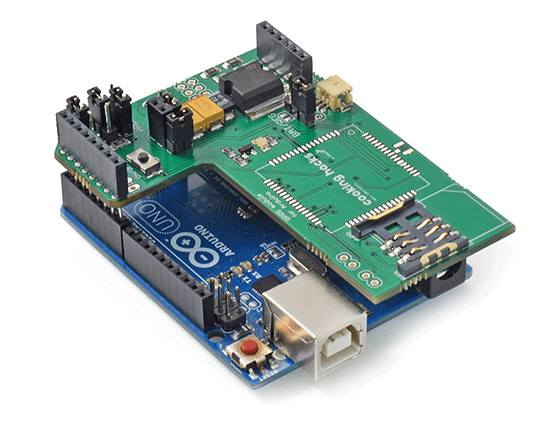
The GPRS+GPS shield is fully compatible with old Arduino USB versions, Duemilanove and Mega.
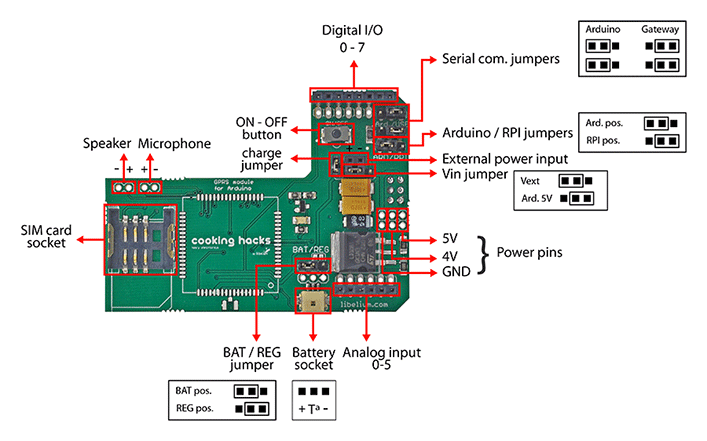
GPRS+GPS shield diagram (top):
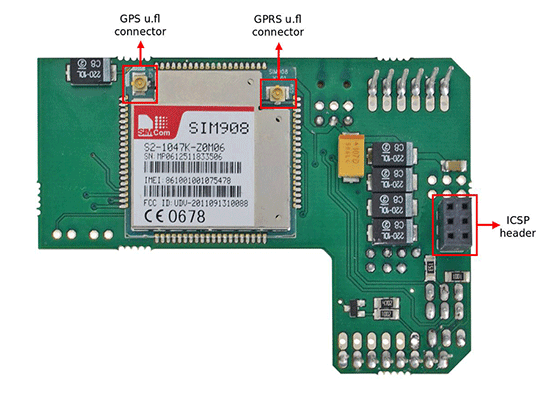
GPRS+GPS shield diagram (bottom):
The LED of the shield shows the status of the GPRS+GPS module. The table below shows the meaning of the blink of the LED.
| Status | SIM908 behavior |
|---|---|
| Off | SIM908 is not running |
| 64ms On/ 800ms Off | SIM908 not registered the network |
| 64ms On/ 3000ms Off | SIM908 registered to the network |
| SIM908 registered to the network | PPP GPRS communication is established |
Step 1b: Using the GPRS+GPS module with Raspberry Pi Go to index
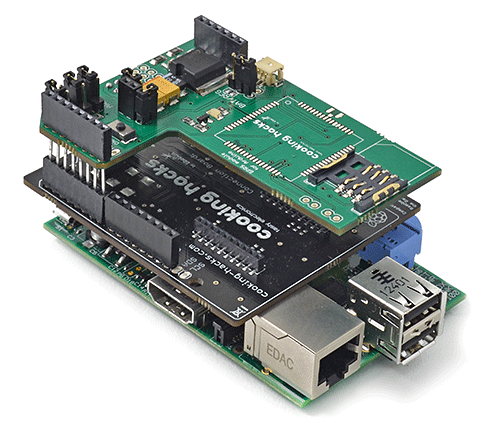
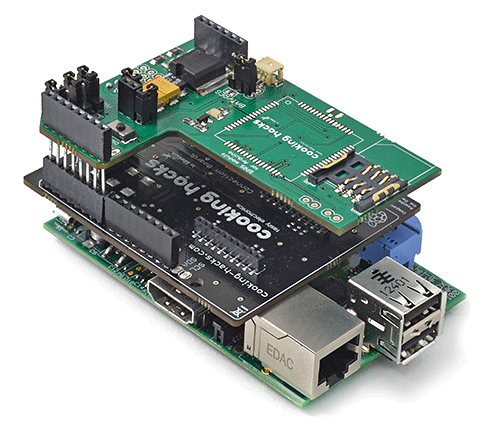
The new GPRS+GPS module can be plugged to Raspberry Pi using the Raspberry Pi to Arduino shields connection bridge.
Using arduPi library lets you to program applications for controling the GPRS+GPS in a very similar way to Arduino.
The steps are the following:
1. Paste the arduino code on the template where it says: YOUR ARDUINO CODE HERE
//Include arduPi library
#include "arduPi.h"

/*********************************************************
 *  IF YOUR ARDUINO CODE HAS OTHER FUNCTIONS APART FROM  *
 *  setup() AND loop() YOU MUST DECLARE THEM HERE        *
 * *******************************************************/

/**************************
 * YOUR ARDUINO CODE HERE *
 * ************************/

int main (){
    setup();
    while(1){
        loop();
    }
    return (0);
}

2. Compile the file as follows:
g++ -lrt -lpthread my_program.cpp arduPi.cpp -o my_program
Step 2: Using GPRS+GPS module with AT commands Go to index
Important issues:
- Use capital letters for AT commands.
- Send CR (Carriage return) and LF (Line feed) after the AT command.
- Place the serial communication jumpers in the right position.
- Use an external power supply and place the power jumpers in the right position. If the shield is powered from the Arduino, the power jumper must be in Arduino 5V position. It the shield is powered from the Vin input (in the shield), the power jumper must be in Vext position.
| Command | Response | Description |
|---|---|---|
| AT | OK | If you get OK, the communication with the module is working |
| AT+CPIN=”****” | OK | If the SIM card is locked with PIN (**** is the pin number) |
| AT+COPS? | Operator information |
Using GPRS+GPS module with AT commands in Arduino
The first thing we are going to do with the module is to connect the module to a PC directly (using an Arduino as gateway) and check the basic AT commands. In this case, serial communication jumpers have to be set on USB gateway position.
Remember take out the ATmega microcontroller from the Arduino gateway.
Connect the antennas to the shield:
Connect the shield to the Arduino gateway:
Then connect the USB cable and the SIM card.
Finally plug the USB cable to the computer and open a serial port terminal to communicate via the usb port (e.g: hyperterminal (win), cutecom / gtkterm (linux)).
If you use the Arduino IDE serial monitor for sending AT commands – Be sure that you are sending CR (Carriage return) and LF (Line Feed).
Set the baudrate to 115200 bps and open the serial port, then press the ON button for two seconds. Then if you type AT you'll get OK, this means that the communication with the module is working fine. Now, with the module working you can check some AT commands to control the module, the basic commands are:
Important type commands in capital letters and with CR (carriage return) and LF (line feed)!!!
NOTE: With some sketches, the buffer of the UART may be small, to increase the length of the buffer you need to change these lines in the file HardwareSerial.h in /arduino-1.0.X/hardware/arduino/avr/cores/arduino/ (or in file HardwareSerial.cpp in /arduino-1.0.X/hardware/arduino/cores/arduino/ depending on the Arduino IDE version)
#if (RAMEND < 1000)
#define SERIAL_TX_BUFFER_SIZE 16
#define SERIAL_RX_BUFFER_SIZE 16
#else
#define SERIAL_TX_BUFFER_SIZE 64
#define SERIAL_RX_BUFFER_SIZE 64
#endif
#endif
to
#if (RAMEND < 1000)
#define SERIAL_TX_BUFFER_SIZE 192
#define SERIAL_RX_BUFFER_SIZE 192
#else
#define SERIAL_TX_BUFFER_SIZE 256
#define SERIAL_RX_BUFFER_SIZE 256
#endif
#endif
Using GPRS+GPS module with AT commands in Raspberry Pi
The first thing we are going to do with the module is to check the basic AT commands in gateway mode. Using gateway mode, commands can be sent from our Raspberry Pi directly to any serial module. To stablish UART connection with the module you can use several programs as cutecom in Raspbian graphical environment or minicom in a terminal window in order to use it via SSH . For using minicom follow these steps:
-
Place the Arduino/RPI jumper in the SIM908 shield to the right, in RPI position.
-
Place the two Serial com. jumpers in the SIM908 shield to the left, in Arduino position. These jumpers always have to be in this position, in gateway mode and when you run codes.
-
We recommend to power externally the shield, but it's not necessary in all cases.
If you decide not to use an external power supply you must set the “Vin ext. Jumper” to the right, in “Arduino 5V position” and do not forget to place the switch in the Raspberry connection bridge to the right.
If you choose to use an external power supply you must place it through the external power input, the “Vin ext. jumper” must be set to the left, in “Vext position” and the BAT/REG jumper must be set to the right, in REG position. The power supply must be able to provide sufficient current up to 2A. You can also use a battery to external power the shield, in that case put the BAT/REG jumper to the left, in BAT position.
Besides this, do not forget to place the switch in the Raspberry connection bridge to the left.
You can check our FAQ about 3G/Sim900/Sim908 here.
-
Connect the antennas to the shield and the shield to the Raspberry Pi connection bridge. Now press the ON button in the shield, you will see a green LED.
-
Open a Terminal window on Raspberry Pi, or connect to Raspberry Pi through SSH. In order to enter via SSH change here the IP from your Raspberry Pi. The default user is pi.
ssh -X [email protected]Now you will have to type your password. The default password is “raspberry”.
-
Install minicom (only if you haven't done it before):
sudo apt-get install minicom -
Open comunication with the module UART, the baudrate is 115200:
minicom -b 115200 -o -D /dev/ttyAMA0 -
Then if you type AT you'll get OK, this means that the communication with the module is working fine. Now, with the module working you can check some AT commands to control the module.
-
To exit minicom press CTRL+A, then press X and Yes.
Step 3: Powering the board: Go to index
There are 3 methods to power the GPRS+GPS shield:
The first one is powering the shield with Arduino 5v (ICSP header). You must set the BAT/REG jumper in REG position, Vin in Ard 5v and remove the charge jumper. Some of the USB ports on computers are not able to give all the current the module needs to work, if your module goes down when it tries to connect to the network, you can use an external power supply (12V – 2A) on the Arduino.
The second one is powering the shield directly via Vext header. You must set the BAT/REG jumper in REG position, Vin in Vext and remove the charge jumper. The external power supply can be able to supply current peaks about 2A. We recommend a 12V-2A power supply.
The last one is using a one cell Li-ion battery. You must set the BAT/REG jumper in BAT position, remove the Vin jumper and set the charge jumper. The shield uses the battery to powers itself but it can't power the Arduino board. To recharge the battery with the shield you only need to power the Arduino. The shield uses the 5v (ICSP header) to charge the battery.
The next table shows a little resume:
| Power source | BAT/REG jumper | Vin jumper | Charge jumper |
|---|---|---|---|
| From Arduino | Reg | Ard | Remove |
| External power | Reg | Vext | Remove |
| Battery | Bat | Remove | Keep |
Step 4: Using the shield in standalone mode – Calls Go to index
Originating and receiving voice calls
The code example and the connection diagram shown below are used to originate a voice call and, pushing a button, end that voice call. The button is connected between digital pin 12 an ground. A 10kΩ pull-up resistor is needed at this pin.
Arduino code:
/*
 *  GPRS+GPS Quadband Module (SIM908)
 *
 *  Copyright (C) Libelium Comunicaciones Distribuidas S.L.
 *  http://www.libelium.com
 *
 *  This program is free software: you can redistribute it and/or modify
 *  it under the terms of the GNU General Public License as published by
 *  the Free Software Foundation, either version 3 of the License, or
 *  (at your option) any later version.
 *  a
 *  This program is distributed in the hope that it will be useful,
 *  but WITHOUT ANY WARRANTY; without even the implied warranty of
 *  MERCHANTABILITY or FITNESS FOR A PARTICULAR PURPOSE.  See the
 *  GNU General Public License for more details.
 *
 *  You should have received a copy of the GNU General Public License
 *  along with this program.  If not, see http://www.gnu.org/licenses/.
 *
 *  Version:           2.0
 *  Design:            David Gascón
 *  Implementation:    Alejandro Gallego & Marcos Martinez
 */


int8_t answer;
int onModulePin = 2;
int button = 12;
char aux_str[30];

char phone_number[]="******";     // ********* is the number to call
char pin[] = "****";

void setup(){

    pinMode(onModulePin, OUTPUT);
    pinMode(button, INPUT);
    Serial.begin(115200);

    Serial.println("Starting...");
    power_on();

    delay(3000);

    // sets the PIN code
    sprintf(aux_str, "AT+CPIN=%s", pin);
    sendATcommand(aux_str, "OK", 2000);


    delay(3000);

    Serial.println("Connecting to the network...");

    while( (sendATcommand("AT+CREG?", "+CREG: 0,1", 500) ||
            sendATcommand("AT+CREG?", "+CREG: 0,5", 500)) == 0 );

    sprintf(aux_str, "ATD%s;", phone_number);
    sendATcommand(aux_str, "OK", 10000);

    // press the button for hang the call
    while(digitalRead(button)==1);

    Serial.println("ATH");            // disconnects the existing call


}

void loop(){

}

void power_on(){

    uint8_t answer=0;

    // checks if the module is started
    answer = sendATcommand("AT", "OK", 2000);
    if (answer == 0)
    {
        // power on pulse
        digitalWrite(onModulePin,HIGH);
        delay(3000);
        digitalWrite(onModulePin,LOW);

        // waits for an answer from the module
        while(answer == 0){     // Send AT every two seconds and wait for the answer
            answer = sendATcommand("AT", "OK", 2000);
        }
    }

}

int8_t sendATcommand(char* ATcommand, char* expected_answer, unsigned int timeout){

    uint8_t x=0,  answer=0;
    char response[100];
    unsigned long previous;

    memset(response, '\0', 100);    // Initialize the string

    delay(100);

    while( Serial.available() > 0) Serial.read();    // Clean the input buffer

    Serial.println(ATcommand);    // Send the AT command


    x = 0;
    previous = millis();

    // this loop waits for the answer
    do{
        if(Serial.available() != 0){
            // if there are data in the UART input buffer, reads it and checks for the asnwer
            response[x] = Serial.read();
            x++;
            // check if the desired answer  is in the response of the module
            if (strstr(response, expected_answer) != NULL)
            {
                answer = 1;
            }
        }
         // Waits for the asnwer with time out
    }while((answer == 0) && ((millis() - previous) < timeout));

    return answer;
}
Raspberry Pi code:
/*
 *  GPRS+GPS Quadband Module (SIM908)
 *
 *  Copyright (C) Libelium Comunicaciones Distribuidas S.L.
 *  http://www.libelium.com
 *
 *  This program is free software: you can redistribute it and/or modify
 *  it under the terms of the GNU General Public License as published by
 *  the Free Software Foundation, either version 3 of the License, or
 *  (at your option) any later version.
 *  a
 *  This program is distributed in the hope that it will be useful,
 *  but WITHOUT ANY WARRANTY; without even the implied warranty of
 *  MERCHANTABILITY or FITNESS FOR A PARTICULAR PURPOSE.  See the
 *  GNU General Public License for more details.
 *
 *  You should have received a copy of the GNU General Public License
 *  along with this program.  If not, see http://www.gnu.org/licenses/.
 *
 *  Version:           2.0
 *  Design:            David Gascón
 *  Implementation:    Alejandro Gallego & Marcos Martinez
 */

 //Include arduPi library
#include "arduPi.h"

int8_t sendATcommand(const char* ATcommand, const char* expected_answer, unsigned int timeout);
void power_on();

int8_t answer;
int onModulePin = 2;
int button = 12;
char aux_str[30];

char phone_number[]="*******";     // ********* is the number to call
char pin[] = "*******";

void setup(){

    pinMode(onModulePin, OUTPUT);
    pinMode(button, INPUT);
    Serial.begin(115200);

    Serial.println("Starting...");
    power_on();

    delay(3000);

    // sets the PIN code
    sprintf(aux_str, "AT+CPIN=%s", pin);
    sendATcommand(aux_str, "OK", 2000);

    delay(3000);

    printf("Connecting to the network...\n");

    while( (sendATcommand("AT+CREG?", "+CREG: 0,1", 500) ||
            sendATcommand("AT+CREG?", "+CREG: 0,5", 500)) == 0 );

    sprintf(aux_str, "ATD%s;", phone_number);
    sendATcommand(aux_str, "OK", 10000);

    // press the button for hang the call
    while(digitalRead(button)==1);

    Serial.println("ATH");            // disconnects the existing call
    printf("Call disconnected\n");


}

void loop(){

}

void power_on(){

    uint8_t answer=0;

    // checks if the module is started
    answer = sendATcommand("AT", "OK", 2000);
    if (answer == 0)
    {
        // power on pulse
        digitalWrite(onModulePin,HIGH);
        delay(3000);
        digitalWrite(onModulePin,LOW);

        // waits for an answer from the module
        while(answer == 0){     // Send AT every two seconds and wait for the answer
            answer = sendATcommand("AT", "OK", 2000);
        }
    }

}

int8_t sendATcommand(const char* ATcommand, const char* expected_answer, unsigned int timeout){

    uint8_t x=0,  answer=0;
    char response[100];
    unsigned long previous;

    memset(response, '\0', 100);    // Initialize the string

    delay(100);

    while( Serial.available() > 0) Serial.read();    // Clean the input buffer

    Serial.println(ATcommand);    // Send the AT command


        x = 0;
    previous = millis();

    // this loop waits for the answer
    do{
        if(Serial.available() != 0){
            // if there are data in the UART input buffer, reads it and checks for the asnwer
            response[x] = Serial.read();
            printf("%c",response[x]);
            x++;
            // check if the desired answer  is in the response of the module
            if (strstr(response, expected_answer) != NULL)
            {
				printf("\n");
                answer = 1;
            }
        }
    }
    // Waits for the asnwer with time out
    while((answer == 0) && ((millis() - previous) < timeout));

        return answer;
}

int main (){
    setup();
    while(1){
        loop();
    }
    return (0);
}
To make a lost call next code is used.
Arduino code:
/*
 *  GPRS+GPS Quadband Module (SIM908)
 *
 *  Copyright (C) Libelium Comunicaciones Distribuidas S.L.
 *  http://www.libelium.com
 *
 *  This program is free software: you can redistribute it and/or modify
 *  it under the terms of the GNU General Public License as published by
 *  the Free Software Foundation, either version 3 of the License, or
 *  (at your option) any later version.
 *  a
 *  This program is distributed in the hope that it will be useful,
 *  but WITHOUT ANY WARRANTY; without even the implied warranty of
 *  MERCHANTABILITY or FITNESS FOR A PARTICULAR PURPOSE.  See the
 *  GNU General Public License for more details.
 *
 *  You should have received a copy of the GNU General Public License
 *  along with this program.  If not, see http://www.gnu.org/licenses/.
 *
 *  Version:           2.0
 *  Design:            David Gascón
 *  Implementation:    Alejandro Gallego & Marcos Martinez
 */

int8_t answer;
int onModulePin = 2;
int seconds = 20;
char aux_str[30];

char phone_number[]="*******";     // ********* is the number to call
char pin[] = "*******";

void setup(){

    pinMode(onModulePin, OUTPUT);
    Serial.begin(115200);


    Serial.println("Starting...");
    power_on();

    delay(3000);

    // sets the PIN code
    sprintf(aux_str, "AT+CPIN=%s", pin);
    sendATcommand(aux_str, "OK", 2000);

    delay(3000);

    Serial.println("Connecting to the network...");

    while( (sendATcommand("AT+CREG?", "+CREG: 0,1", 500) ||
            sendATcommand("AT+CREG?", "+CREG: 0,5", 500)) == 0 );

    sprintf(aux_str, "ATD%s;", phone_number);
    sendATcommand(aux_str, "OK", 10000);


    delay(seconds * 1000);

    Serial.println("ATH");            // disconnects the existing call
    Serial.println("Call disconnected");


}

void loop(){

}

void power_on(){

    uint8_t answer=0;

    // checks if the module is started
    answer = sendATcommand("AT", "OK", 2000);
    if (answer == 0)
    {
        // power on pulse
        digitalWrite(onModulePin,HIGH);
        delay(3000);
        digitalWrite(onModulePin,LOW);

        // waits for an answer from the module
        while(answer == 0){     // Send AT every two seconds and wait for the answer
            answer = sendATcommand("AT", "OK", 2000);
        }
    }

}

int8_t sendATcommand(char* ATcommand, char* expected_answer, unsigned int timeout){

    uint8_t x=0,  answer=0;
    char response[100];
    unsigned long previous;

    memset(response, '\0', 100);    // Initialize the string

    delay(100);

    while( Serial.available() > 0) Serial.read();    // Clean the input buffer

    Serial.println(ATcommand);    // Send the AT command


    x = 0;
    previous = millis();

    // this loop waits for the answer
    do{
        // if there are data in the UART input buffer, reads it and checks for the asnwer
        if(Serial.available() != 0){
            response[x] = Serial.read();
            x++;
            // check if the desired answer  is in the response of the module
            if (strstr(response, expected_answer) != NULL)
            {
                answer = 1;
            }
        }
        // Waits for the asnwer with time out
    }while((answer == 0) && ((millis() - previous) < timeout));

    return answer;
}
Raspberry Pi code:
/*
 *  GPRS+GPS Quadband Module (SIM908)
 *
 *  Copyright (C) Libelium Comunicaciones Distribuidas S.L.
 *  http://www.libelium.com
 *
 *  This program is free software: you can redistribute it and/or modify
 *  it under the terms of the GNU General Public License as published by
 *  the Free Software Foundation, either version 3 of the License, or
 *  (at your option) any later version.
 *  a
 *  This program is distributed in the hope that it will be useful,
 *  but WITHOUT ANY WARRANTY; without even the implied warranty of
 *  MERCHANTABILITY or FITNESS FOR A PARTICULAR PURPOSE.  See the
 *  GNU General Public License for more details.
 *
 *  You should have received a copy of the GNU General Public License
 *  along with this program.  If not, see http://www.gnu.org/licenses/.
 *
 *  Version:           2.0
 *  Design:            David Gascón
 *  Implementation:    Alejandro Gallego & Marcos Martinez
 */


//Include arduPi library
#include "arduPi.h"

int8_t sendATcommand(const char* ATcommand, const char* expected_answer, unsigned int timeout);
void power_on();

int8_t answer;
int onModulePin = 2;
int seconds = 20;
char aux_str[30];

char phone_number[]="*******";     // ********* is the number to call
char pin[] = "*******";

void setup(){

    pinMode(onModulePin, OUTPUT);
    Serial.begin(115200);


    printf("Starting...\n");
    power_on();

    delay(3000);

    // sets the PIN code
    sprintf(aux_str, "AT+CPIN=%s", pin);
    sendATcommand(aux_str, "OK", 2000);

    delay(3000);

    printf("Connecting to the network...\n");

    while( (sendATcommand("AT+CREG?", "+CREG: 0,1", 500) ||
            sendATcommand("AT+CREG?", "+CREG: 0,5", 500)) == 0 );

    sprintf(aux_str, "ATD%s;", phone_number);
    sendATcommand(aux_str, "OK", 10000);


    delay(seconds * 1000);

    Serial.println("ATH");            // disconnects the existing call
    printf("Call disconnected\n");


}

void loop(){

}

void power_on(){

    uint8_t answer=0;

    // checks if the module is started
    answer = sendATcommand("AT", "OK", 2000);
    if (answer == 0)
    {
        // power on pulse
        digitalWrite(onModulePin,HIGH);
        delay(3000);
        digitalWrite(onModulePin,LOW);

        // waits for an answer from the module
        while(answer == 0){     // Send AT every two seconds and wait for the answer
            answer = sendATcommand("AT", "OK", 2000);
        }
    }

}

int8_t sendATcommand(const char* ATcommand, const char* expected_answer, unsigned int timeout){

    uint8_t x=0,  answer=0;
    char response[100];
    unsigned long previous;

    memset(response, '\0', 100);    // Initialize the string

    delay(100);

    while( Serial.available() > 0) Serial.read();    // Clean the input buffer

    Serial.println(ATcommand);    // Send the AT command


        x = 0;
    previous = millis();

    // this loop waits for the answer
    do{
        if(Serial.available() != 0){
            // if there are data in the UART input buffer, reads it and checks for the asnwer
            response[x] = Serial.read();
            printf("%c",response[x]);
            x++;
            // check if the desired answer  is in the response of the module
            if (strstr(response, expected_answer) != NULL)
            {
				printf("\n");
                answer = 1;
            }
        }
    }
    // Waits for the asnwer with time out
    while((answer == 0) && ((millis() - previous) < timeout));

        return answer;
}

int main (){
    setup();
    while(1){
        loop();
    }
    return (0);
}
To receive calls the used code are this and the connection diagram is the same that the used to originate calls. Don't forget the pull-up resistor on pin 12.
Command summary
| Command | Response | Description |
|---|---|---|
| ATD*********; | ********* is the number to call. | |
| ATA | OK | Answer an incoming call. |
| ATH | OK | Cancel voice calls. |
Step 5: Using the shield in standalone mode
Sending and receiving SMS Go to index
The first code is used to send a SMS, the second one reads the first SMS into the memory.
Arduino code:
/*

 *  GPRS+GPS Quadband Module (SIM908)

 *

 *  Copyright (C) Libelium Comunicaciones Distribuidas S.L.

 *  http://www.libelium.com

 *

 *  This program is free software: you can redistribute it and/or modify

 *  it under the terms of the GNU General Public License as published by

 *  the Free Software Foundation, either version 3 of the License, or

 *  (at your option) any later version.

 *  a

 *  This program is distributed in the hope that it will be useful,

 *  but WITHOUT ANY WARRANTY; without even the implied warranty of

 *  MERCHANTABILITY or FITNESS FOR A PARTICULAR PURPOSE.  See the

 *  GNU General Public License for more details.

 *

 *  You should have received a copy of the GNU General Public License

 *  along with this program.  If not, see http://www.gnu.org/licenses/.

 *

 *  Version:           2.0

 *  Design:            David Gascón

 *  Implementation:    Alejandro Gallego & Marcos Martinez

 */
int8_t answer;
int onModulePin= 2;
char aux_string[30];
char phone_number[]=“*********”; // ********* is the number to call
char pin[] = “****”;
char sms_text[]=“Test-Arduino-Hello World”;
void setup(){
pinMode(onModulePin, OUTPUT);
Serial.begin(115200);
Serial.println(“Starting…”);
power_on();
delay(3000);
// sets the PIN code
sprintf(aux_string, “AT+CPIN=%s”, pin);
sendATcommand(aux_string, “OK”, 2000);
delay(3000);
Serial.println(“Connecting to the network…”);
while( (sendATcommand(“AT+CREG?”, “+CREG: 0,1”, 500) ||
sendATcommand(“AT+CREG?”, “+CREG: 0,5”, 500)) == 0 );
Serial.print(“Setting SMS mode…”);
sendATcommand(“AT+CMGF=1”, “OK”, 1000); // sets the SMS mode to text
Serial.println();


