This Raspberry Pi IoT project is the best way to get started on working with the IoT (Internet of Things) and to build your knowledge to expand it to other applications. The first problem was figuring out a simple enough sample project to learn how to make sensors communicate with each other. So, we made a step-by-step guide for Pi beginners so they can learn various methods that can be used to make their application of choice.
In short, we use the Raspberry Pi to record temperature on a trigger and then push notifications from the server to your Android device. You can also find all the project files for the Android app below this tutorial. Here is what you will learn from this project:
- Setting up a Raspberry Pi
- Using a temperature sensor (DS18B20)
- Using a PIR sensor
- Using a temperature and PIR sensor together
- Setting up and working with a web server to store data and run other applications
- Using Python, PHP, and MySQL
- Using Google Cloud Messaging (GCM) service to send temperature notification to an Android app when the situation arises and to display stored data
We have divided the whole Raspberry Pi IoT project into two parts. The first part consists of setting up the Raspberry Pi and interfacing it with the sensors. The second part covers building the Android application and connecting it to the server.
Required Materials
- Raspberry Pi
- SD Card (minimum recommended – 4GB, would be a micro SD card)
- DS18B20 Temperature sensor (preferred Keyes model)
- PIR Motion Sensor
- Jumper wires, breadboard
- Working Laptop with internet connection
- Router and ethernet cables
If you aren’t familiar with Linux and terminal, check out this Basic Linux Commands for Beginners tutorial.
Note: We’ll be remotely accessing the Raspberry Pi’s terminal through SSH, so you won’t need a dedicated monitor, mouse or keyboard in any part of this tutorial.
You would also want to download the following software:
- Win32 Disk Imager (Windows users)
- PuTTY (Windows users)
- Advanced IP Scanner
- WAMP/LAMP/MAMP server (This project was done using a Windows laptop on a WAMP server)
How Does it Work?
The raspberry Pi is interfaced with a temperature sensor and PIR sensor and reads data from it through its GPIO pins. After this, the data is relayed to a web server and subsequently pushed to your Android device through the Google Cloud Messaging (GSM) service. A brief outline of the process:
Raspberry pi
↓
Interface temperature sensor (DS18B20) and PIR sensor
↓
Store data from sensors in a web server
↓
Google Cloud Messaging (GCM) service to send temperature notification to an android app when situation arises and to display stored data
You are working with: DS18B20
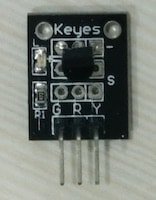
Raspberry Pi can only handle digital signals. The DS18B20 is a digital temperature sensor. In the above Keyes model of the sensor that we used, the left-most pin is Ground, the center pin is Vcc, and the right-most pin is Output/Data pin. The sensor that we used came with a 4.7K ohm resistor connected between Vcc and the data pin. You might have to connect an external one in case yours does not have it. It requires an input voltage of 3.3V
For more detail: How to Get Started With IoT Using Raspberry Pi and PuTTY – Part 1


