
Required Hardware
Before you get started, let's review what you'll need.
- Raspberry Pi 3 (Recommended) or Pi 2 Model B (Supported) – Buy on Element14 – Pi 3 or Pi 2.
- MATRIX Voice ESP32 Version (Wi-Fi, Bluetooth, Microcontroller) – The Raspberry Pi does not have a built-in microphone, the MATRIX Voice has an 8 mic array perfect for Alexa and any other voice solution – Buy MATRIX Voice
- Micro-USB power supply for Raspberry Pi – 2.5A 5V power supply recommended
- Micro SD Card (Minimum 8 GB) – You need an operating system to get started. NOOBS (New Out of the Box Software) is an easy-to-use operating system install manager for Raspberry Pi. The simplest way to get NOOBS is to buy an SD card with NOOBS pre-installed – Raspberry Pi 16GB Preloaded (NOOBS) Micro SD Card. Alternatively, you can download and install it on your SD card.
- A USB Keyboard & Mouse, and an external HDMI Monitor – we also recommend having a USB keyboard and mouse as well as an HDMI monitor handy if you're unable to remote(SSH) into your Pi.
- Internet connection (Ethernet or WiFi)
- (Optional) WiFi Wireless Adapter for Pi 2 (Buy on Element14). Note: Pi 3 has built-in WiFi.
- Personal Computer (Windows, Linux, or Mac)
Let's Get Started
The MATRIX Voice ESP32 version has an ESP-WROOM-32. This tiny module allows for standalone applications with wifi and bluetooth. Temporarily, we require the Raspberry Pi for the initial setup. The environment we're setting up in this guide will end with our PC serving as the development environment for our apps. The apps will then be sent to the Raspberry Pi which will deploy them to the Matrix Voice for stand alone deployment. The following steps will go over how to achieve this.
Step 1: Raspberry Pi Setup
Attach the Matrix Voice and Run the following commands inside your Raspberry Pi terminal to install the MATRIX Voice Software. This will keep the FPGA firmware updated and install few tools to flash the ESP-WROOM-32.
# Add repo and key
curl https://apt.matrix.one/doc/apt-key.gpg | sudo apt-key add -
echo "deb https://apt.matrix.one/raspbian $(lsb_release -sc) main" | sudo tee /etc/apt/sources.list.d/matrixlabs.list
# Update packages and install
sudo apt-get update
sudo apt-get upgrade
# Installation
sudo apt install matrixio-creator-init
Reboot your Raspberry Pi to make sure all the required services are running.
Step 2: Personal Computer Setup
Here we're installing the requirements needed to allow your pc to develop and compile ESP32 projects.
Install Git
Install ESP32 toolchain:
- Linux: https://esp-idf.readthedocs.io/en/latest/get-started/linux-setup.html
- Mac: https://esp-idf.readthedocs.io/en/latest/get-started/macos-setup.html
- Windows: https://esp-idf.readthedocs.io/en/latest/get-started/windows-setup.html (currently not functioning)
Stop Following when you reach “Next Steps”
Setup ESP-IDF development framework
- Download ESP-IDF: https://esp-idf.readthedocs.io/en/latest/get-started/index.html#get-esp-idf
- Set ESP-IDF Path: https://esp-idf.readthedocs.io/en/latest/get-started/add-idf_path-to-profile.html
Clone MATRIX Voice ESP32 repository
This repository contains the necessary libraries to control the MATRIX Voice's components.
# windows must be using MINGw32 terminal from toolchain step
git clone https://github.com/matrix-io/matrixio_hal_esp32.git
Step 3: Build and Deploy
Here we will be deploying and running one of the example apps in the Repository we just downloaded.
Configuring IDF (one time setup):
cd matrixio_hal_esp32/examples/mic_energy/
make menuconfig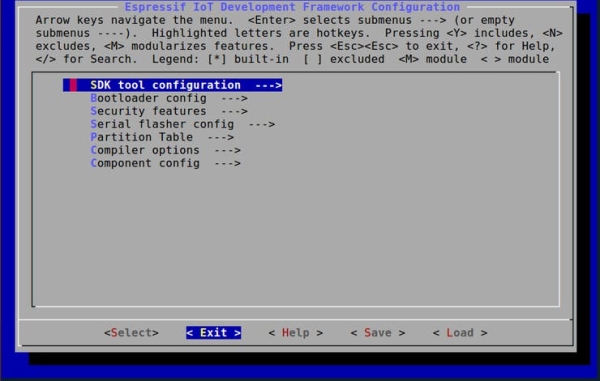
You will now be taken to the IDF Configuration screen. Once there, select the <Exit> option to save default configuration.
Running example project:
To finish running the example, all that's left is to make and deploy the code to the Raspberry Pi. This requires the Pi's IP address and you will be prompted to insert the Pi's password as well.