
The C Elegans worm is one of the most-studied animals in science. In neurobiology, it's the most basic brain model scientists use to study how the brain works. Now you can have a robot that thinks like one!
The C Elegans worm brain has been brought to the Raspberry Pi Robot. The Connectome project has modeled the C Elegans brain into a Python program and made it open-source. You can download yourself, and have a worm-brained robot running around the house.
Hacking the Worm Brain
The C Elegans neuron map, courtesy of the Connectome Project. The C elegans worm has approximately 1000 cells that make up the entire organism. 302 of those cells are neurons. The neurons form a network that help the worm find food, move muscles, and do whatever it is that worms do. The program made by the Connectome project takes a map of these cells and models how they're connected. The resulting model and code work just like a worm would, but in Python. And on your Raspberry Pi. The worm is a simple beast: and spends its life bumping into things and looking for food. But its simplicitiy is what makes it such a powerful brain model. The end-result is truly a totally autonomous robot that is reacting to its environment through a simulated brain of a nematode (worm).
Simulating the Brain in a Raspberry Pi
In this project, we walk you through simulating the C Elegans brain in a Raspberry Pi.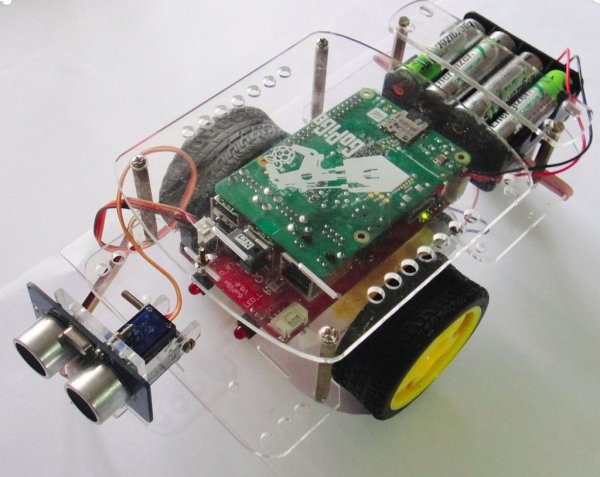
Step 1: Build the GoPiGo.
You can find a GoPiGo here. The GoPiGo Starter Kit includes everything you need to make a Raspberry Pi Robot.
The GoPiGo is quick to assemble and takes about 20 minutes or less with just a philips head screw driver. No soldering is required and no prior expertise required.
Check out the code and designs on the Dexter Industries Github repo. The GoPiGo can be programmed in Python, Scratch and Java.
There step by step instructions on building the GoPiGo here.
Step 2: Build the GoPiGo Servo Controller.
The GoPiGo Servo Controller is essential for controlling and moving the Ultrasonic sensor.
The Servo Controller attaches directly to the GoPiGo and is controlled by software. There are mounting holes for the Raspberry Pi camera and the Ultrasonic sensor.
There are building instructions for attaching the servo and an ultrasonic sensor to the Raspberry Pi here.
Step 3: Attach the GoPiGo Ultrasonic Sensor.
You should attach an Ultrasonic Sensor to your Raspberry Pi Robot. Instructions for attaching the ultrasonic sensor to your Raspberry Pi Robot can be found here.
Step 4: Connect the GoPiGo and Raspberry Pi to the internet.
Setup a wifi connection to the internet with your Raspberry Pi.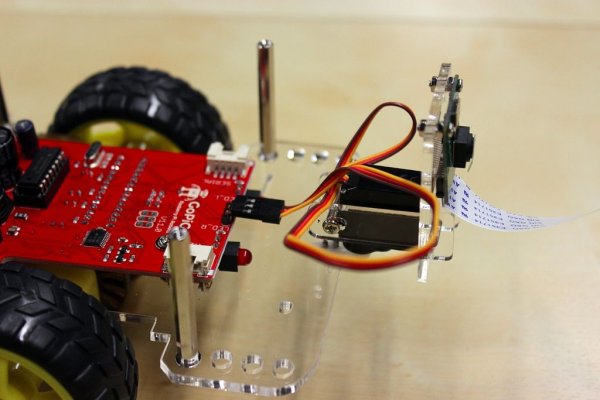
Step 5: Clone the Github repository to your desktop.
After your Raspberry Pi is connected to the internet, you should open up the command line and clone the Ceonnectome Github Repository. You don't need to setup a github account to do this step, we're just copying the github repository to your Raspberry Pi. All of the code will be downloaded.
In your command line type:
sudo git clone https://github.com/Connectome/GoPiGo
Step 6: Run the Python Program and Start Your Worm Brain
In the command line again, change directory to the directory that was setup in the previous step. This should have your Connectome code in it.
In the command line, type:
sudo Python GoPiGoConnectome.py
Watch your worm brained Raspberry Pi go! When the program is run, your GoPiGo will start to behave like a worm. Now with a worms brain, it will start moving around and looking for food!
To be clear, there is no programming that is directing the robot to stop or rotate a wheel in one direction or another. It is only the collective weighted values being generated from the simulated worm connectome that guides the actions of the robot. It was very difficult to contain the connectome into a single application and make it run on a Raspberry Pi but this is a very good attempt. This is truly a totally autonomous robot that is reacting to its environment through a simulated brain of a nematode.
You can find more information and the Python program on the Connectome Website.
You can see video of the GoPiGo robot running with the simulated connectome here.